Purpose
Learn how to:
- Create and implement templates with and without a change request
Expected Outcome
- Users are equipped to implement template in SimplerQMS
- Be able to implement a template that does not require change request
Prerequisites for all
- Must be logged in to SimplerQMS
- Must be a member of one of these ‘User Groups’ to view records:
- All internal and external users
- Must be a member of one of these ‘User Groups’ to create new records
- All Contributors
Section 1: Workflow overview
The flowchart below outlines the process of creating a template without change request. To see how template processing changes due to a Change Request, refer to Work Instruction: Managing Change Request
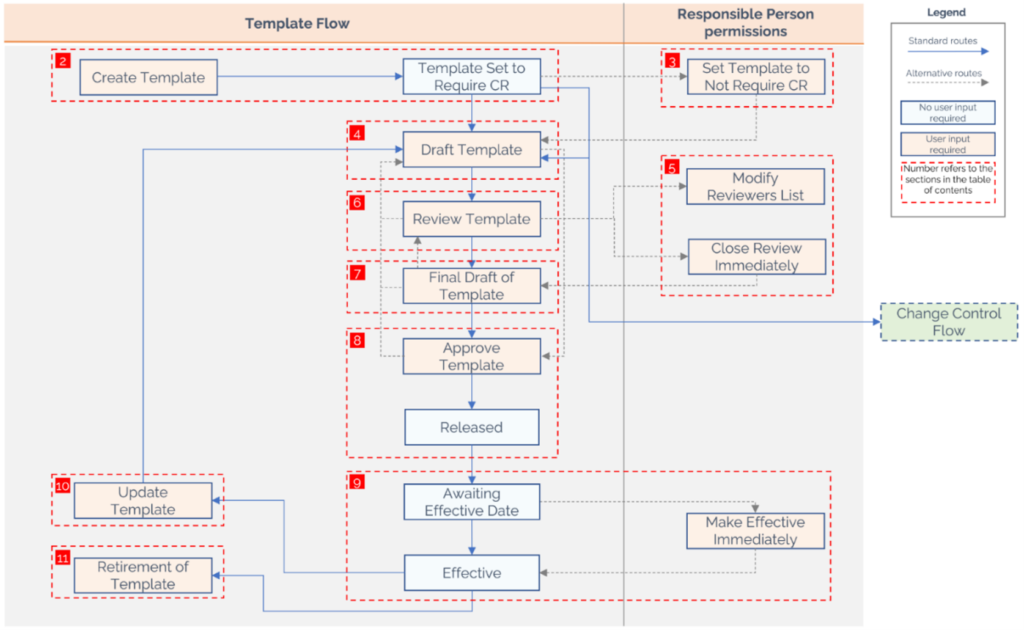
TEMPLATE CONDITIONS:
- All Templates in SimplerQMS require CR by default. Regardless of what the global setting is, this can be changed by setting the template to “NOT require CR” under State Transition by the Process Manager and by the Responsible Person
- The Template will receive its unique ID and is ready for editing. To find out more on how to do that, refer to section 3.
- The metadata card of templates is dynamic, and changes based on the chosen Target Class. This is to ensure that when establishing Properties inside the templates, a full list of property codes is available for creation. To learn more about the Insert Property Feature, please refer to Section 4 of this Work Instruction
Global Template CR Settings
This feature is intended for companies comfortable with not controlling templates via Change Requests, as defined in their Change Control procedure. (This is NOT recommended by SimplerQMS A/S but a possible choice for companies whose change control is not too tight)
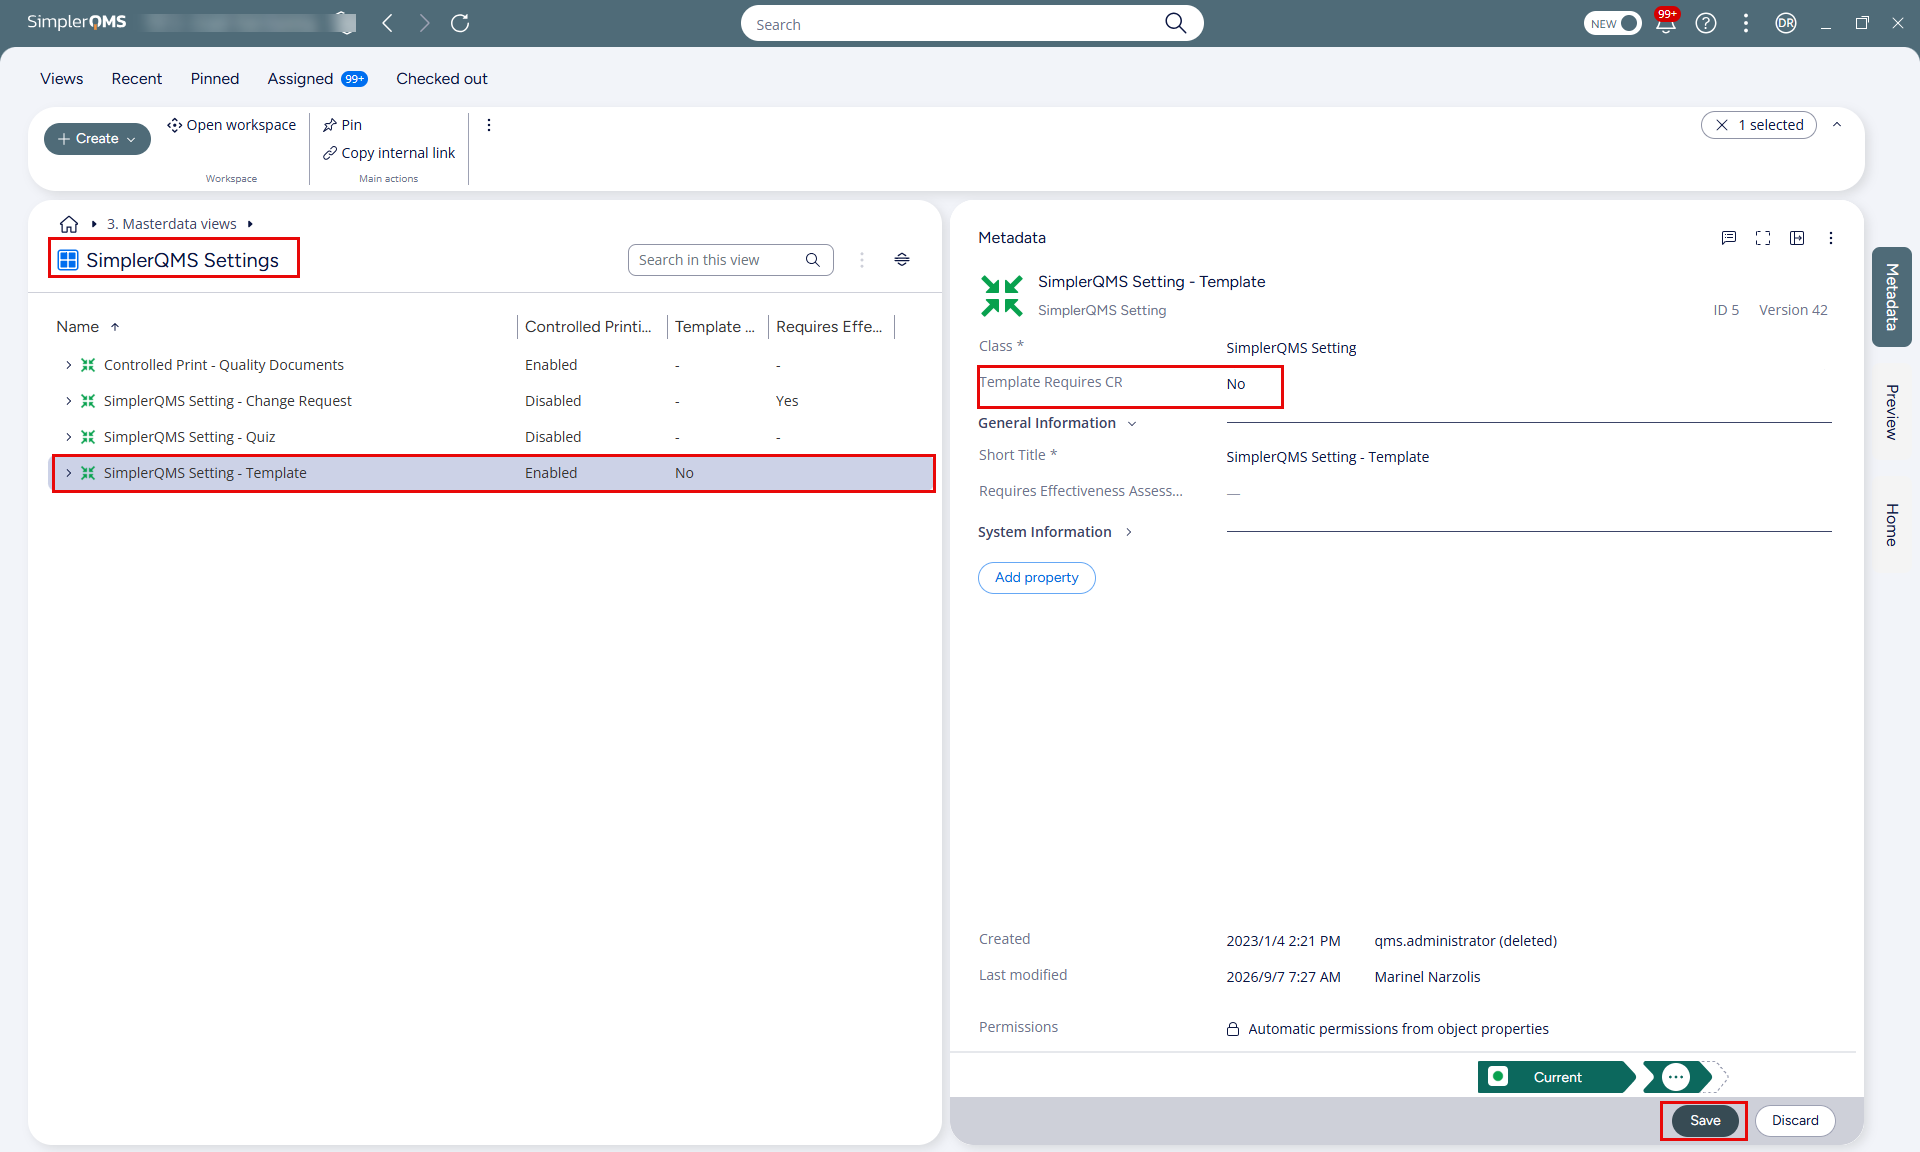
To change the setting for Change Request requirement globally for all templates generated in SimplerQMS, the system’s metadata administrator(s) can change the setting by:
- Navigating to Masterdata Views > SimplerQMS Settings
- Clicking on SimplerQMS Setting – Template
- Change the Template Requires CR by Default setting from Yes to No, then click Save.
- After this setting is enabled, all Templates will be created without requiring CR.
NOTE: This Work Instruction has been updated for the new M-Files interface. The template workflow and functionality remain the same, but some navigation elements and their locations have changed.
Section 2: Creating New Template
Step 2.1 Create a new template – Initiator/Author
Step 2.1. Can be accomplished by a person who has the All-Contributors User Group assigned to them.
Option 1: Create a Template by Drafting – Initiator / Template Author
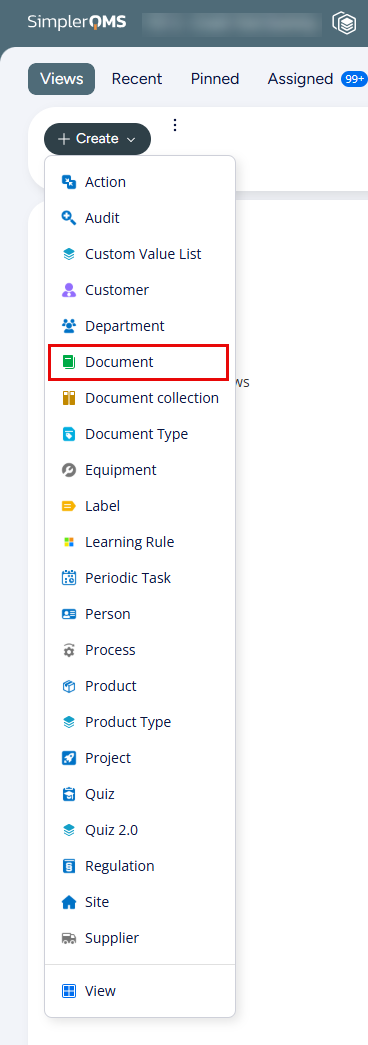
- Click Create (+) on the Task Bar, then select Template from the dropdown list.
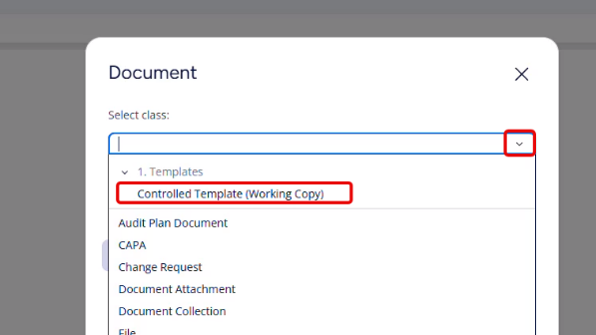
- Select the Class Controlled Template (Working Copy)
- Select the right master template
A Metadata Card will pop up. Proceed to Step 2.2
Option 2: Create a Template by Drag & Drop – Initiator / Template Author
Another way of implementing a template is by dragging an existing file from the local drive into the system.
- Select a file from the local drive.
- Drag the file into any empty space within the ‘Listing area’.
- A metadata card will pop up.
- Select “Controlled Template (Working Copy)” on the Class dropdown.
- Proceed to Step 2.2
Step 2.2 Filling in the Metadata Card
| Part 1: Template Info | ||
| Field name | Description | Note |
| Short Title* | Title of the template – choose a template title that will be easy to look for and outlines what it needs to be used for | |
| Site(s)* | Select one or more site(s) that the template will belong to. When in use, only people with access to the selected site will see the template. | This field will also default itself on the resulting documents |
| Target Class* | Select the target class that is intended for this template from Audit Plan, CAPA, Change Request, Controlled Template (Working Copy), Quality Document & Recorded Issue Template. The template will be categorized based on this field, and when creating new records, it will show up in the Suggested Templates section. | The metadata will adapt the displayed values based on the target class that was selected |
| Process* | Select the process that the template belongs to | |
| Template Requires CR* | Default value is Yes and cannot be changed at this point | Refer to Section 3 for more info |
| Template Responsible Person(s)* | The person assigned to the template with broader access rights | See Section 5 for additional details |
| Template Author(s)* | Person to drafts/authors the template | |
| Template Reviewer(s) | This is optional if a review is needed for the template; this person has the same access/edit rights to the template as the author | |
| Template Approver(s)* | Person to approve the release of the template | |
| Changes in This Version | This field is utilized to document the revision history of a template. By default, the initial version will be labeled as “First Version” upon template creation. The option exists to modify this label to be more descriptive or retain the default setting. For subsequent versions, always describe the latest update made to the template. | This field will be mandatory to fill – displays error message when missing |
| Effective Date | This field is not visible upon the creation of the template as it is not mandatory for templates controlled via Change Request. However, if the RP sets the template not to require CR, the effective date will need to be filled before sending the template for approval. The effective date set is going to determine when the template becomes usable in the system. | This field will be mandatory to fill – displays error message when missing |
| Latest Review Close Date | Date of the last closed review – automatic value | |
| Date Approved | Date of approval – automatic value | |
Upon the successful completion of these fields, the template can be created.
Subsequent fields on the metadata are used to automate values on the resulting documents and are displayed according to the selected Target Class.
In the example below, the Quality Document Target Class is presented. Each Target Class will have specific fields that are useful in the resulting document which are explained in the respective work instructions for each target class. Refer to those as well as the WI Appendix: Frequently Used Property Codes for more information.
If certain fields are left unpopulated, they will remain editable in the resulting document. Therefore, it is advisable to populate these fields only if default values are intended to be established. While the values assigned on the template can be modified in the subsequent quality document, they should ideally represent the anticipated values. It is crucial to ensure that the default values are explicitly stated in the corresponding procedures, thereby providing guidance to employees in the creation of documents and records and informing them of the appropriate handling methods.
| Part 2: Document Information – Information added in the following fields will travel over to the resulting document | ||
| Field name | Description | Note |
| Document Type | Document Type is a determining factor when a Quality Document is created based on a template, as it will determine if it requires a Change Request. | See more in Work Instruction: Managing Quality Documents |
| Department | Select a department that the resulting documents will belong to | |
| Archive | Select an archive if necessary | |
| Document Process | Select a Document Process. This will be preset as the process on the future document created from the template. This process can be different than the Template Process | |
| Part 3: Workflow Process Information – Information added in the following fields will travel over to the resulting document | ||
| Field name | Description | Note |
| Responsible Person(s) | Responsible Person of the resulting Quality Document | |
| Author(s) | Author of the resulting Quality Document | |
| Reviewer(s) | Reviewer of the resulting Quality Document | |
| Approver(s) | Approver of the resulting Quality Document | |
| Due Date | This field should never be filled since it will act as a due date every time a new document is created. Please leave field empty – only on the metadata for Insert Property purposes | |
| Part 4: Relations – Information added in the following fields will travel over to the resulting document | ||
| Field name | Description | Note |
| Relation(s) | This field can be used to preset desired relations for the resulting document. It will also generate specific fields for potential related items, which become mandatory to fill in the resulting quality document. | E.g. Preset Equipment on Calibration Certificate template and it will become mandatory to choose the correct equipment on the QD |
| Regulation Chapters | Regulation Chapters can be preset to ensure their presence in the resulting document. | |
| Initiated from Template | Leave this field empty – it will be set automatically to the current template on the resulting QD | |
The template printing settings and complete change history are captured in the below fields:
| Part 5 and 6: Controlled Printing and Change History | ||
| Field name | Description | Note |
| Controlled Printing | This field indicates whether the template is blocked from printing via the Controlled Printing module. If the module is activated, the system will automatically populate this field as either disabled or enabled according to the chosen settings. | |
| Complete Change History | This field will showcase the complete change history of the template and will also be appended to the end of the template’s Effective version as a revision history page. The content will be generated based on the information provided in the “Changes In This Version” field mentioned above. | |
Once the metadata is completed:
- Click Create
- Working copy of the template launches in MS Word (or in the applications where template was initiated). If not editable, make sure that you have clicked on “Enable Editing” under the ribbon.
- You can also select to check the template in immediately, in which case the template document will not open. Please note that then the template can first be edited if in Edit Preliminary Template state, if the change request requirement is disabled, or if the change request that will release the template has gone through the plan approval.
- Modify or draft the template – see necessary actions in Section 4
- Save and check in the template and go back to SimplerQMS
- The template should be assigned to the template author. The template name will state “Pending Change Approval” and the state in the metadata will also be “Pending Change Approval”.
- Template Requires CR: By default, all templates will require a Change Request. The Responsible Person can set a template to not require CR. Refer to section 3 to learn how.
- Select the NEW Template (NAME), and in the metadata card read the assignment description.
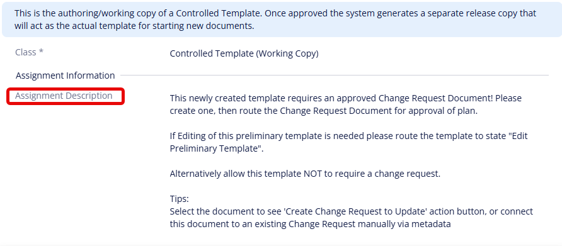
NOTE: A template controlled by CR will only receive a unique ID once the CR Planning phase is completed.
NOTE: This Work Instruction will follow the flow of a Template without Change Request, but notes referring to the changes that a CR adds to the flow are added where relevant.
Section 3: Setting a Template to NOT Require CR
Step 3.1 Set Template to NOT Require CR – Template Responsible Person
This feature is intended for companies comfortable with not controlling templates via Change Requests, as defined in their Change Control procedure. (This is NOT recommended by SimplerQMS A/S but a possible choice for companies whose change control is not too tight)
Under State Transition the following options are available:
- Edit Preliminary Template
- This option is applicable to templates that are still under Change Request requirement but have not yet been approved on a Change Request Plan. Transitioning the template to this state permits editing in its preliminary form, eliminating the need to wait for the approved CR Plan. It’s crucial to “Complete Editing” under state transition once changes are made, enabling the template to progress through its workflow on the Change Request.
- Not Current – Archive
- Choose this option if it’s determined that the newly initiated template is not needed
- Set Template NOT to Require CR
- Choose this option to create a template without utilizing the Change Request process.
- Set Template to Require CR
- If selected when the template already requires CR, no change will be carried out
- If selected after “Set Template NOT to Require CR”, then it will set the template back to require the entire Change Request process
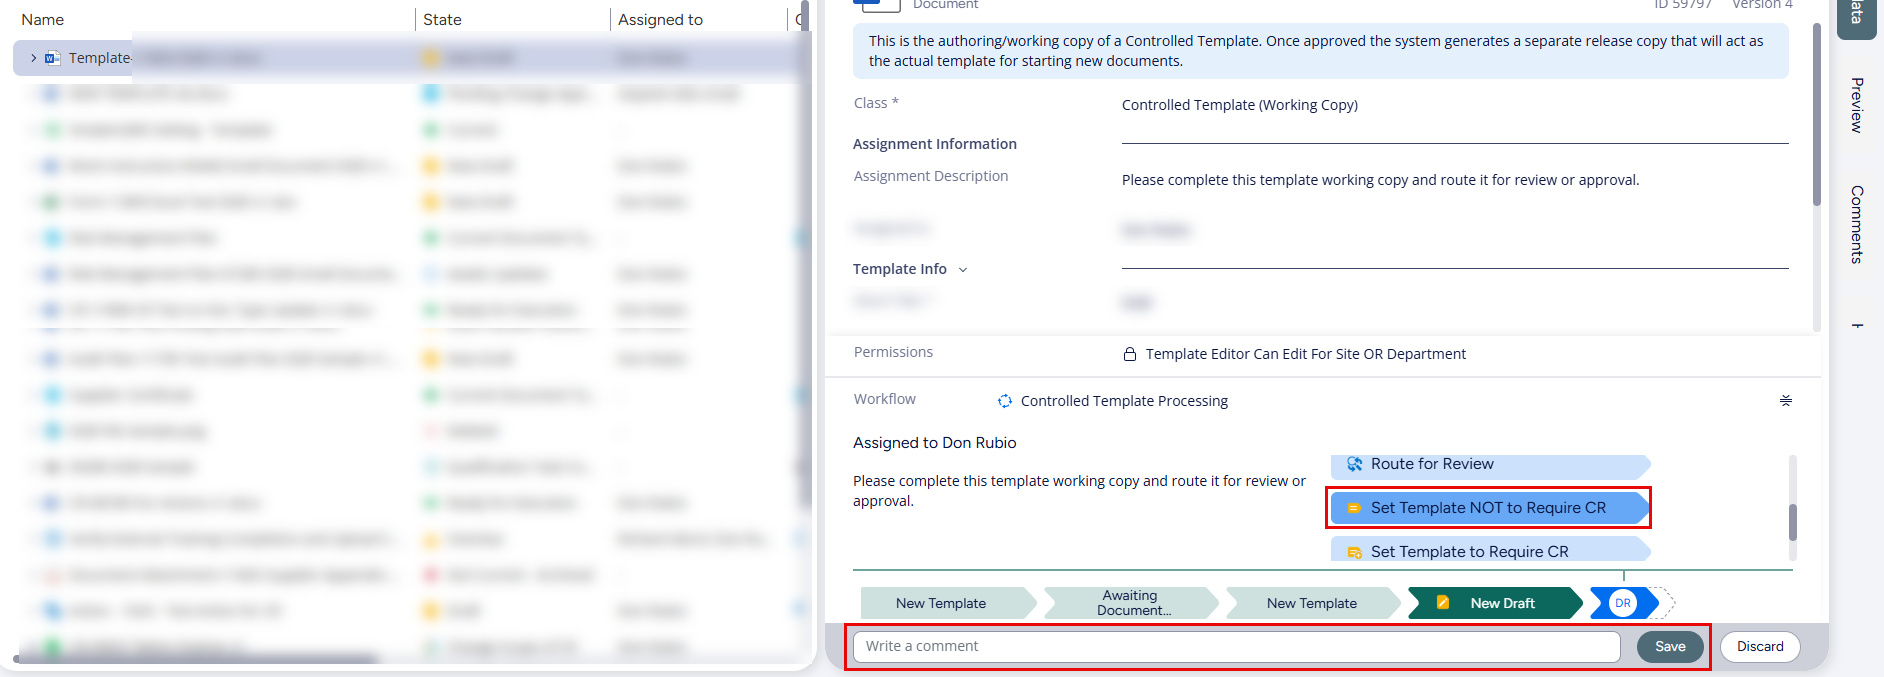
If the template is set to not require CR, it will automatically generate a unique ID, and the template is now ready for drafting and will be assigned to the template author.
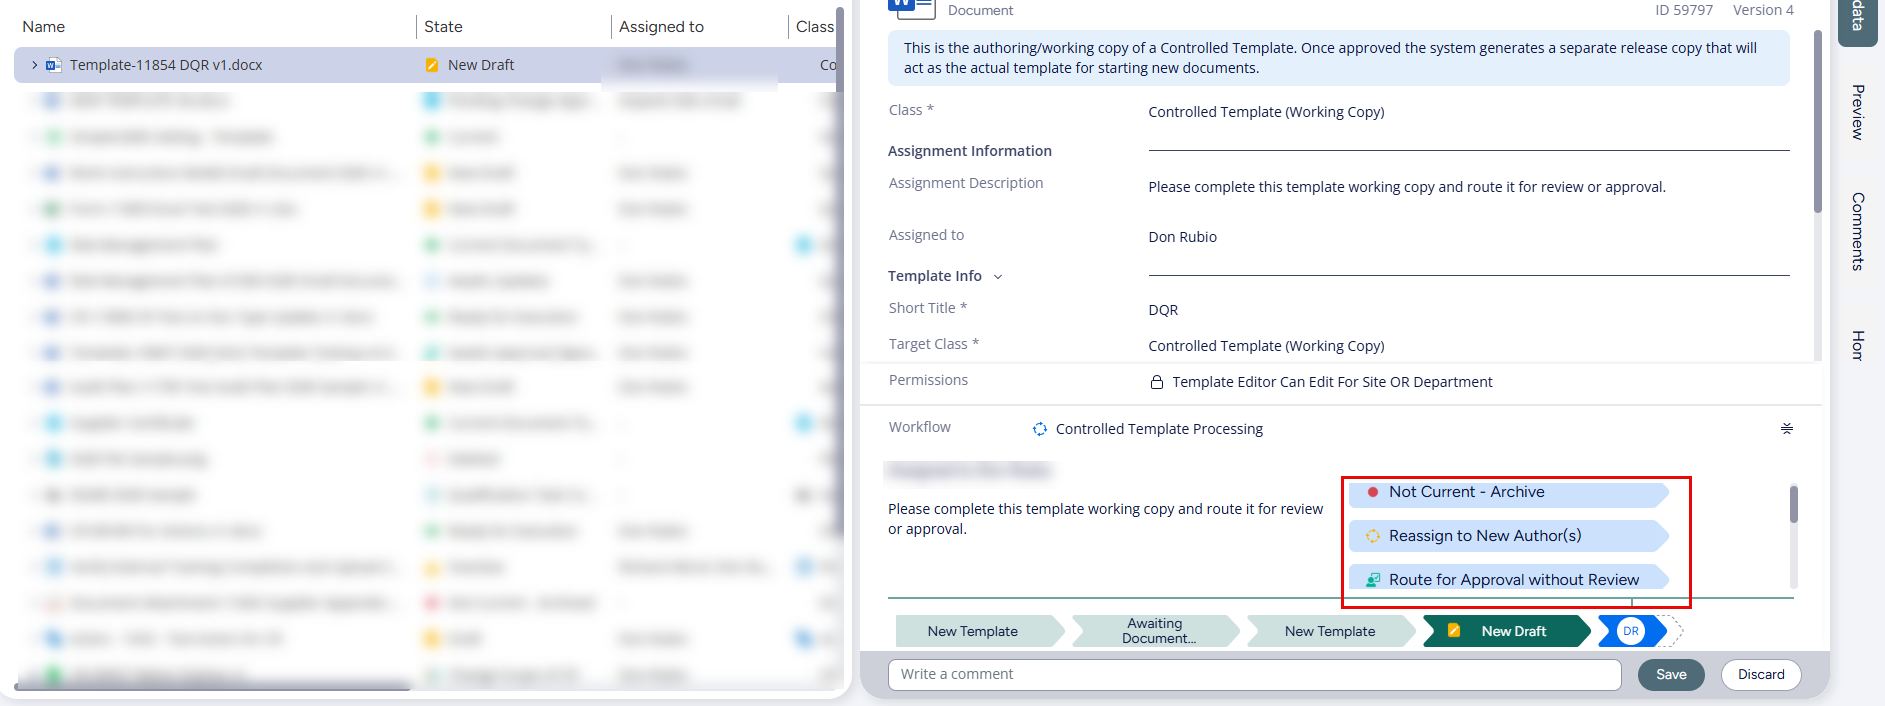
State should be New Draft. Read the new assignment description in the metadata card. It describes that the template is now ready to proceed with processing.
NOTE: If the Template is switched back to “Set Template to Require CR”, Change Control will automatically change its status to “Yes”. The Template can be processed without adding it to a CR, but after approval, it will not be released until it is associated with a CR that has been approved and closed.
Section 4: Drafting a new Template
NOTE: If the Template is controlled by a Change Request, the CR plan needs to be approved before moving on to the next steps. If the Template needs to be edited before the plan is approved, it needs to be in the state “Edit Preliminary Template”.
Refer to WI: Managing Change Request
Step 4.1 Draft Template – Template Author
- Check out the template, launches in Word (or other applications the template was initiated from)
- Draft the template including all the necessary layout changes, formatting, codes, and information
Step 4.2 Using the Insert Property M-Files feature – Template Author
The Insert Property function is designed for setting up your organization’s templates, automating information retrieval from document metadata within the system upon document creation. This operates according to the template’s Target Class and enabled metadata fields for the document’s future Class.
- Open the template that needs to edited
- In Microsoft Word, position the cursor at the desired location for adding the metadata property.
- Open the M-Files toolbar and click Insert Property.

- The Insert M-Files Property window is opened.
- Select the name of a property that needs to be incorporated in the template
- Refer to the WI Appendix: Frequently Used Property Codes for explanations
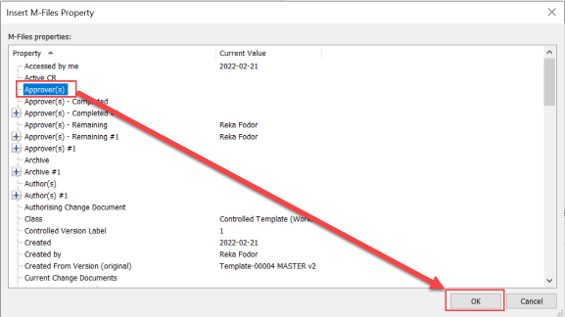
- Click OK to close the Insert M-Files Property window
- The property code will be inserted in the field chosen
NOTE: When a code is inserted, it will default to one of 2 appearances:
Pointing to an already existing value – since this part of the metadata is filled
Stay empty – the code is present, but the value will only show up once the field in the metadata is filled

Codes in the template will automatically refresh when you start using the template for the creation of a record and will include the correct metadata values from the record you are using the template for.
Step 4.3 Verify that a code is inserted into the Word Document
In the case that you have chosen a property code that would later turn into data, you will not see that anything has been inserted into the document until you verify the code is there. To do that:
- Right-click on the field where the property code was inserted.
- Click on Toggle Field Codes.
- A code like this will appear: {DOCPROPERTY”MFiles_PGA6F1A37D90054E3891763212611081D0″ \*MERGEFORMAT}
- Before saving any document containing codes, make sure to click on toggle all field codes back so the codes will not be visible.
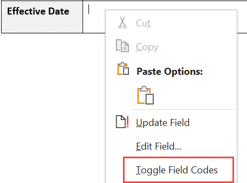
NOTE: Refreshing the codes typically occurs automatically, but if the desired results are not visible, utilizing the Update Field option may be necessary.
Step 4.4 Insert Property from the Template Metadata for Excel Documents
- Open the template that needs to be edited
- In Microsoft Excel, single-click in the cell where the property should be inserted
- Open the M-Files toolbar and click Insert Property.
- The Insert M-Files Property window is opened.
- Click the name of a property that the needs to be added to the template
The code will be placed inside the excel document. It with either result in information that is already filled or an empty cell. To verify that the correct field code is added, double click the cell, or look in the formula bar:
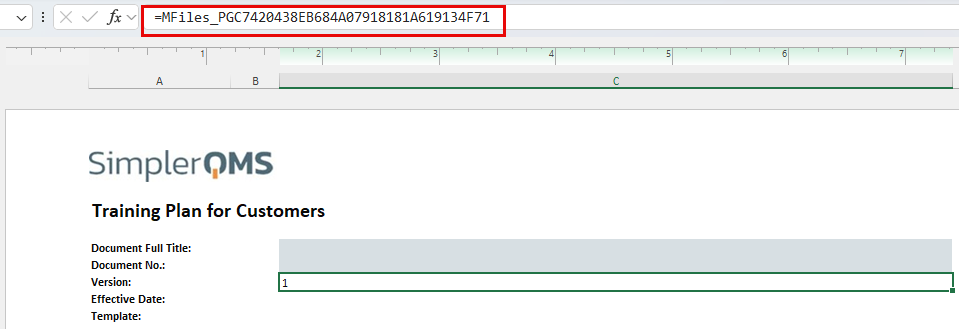
Step 4.5 Insert Property from the Template Metadata for Excel Documents
- Click Save and close the template, check in to SimplerQMS
- Send the template for review by clicking “Route for Review” under State Transition (only when there is an assigned template reviewer)
- Alternatively, if no reviewer is assigned or the template ends up not needing a review, click on “Route for Approval without Review”
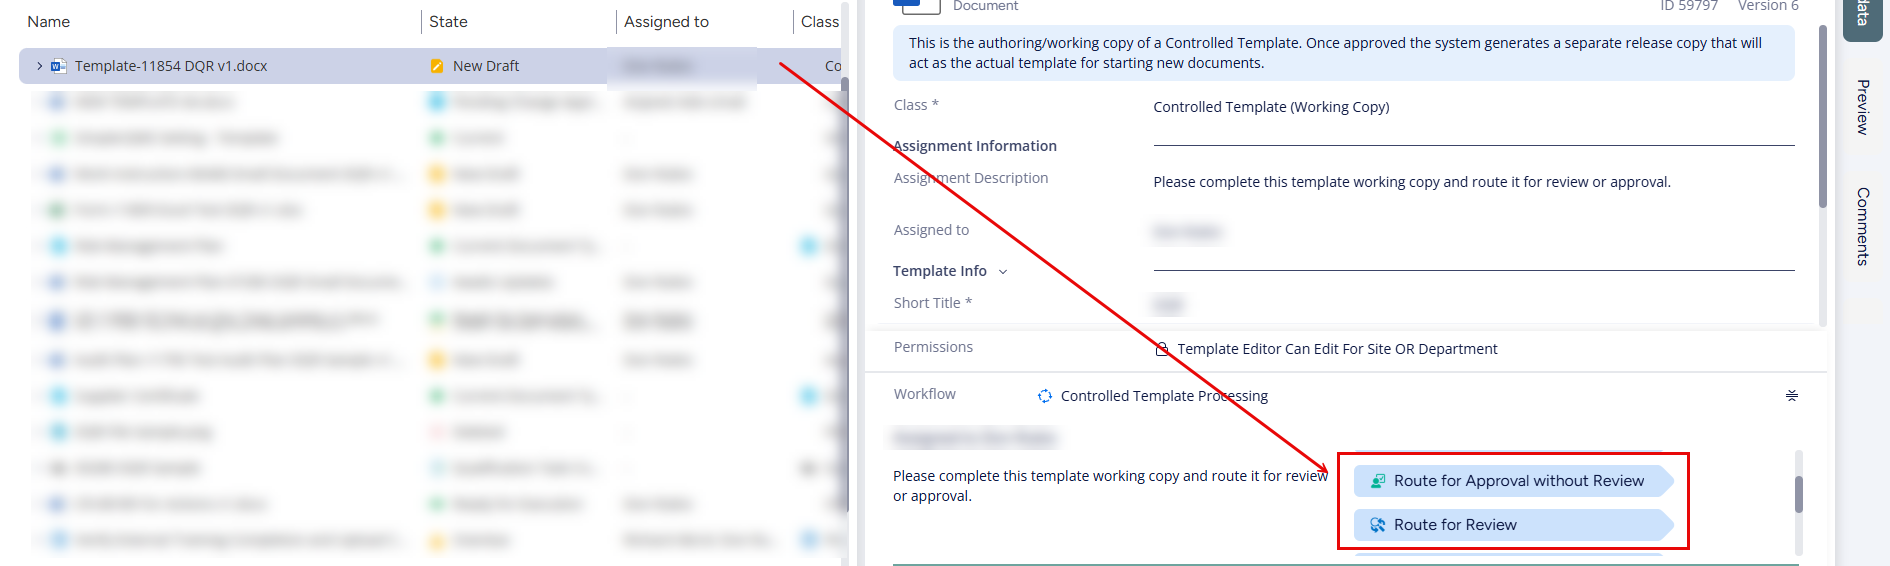
Section 5: Additional State Transitions for a Responsible Person under Review
(Skip this Section if there is no template reviewer assigned. Proceed to Section 7)
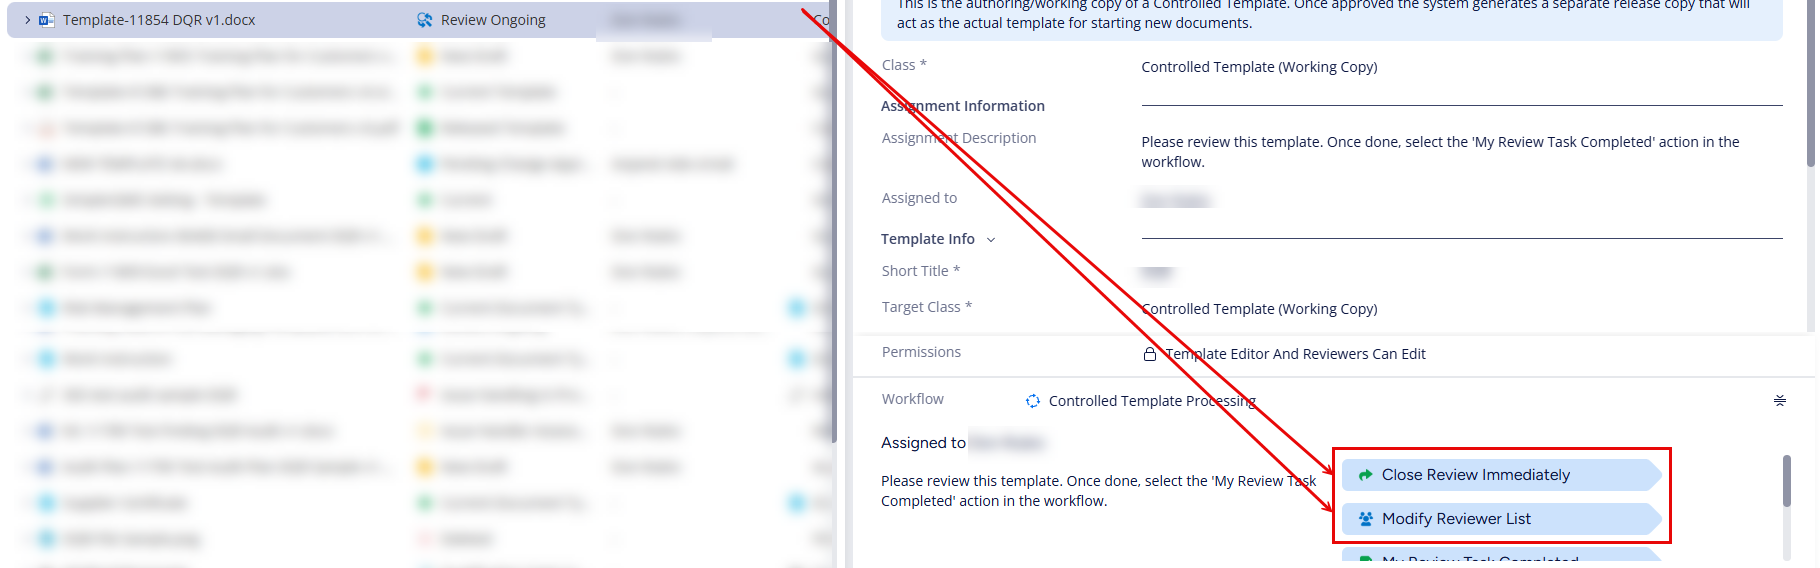
Step 5.1 Close Review Immediately
If the review is no longer necessary, the Responsible Person can end the review process without the need for reviewers to press “My Review Task Completed”
- Click on “Close Review Immediately” under State Transition
- This will require an electronic signature
- The template will be assigned back to the template author and can move on to approval
Step 5.2 Modify Reviewers List
When the template has been routed for a review, and the assigned template reviewer(s) need to be changed, the Responsible Person can modify the reviewers list.
- Click on “Modify Reviewer List” under State Transition
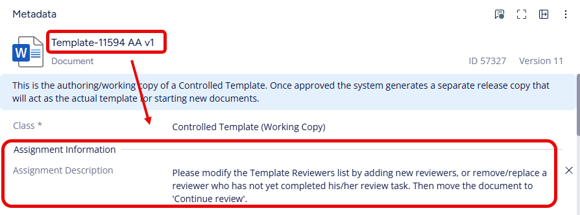
- At this stage, you can add other reviewer(s), remove, and reassign reviewer(s) on the metadata. See highlighted on the Assignment Description below:
- Once done, click on “Continue Review” under the State Transition
Section 6: Reviewing the Template
(Skip this section if no review is necessary)
Step 6.1 Complete the review of the template – Template Reviewer
When the template has been routed for a review, it assigns to the Template Reviewer and the State in the metadata is “Review Ongoing”.
- Check out the template, launches in Word (or other applications the template was initiated from).
- Review the template
- Template reviewer has the same level of access rights to the template as the template author when it is on the “Review Ongoing” state.
- Save and Close the Template. Check in to SimplerQMS.
- When the review has been completed, click on “My Review Task Completed” under State Transition if the number of modifications needed are acceptable.
- If there are too many modifications needed after the review process, it is recommended to reject the template by pressing “Reject Template – Send Back to Draft for Editing”.
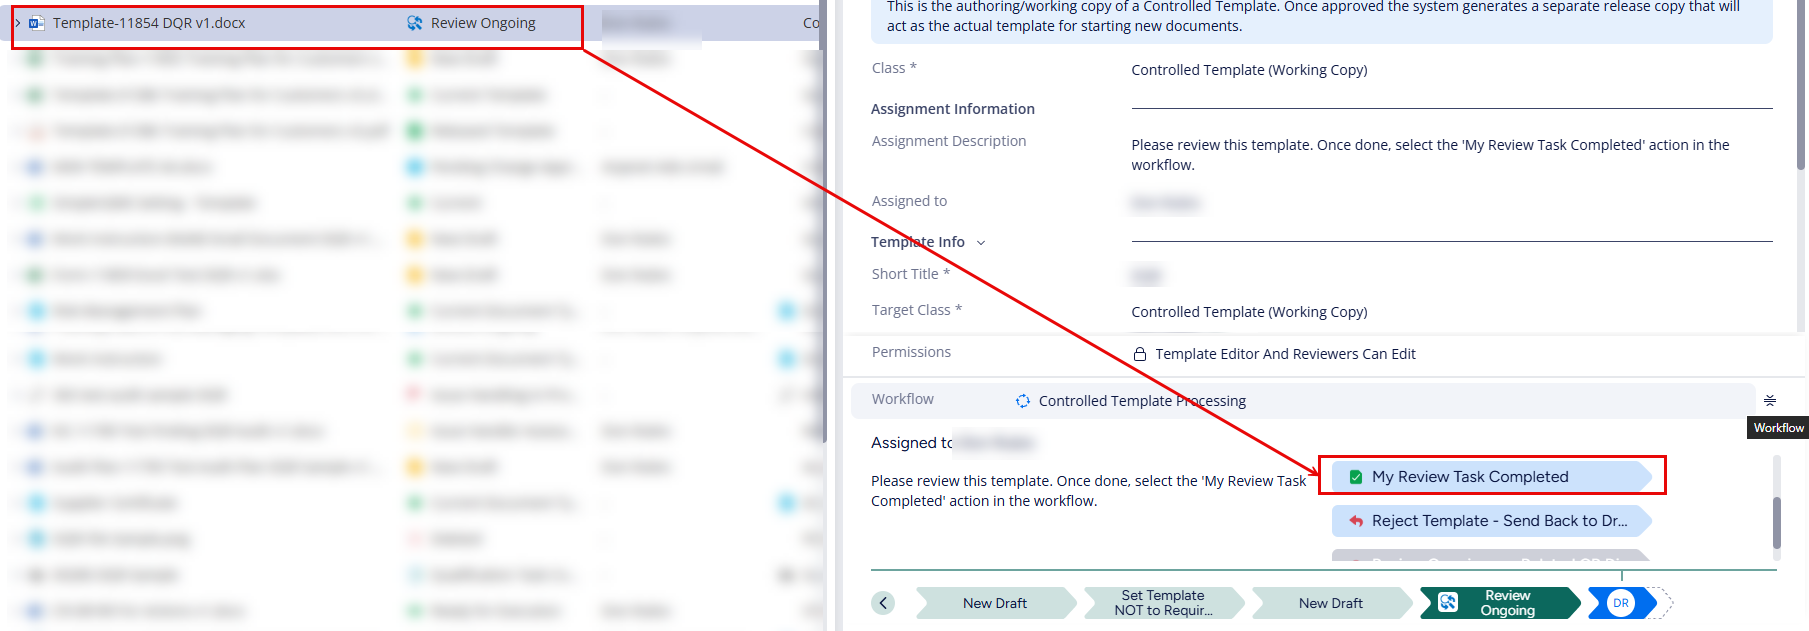
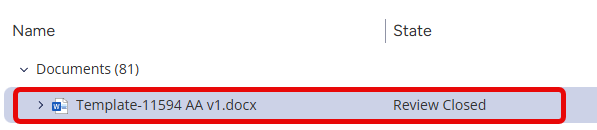
State should change to “Review Closed”
Section 7: Finalizing the Template
Step 7.1 Final draft of the Template – Template Author
When the template has been reviewed, it assigns back to the Template Author to finalize the drafting of the template and route it for approval.
- Check out the template, launches in Word (or other applications the template was initiated from).
- Write the final changes in the template.
- Save and close the template. Check in to SimplerQMS.
- Set the effective date in the metadata card (template cannot be routed for approval without the effective date).
- Under State Transition, the author has the options to
- “Reject Template – Send Back to Draft for Editing” – If the author is dissatisfied with the template, they can restart the process from Section 3 by selecting this button.
- “Route for Another Review” – if multiple changes have been made in the template, it is recommended to send it for another review.
- “Route for Approval” – to move forward with the template and proceed to Section 8.
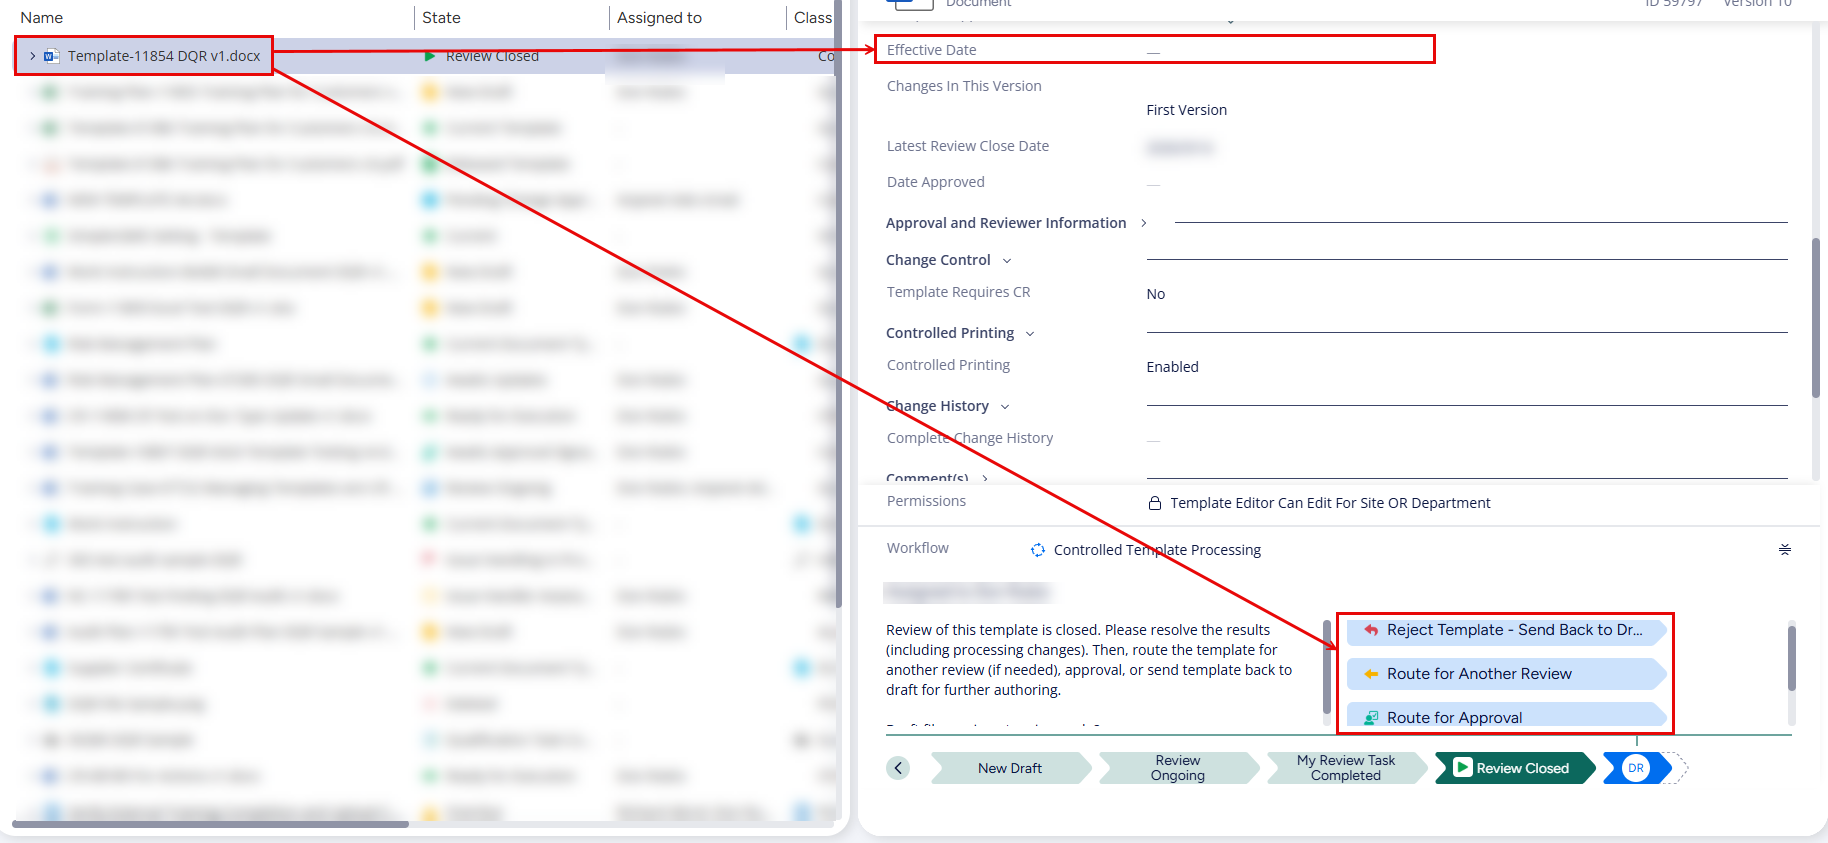
NOTE: If the Template is controlled by a Change Request, the Effective Date field will not be available. The effective date of the Change Request will be transferred to the template once the CR has been closed.
Section 8: Approving the Template
The template should now be assigned to the Template Approver(s) and the state is” Awaits Approval Signature(s)”.
At this stage, no changes can be made on either the template or the metadata.
Step 8.1 Approve the Template – Template Approver(s)
- Select the template and under State Transition click on “Approve Template”.
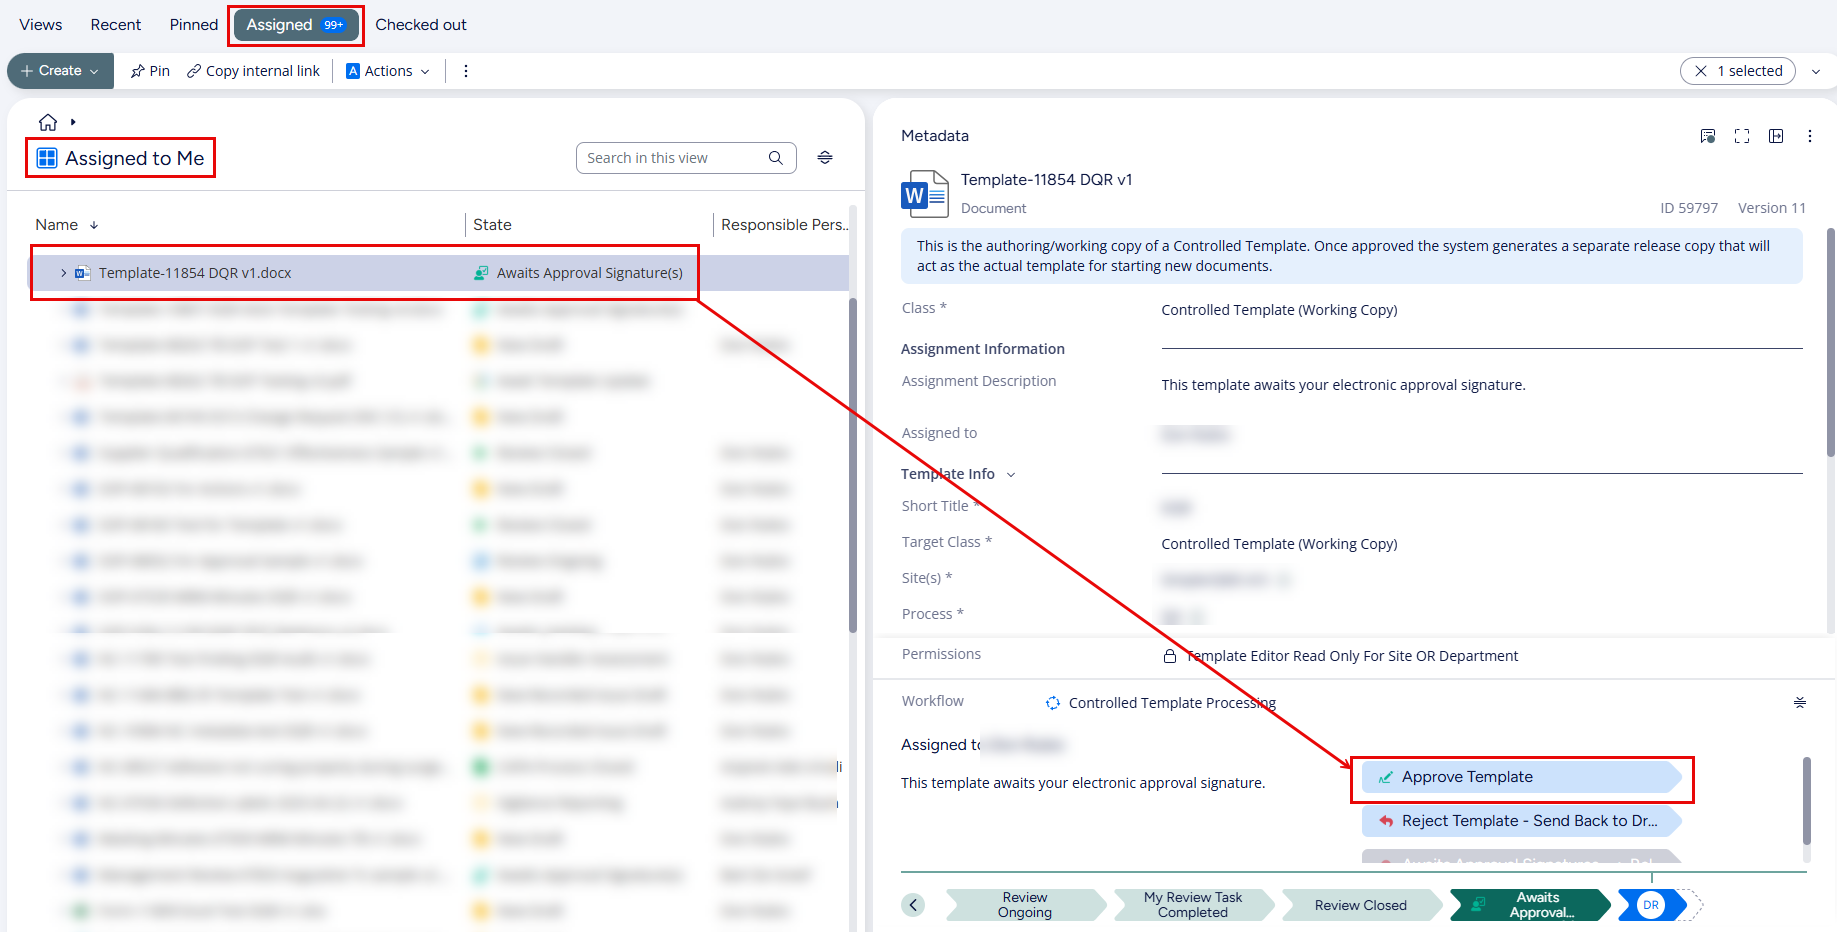
- Approve the template with electronic signature using SimplerQMS log-in and password
- If the Template Approver isn’t satisfied with the content or layout of the template, they can reject it. The template will revert to draft status, and the process restarts from Section 4.In scenarios with multiple template approvers, if any one of them rejects the template, it will revert to draft status and be reassigned to the template author.
- If the effective date is set to the day of approval, the template will be released as a PDF and be in the “Effective” state. It can be immediately utilized for creating documents based on this template.
- If the effective date is set in the future, the template will go under State “Awaiting Effective Date”. Proceed to Section 8.
NOTE: If a Template is controlled by a Change Request, it will be in the “Awaits CR Approval” State. Implementation and Closure of the Change Request can then proceed.
Refer to WI: Managing Change Request, Section 6 and onward. The Template will become effective once the Entire Change Request has been approved and released.
Section 9: Make Effective Immediately – Responsible Person
(Skip this section if the effective date is not set in the future)
If the effective date of the template is set in the future, the PDF copy of the template will not be released. Consequently, the template will not be available for use until the effective date is reached. This will place the template in the “Awaiting Effective Date” state.
If the template is needed to be released earlier than the set effective date, the Responsible Person has the option to make a template effective immediately.
- Click onthe PDF version of the document. It should be on state “For Learning”.
- Under State Transition click on “Make Effective Immediately”
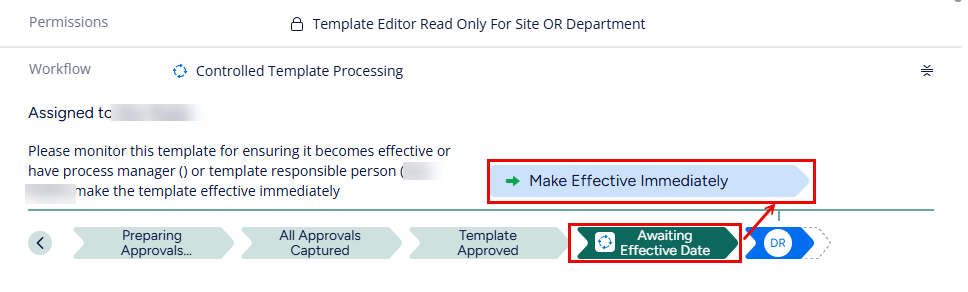
- Enter electronic signature and then click OK.
- An “Exceptions” box is available to write an explanation as to why the template needs to be effective immediately.
- This will release the template as a PDF and in state “Effective”. It can be used immediately for creating documents based on this template.
Section 10: Route for Update – Author / Responsible Person / Process Manager
These commands are available for the author, responsible person, and process manager.
- If the template needs to be updated to a new version, select the released version (PDF file) and under State Transition click on “Route for Updates”.
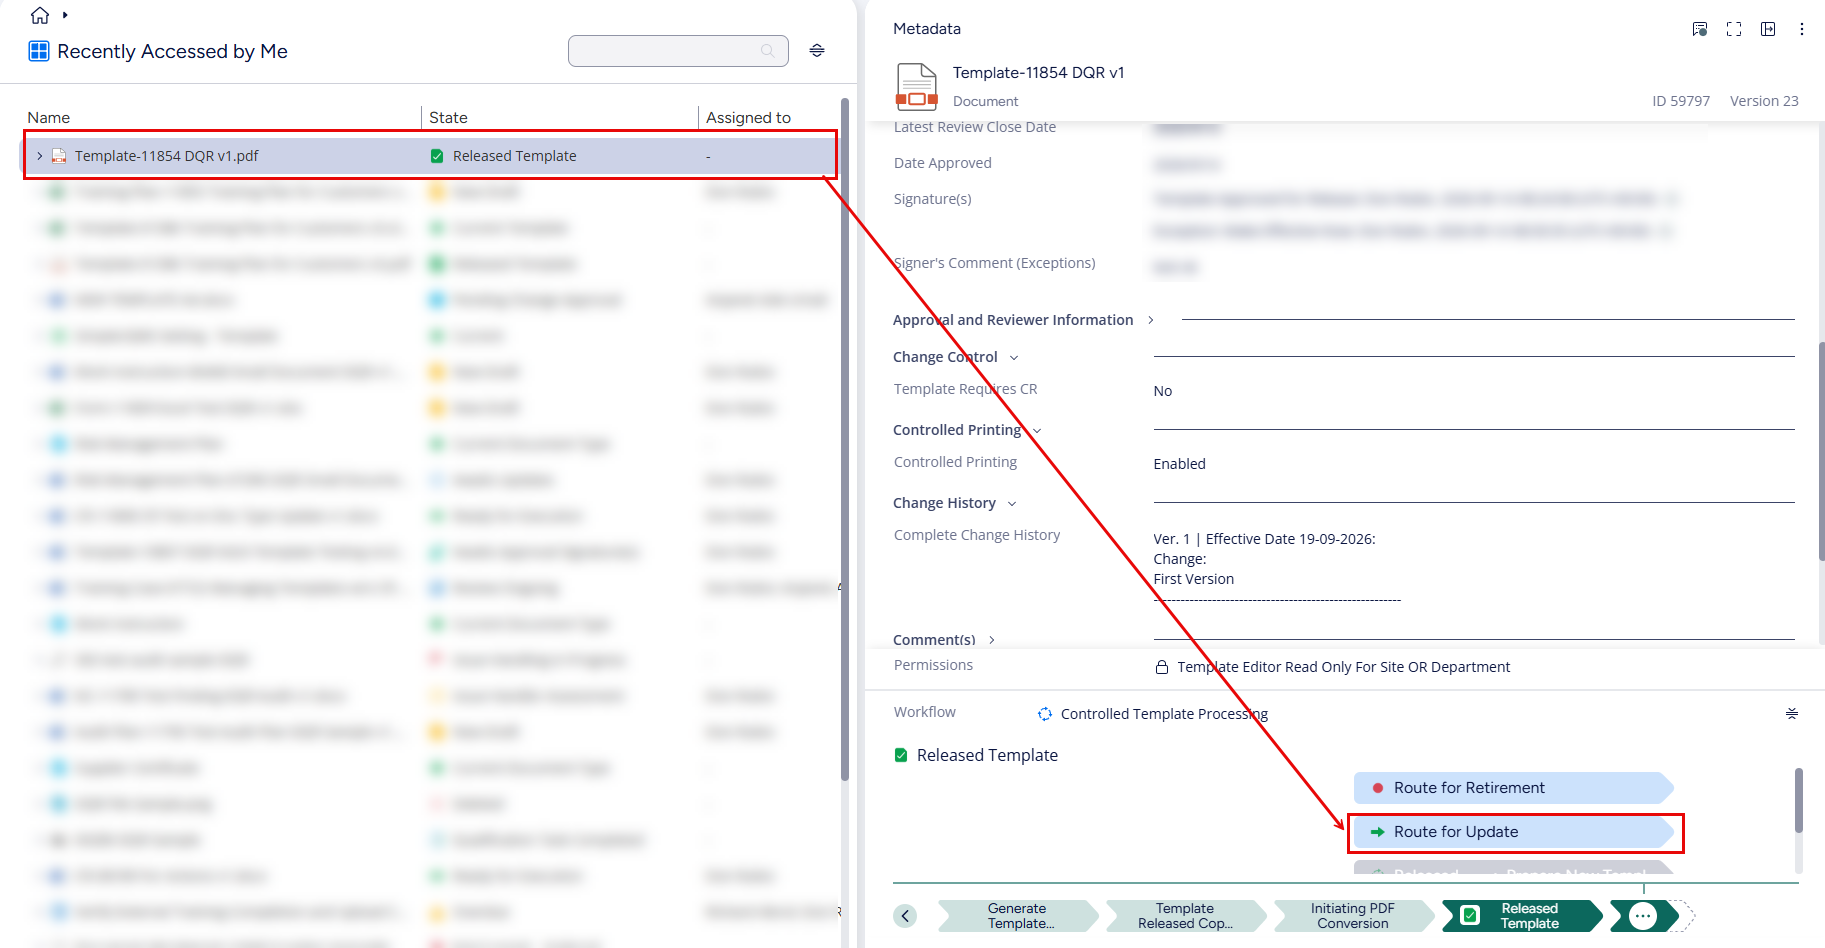
- The state should change to “Await Template Update” and the title should update to include the next version number (e.g., v2)
- Go through the actions described in Section 4, 6, 7, and 8
NOTE: If a Template is controlled by a Change Request, updating it requires creating a new Change Request. The entire Change Request flow must be followed for an update. Editing the template becomes available only after teh Change Request Plan has been approved.
Section 11: Route for Retirement – Responsible Person / Process Manager
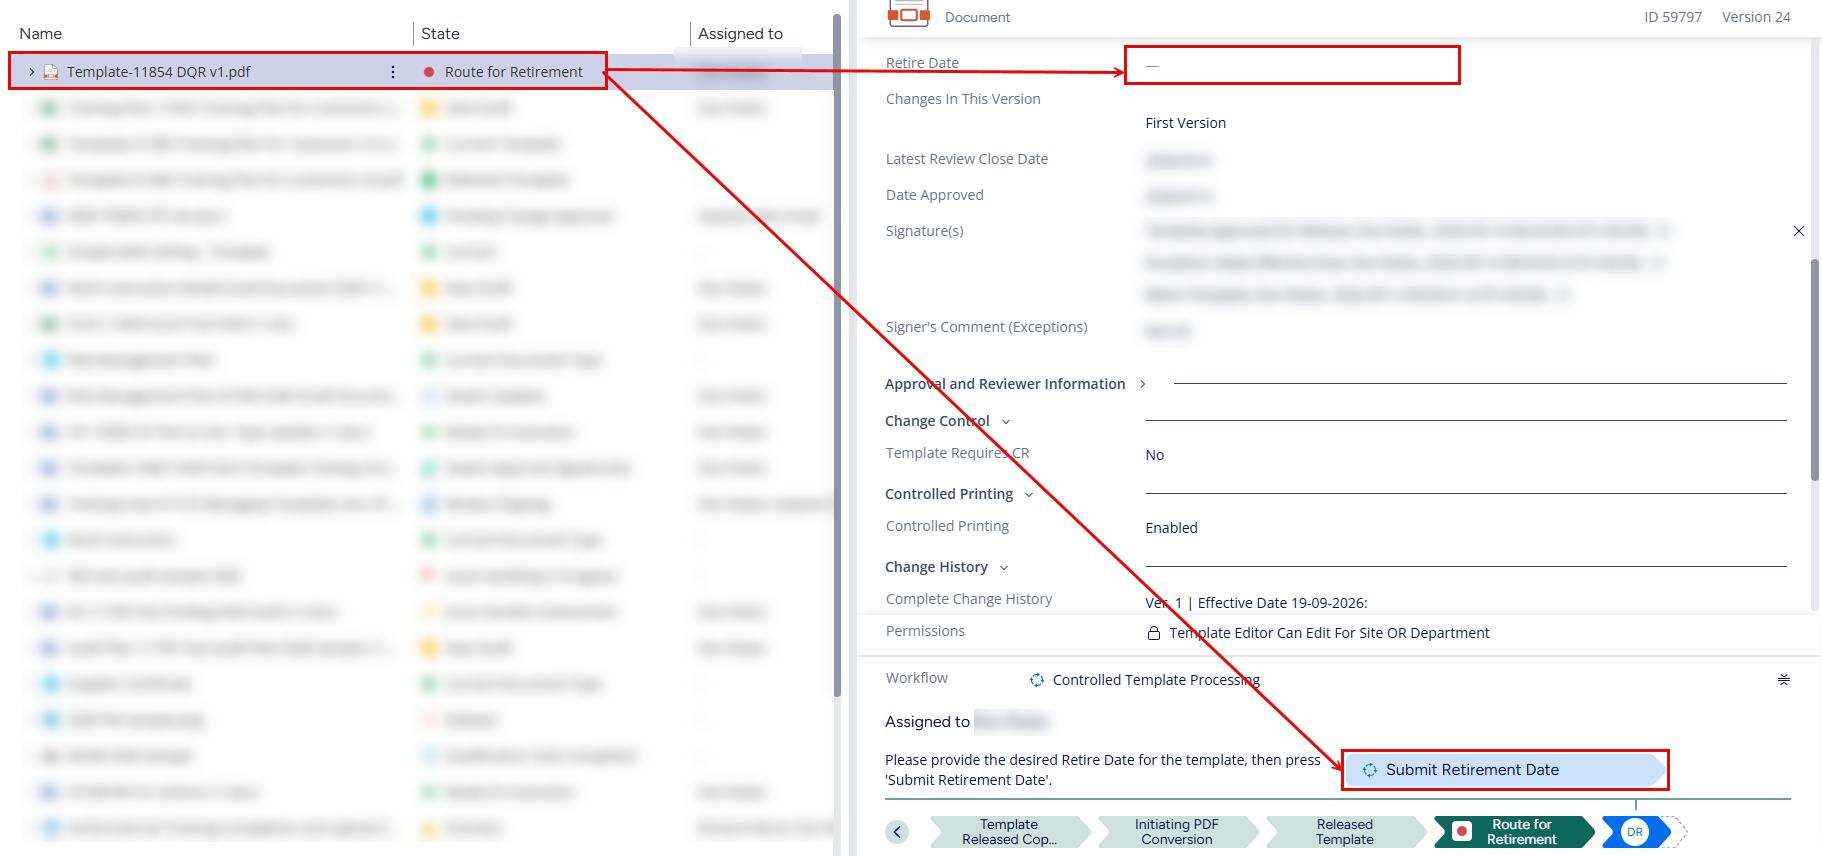
- If the template needs to be retired, select the released version (PDF file) and under State Transition click on “Route for Retirement”.
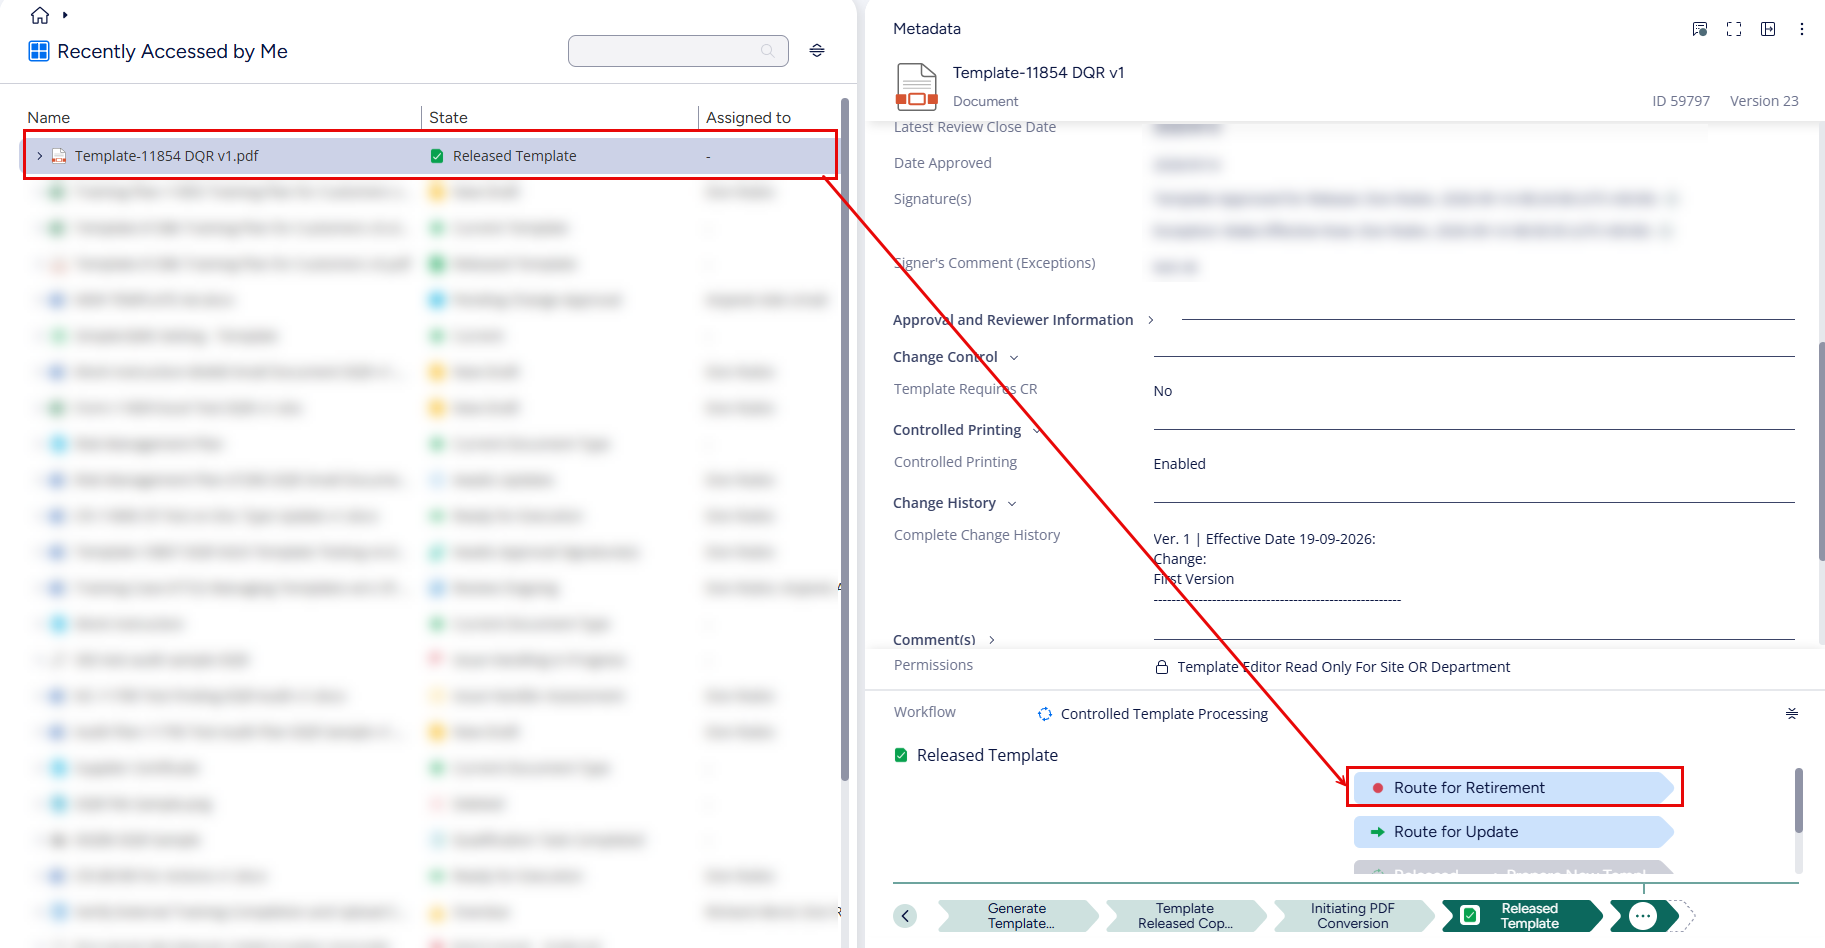
- A Retire Date will need to be entered in the metadata
- Click on Submit Retirement Date under State Transition.
- The state should change to “Retired Template”
NOTE: If a Template is controlled by a Change Request, retiring it involves creating a Retire Request. The complete Change Request process must be followed for retirement. However, direct management of the template isn’t necessary, as the system will automatically transition it to the “Retired Template” state once the CR is approved.
