Purpose
Learn how to:
- Create and utilize a document collection
- Determine Latest version and Specific version when storing documents in the collection
Expected Outcome
- Users are equipped to handle document collection in SimplerQMS
- Users have a better overview of their options with document collections
Prerequisites for all
- Must be logged in to SimplerQMS
- Must be a member of one of these ‘User Groups’ to view records:
- All internal and external users
- Must be a member of one of these ‘User Groups’ to create new records
- All Contributors
Section 1: Creating Document Collection
Advantages:
- An unlimited number of documents can be stored in the collection.
- One document can be stored in multiple document collections.
- A document in any state can be added to the document collection.
- The document can be stored in its latest version.
- The document can be stored in its historical version.
Note: Document Collections are only limited to include Documents. Equipment, Products, Suppliers, Departments etc. cannot be added to a document collection.
Step 1.1 – Create Document Collection – All Users
There are multiple ways to create a Document Collection in SimplerQMS:
I. Click on the (+) Create and choose Document Collection from the dropdown list.
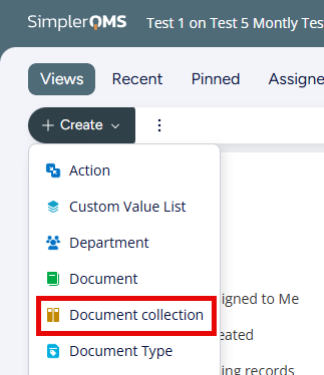
A Metadata Card will pop up.
Step 1.2 – Fill in the Metadata Card
| Field name | Description | Note |
| Class* | Document Collection | Set as default |
| Short Title | Preferred title for the Document Collection | |
| Site(s)* | Select the applicable site related to the Document Collection | |
| Process* | Select the process that the document collection belongs to | |
| Archive | Select the necessary archive for the document collection if necessary | Optional |
| Responsable Person* | The person responsible for the Document Collection | |
| Author(s)* | Assigned to draft the Document Collection | |
| Reviewer(s) | Assigned to review the Document Collection | Optional |
| Approver(s)* | Assigned to approve the Document Collection | |
| Relations | Select one or more Relations which the Document Collection is Related to if necessary e.g., If Related to Customer – another field will be added to fill in the Customer Name | Optional |
I. Click Create after filling out all necessary information on the metadata card.
a. The collection will only be assigned to the author. However, if changes in the metadata card are necessary, ONLY the responsible person or the process manager can make them. These changes can only be made when the document collection is in the “New Draft” state.
b. A Document Collection is ONLY a metadata card. This is a container for selected various documents to be part of a collection. The Document Collection still needs to undergo optional review and approval.
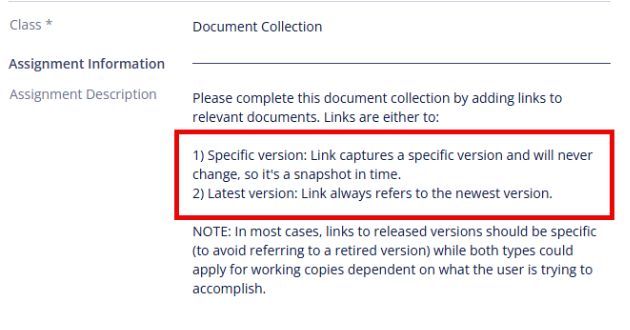
II. Read the assignment description in the metadata. This contains guidance on what task is needed to be accomplished by the Author (assigned to when in New Draft state, after creating the document collection). Pay attention to the “Specific version” and “Latest version” as this will be relevant for the next few steps.
Section 2: Adding Documents to the Collection
Step 2.1 – Add Documents – Author
There are three ways of adding documents to a collection:
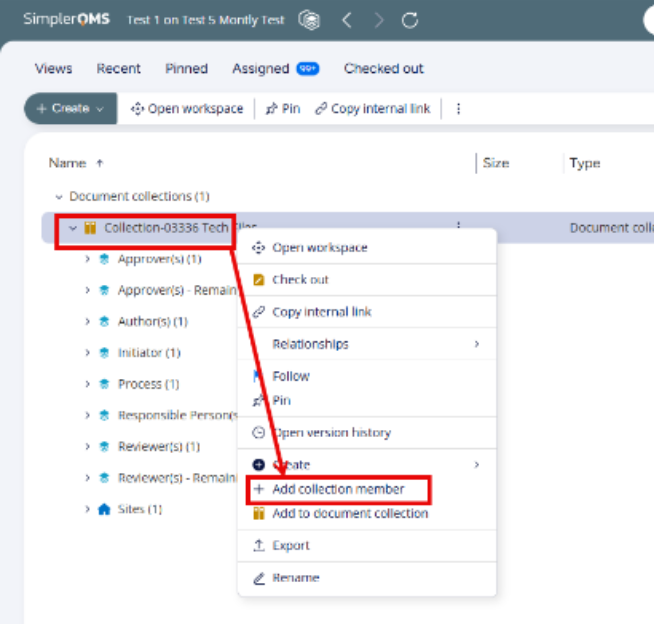
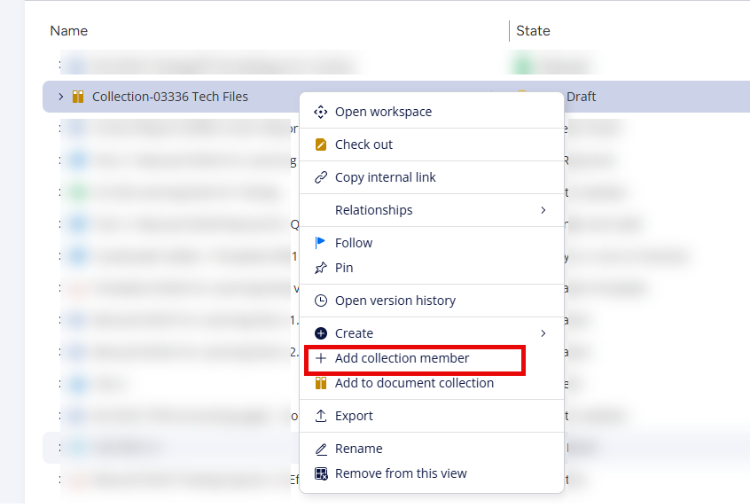
I. Right-click on the document collection (in “Assigned to Me,” “Recent,” or “Pinned”), then select “Add collection member.”
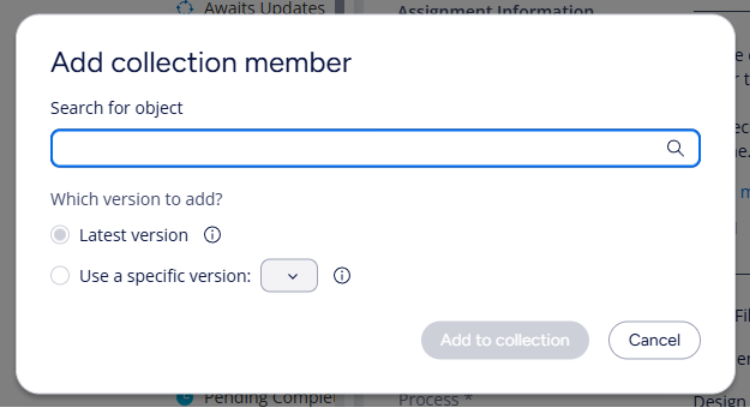
a. In the “Add collection member” dialog that opens, search for the object you want to add.
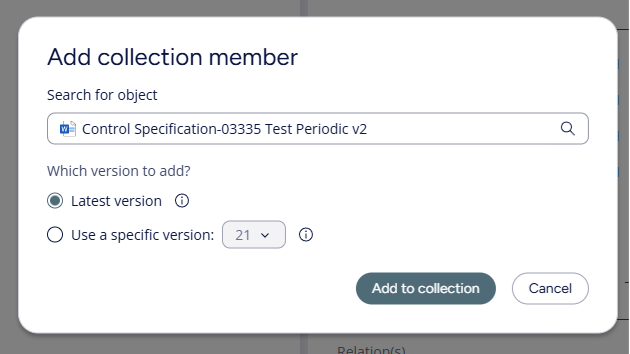
b. Choose which version to add – “Latest version” or “Use a specific version.”
c. Click “Add to Collection”.
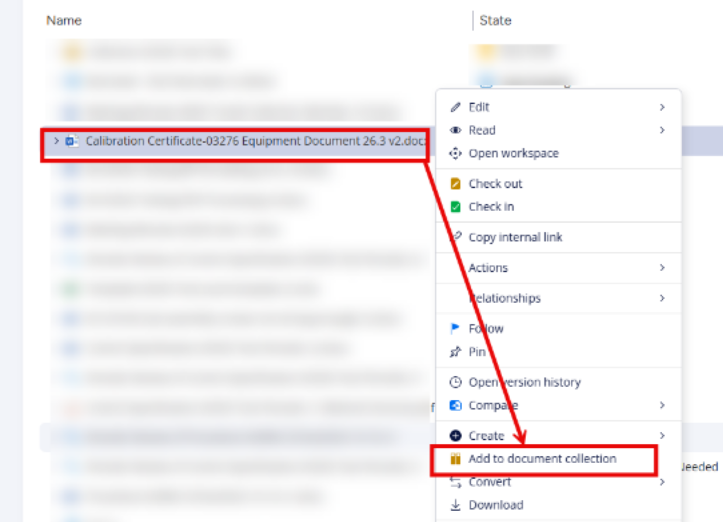
II. Right-click the document you want to add, then select “Add to document collection.”
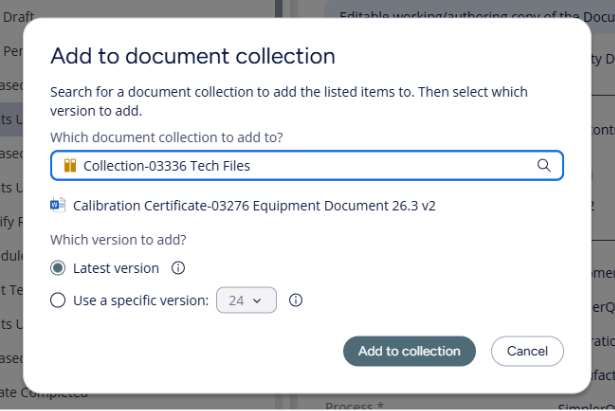
a. In the “Add to document collection” dialog that opens, search for the Document Collection to add it to.
b. Choose which version to add — “Latest version” or “Use a specific version.”
c. Click “Add to collection.”
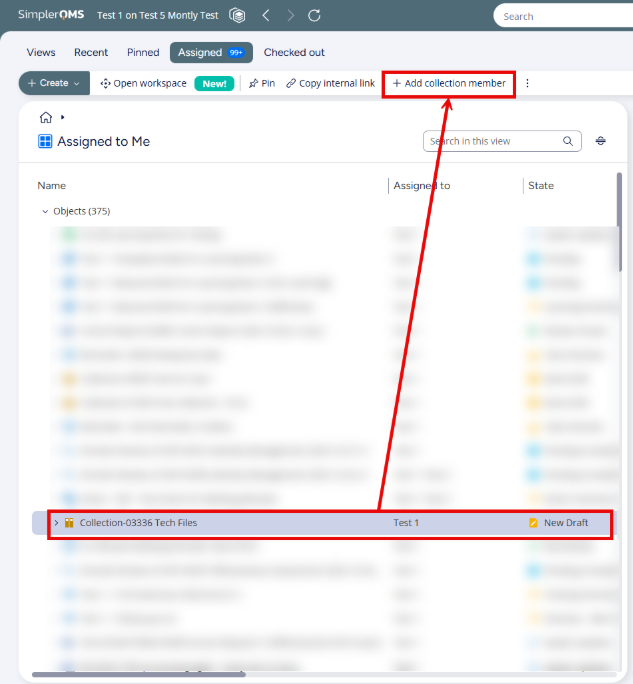
III. Select the collection (in “Assigned to Me”, “Recent”, or “Pinned”), then click ” +Add Collection member” in the toolbar.
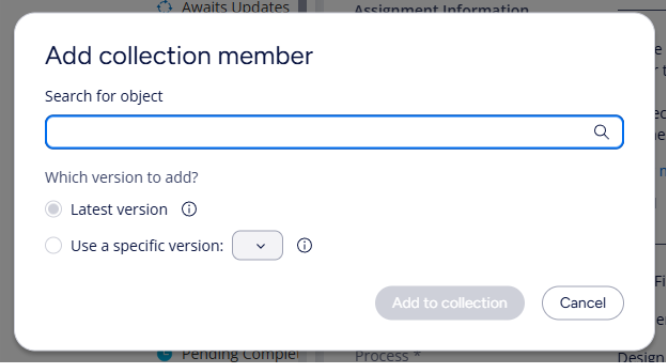
a. In the “Add collection member” dialog that opens, search for the object you want to add.
b. Choose which version to add — “Latest version” or “Use a specific version.”
c. Click “Add to collection”.
Step 2.2 – Define Membership (Target Object Version)
Selecting the preferred version:
a. Latest version – The collection always contains the latest version of each added object. If a new version is created later, the collection automatically points to that version instead.
b. Specific version – The collection keeps the current version of each added object. If a new version is created later, the collection still contains that version, not the newer one.
Specific Version is helpful for storing historical versions of a document within a document collection.
To add a specific or historical version:
- Right-click the collection and choose “Add collection member”.
2. In the “Add collection member” dialog, search for the object, select “Use a specific version”, and choose the version number from the dropdown.
3. Click “Add to collection”.
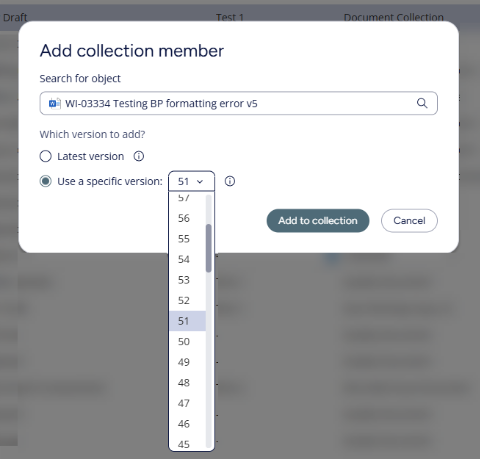
Note: When trying to store an earlier version of the same document in the collection, it will ask to replace the existing document. When storing a unique document in the collection, there will be no prompt for replacing a document.
The document is now stored as the selected historical version. A small clock indicator shows that the stored version is historical, and there is a newer version outside the collection.

Section 3: Routing the Document Collection for Review
Step 3.1 – Route for Review – Author
I. Select the Collection
II. Click on “Route for Review” in the Workflow section if there is an assigned Reviewer.
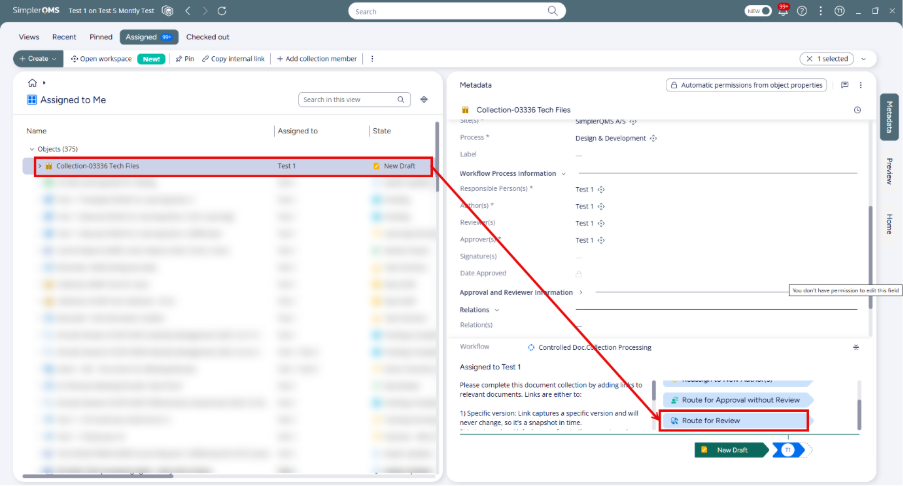
a. If the collection does not have a reviewer, click on “Route for Approval without Review“.
When the Collection is in the state “Review Ongoing”, only the responsible person and process manager can make changes in metadata. The reviewer cannot be changed as the collection is on review process.
Step 3.2 – Review of the Document – Reviewer
I. Select the Collection
II. Check the collection and click on “My Review Task Completed” in the Workflow section.
a. If the collection needs to be sent back to draft by the reviewer, click on “Route Back to Draft”.
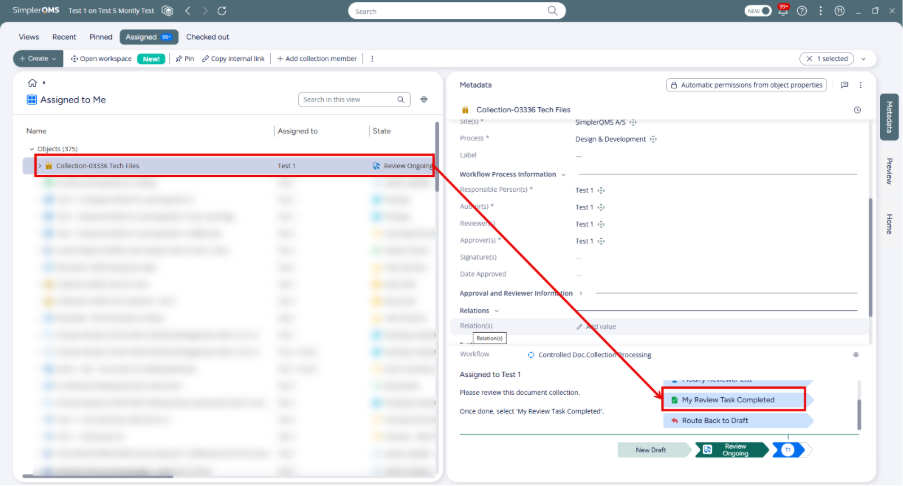
III. The state should be “Review Closed”.
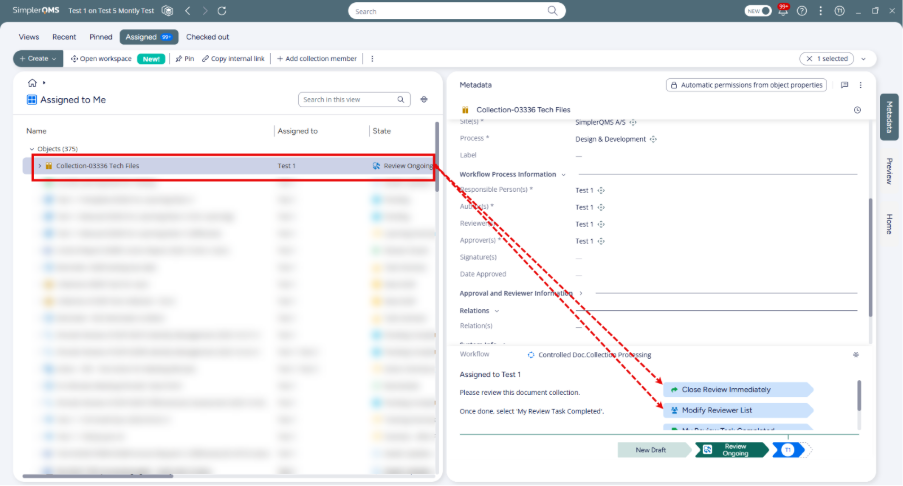
In case the Review is not needed while there is an assigned reviewer on the document, the Process Manager and the Responsible Person can use their permissions to Close the Review Immediately, which will require an electronic signature. They can also Modify the Reviewers List if a different reviewer needs to be assigned.
Section 4: Approving the Document Collection
Step 4.1 – Route for Approval – Author
I. Select the Collection.
a. Adding and/or removing documents is still possible
b. If there are too many modifications needed, it is recommended to route the document back to draft by clicking “Route Back to Draft”
II. Click on “Route for Approval” in the Workflow section.
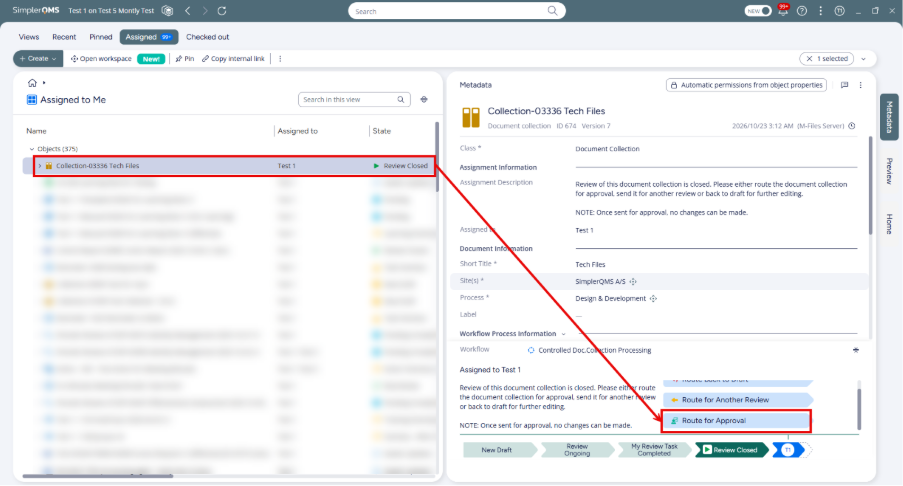
State should change to “Awaits Approval Signature(s)”

Step 4.2 – Approve the Document Collection – Approver
I. Select the Collection.
II. Click on “Approve Document Collection” in the Workflow section. Sign, using yourelectronic signature.
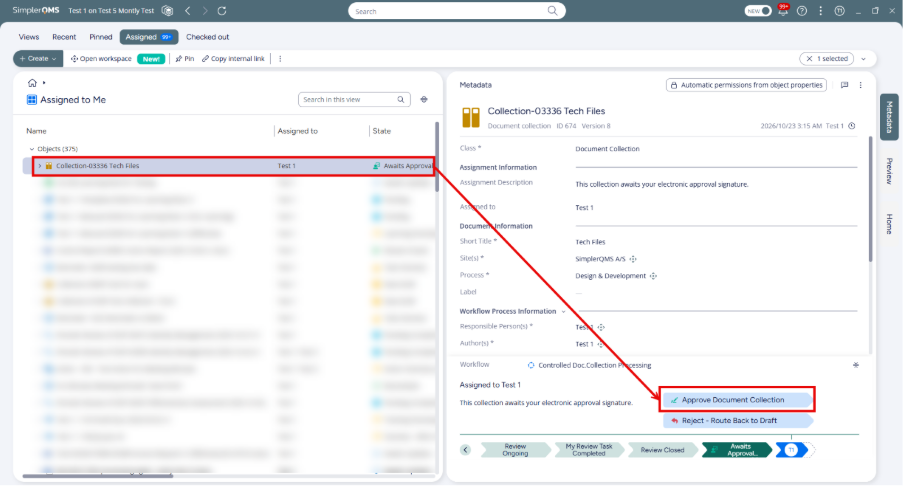
The state should be “Approved Document Collection.” At this state, you can no longer make any changes to both the collection or the metadata. If you need to make changes, you need to update the collection.
Note: Collection will show “Date Approved” in the metadata card, as it does not require an effective date.
Section 5: Updating the Collection
Step 5.1 – Update the collection – Author/Responsible Person/Process Manager
I. Select the collection that needs an update.
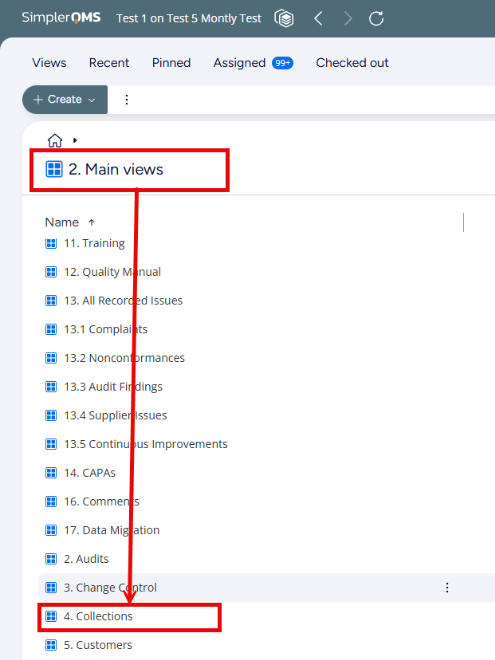
a. If the collection is not visible on your “Recently Accessed by Me”, open “Main Views” and select “4. Colletions” to find it, or search by the unique ID if known.
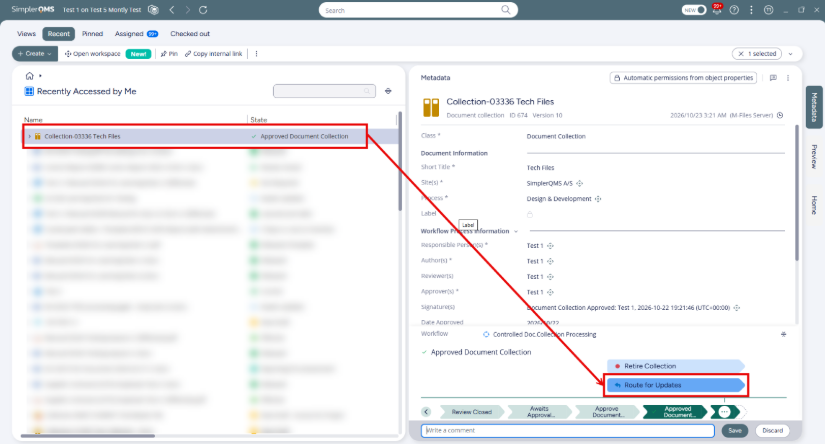
II. Click on “Route for Updates” in the Workflow section.
a. As an author, you will only have “Route for Updates” option in the Workflow section.
b. As a responsible person or process manager, you will have both options as shown below.
III. The document collection to update is assigned to the author. Go through the actions described in Section 2 and onwards.
Section 6: Retiring the Collection
Step 6.1 – Retire the Collection – Responsible Person/Process Manager
I. If the collection is no longer in need, select the collection in the Workflow section, click on “Retire Collection”.
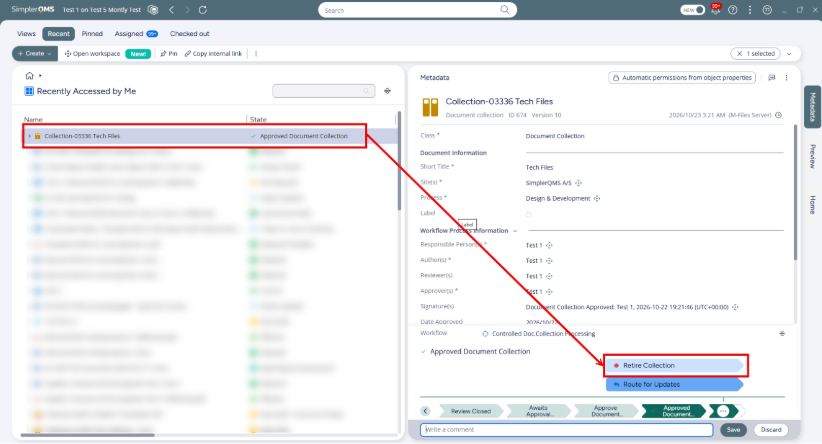
II. Sign using your electronic signature.
III. The state will be Retired Collection.
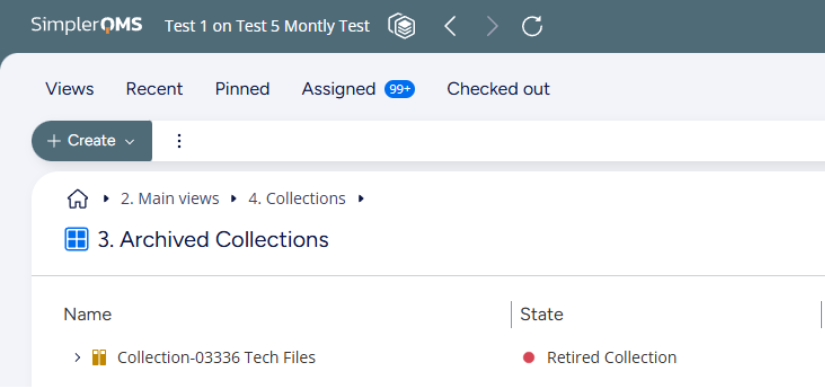
You can still view the collection, but no further actions can be made.
