Purpose
Learn how to:
- Create and update the following Recorded Issues: Complaints, Nonconformances/Deviations, Supplier Issues and Continuous Improvements
- Create CAPA and CAPA Attachments with the Recorded Issues
Expected Outcome
Users are equipped to handle all Recorded Issues (excluding results from Audit Findings), and CAPAs in SimplerQMS
Prerequisites for all
- Must be logged in to SimplerQMS
- Access to the site that the Recorded Issue is assigned to
- Must be a member of one of these ‘User Groups’ to view records:
- All internal and external users
- Must be a member of one of these ‘User Groups’ to author, review and approve records:
- All Contributors
Prerequisites for the Quality Assurance Responsible
- Must be a member of one of these ‘User Groups’
- Quality Assurance Responsible
Prerequisites for creating Recorded Issues
- Must be a member of one of these ‘User Groups’ to create new records:
- Masterdata Administrator
- Complaint Handler, Audit Handler and/or NC Handler
Prerequisites for creating CAPAs
- Must be a member of the ‘User Group’ to create new CAPAs:
- CAPA Handler (named Issue Handler on the Recorded Issue metadata card)
Section 1: Configuration: Recorded Issue List & Vigilance Reporting
Recorded Issue List
The recorded issue list can be configured based on the industry or preference of the general users of SimplerQMS. It is important to decide on how recorded issues are named as it will be applied on every record created after the configuration.
The user with a Metadata Administrator user group can make the configuration.
The default names are presented on the table:

Vigilance Reporting
Vigilance reporting can be set up as part of the configuration, according to your company’s process and preferences.
Vigilance reporting is used for issues that must be reported to the authorities your company is regulated by. When this feature is turned on, vigilance reporting has two steps. First, a pre-assessment is done before the CAPA decision. This makes sure that reporting details are captured early, especially when urgent reporting is required. Second, a final assessment is done after the CAPA decision, to complete any missing details.
By default, vigilance reporting is set to Yes for Nonconformances and Complaints, and to No for all other Recorded Issue Types.
Members of the Metadata Administrator User Group can change this configuration:
I. From 3. Masterdata views, click Recorded Issue Types
II. Select the Recorded Issue Type and in the metadata card, select Yes on the Reportable field
III. Click Save.
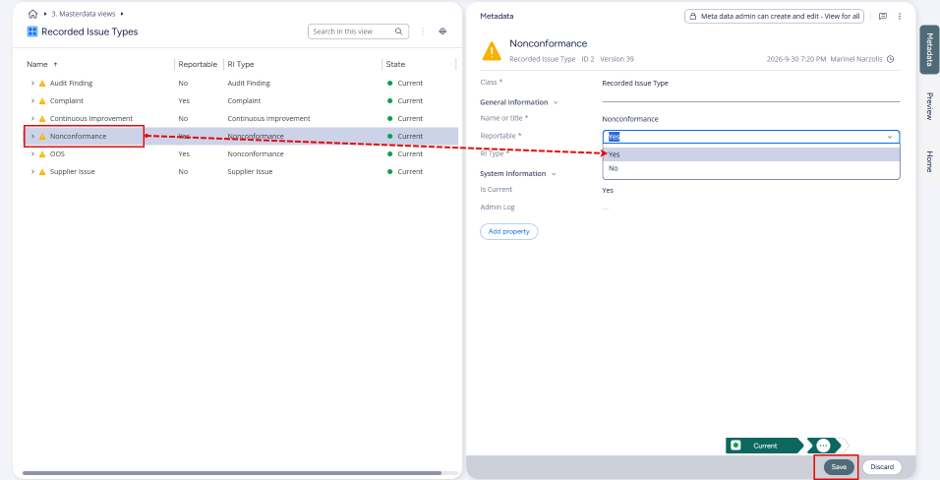
NOTE: This configuration does not mean that you must report every case. If you choose Yes, you are asked whether reporting is required every time this Recorded Issue Type is raised, so that you follow your procedure. In both reporting steps, you can still choose No for the individual record. Refer to Sections 4 and 8 of this WI.
For more details on setting up Recorded Issue Types: Refer to WI: Masterdata
Section 2: Workflow Review
The flowchart outlines the Recorded Issue (RI), CAPA and CAPA Attachment flows, which are all divided into phases.

Section 3: Create Recorded Issue
Step 3.1 – Create Recorded Issue
Option 1: Create a Recorded Issue (stand-alone)
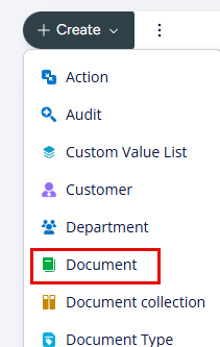
I. Click (+) Create and choose Document from the dropdown list.
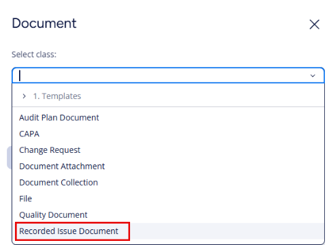
II. Select Recorded Issue Document as the Class.
III. Select the approved template for Recorded Issue.
A Metadata card will pop up. (Prefilled data is based on the selected template)
Option 2: Create a Recorded Issue based on an existing record
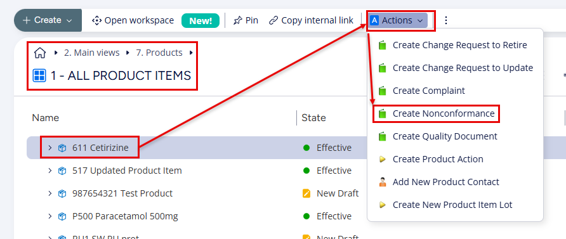
The example below shows how to create a Nonconformance for a Product. You can also start this process from Customers, Suppliers or Equipment for the relevant Recorded Issue Types. To begin, select the item the Recorded Issue is related to. The metadata card is then pre-filled with the relevant data from the selected item.
I. Click Views > 2. Main Views, then click 7. Products.
II. Select the Product Item you discovered a nonconformity
III. Under the Actions menu, click Create Nonconformance
IV. Select the approved template for NC and click Next
A Metadata card will pop up.
Step 3.2 – Fill metadata card
| Field name | Description | Note |
| Short Title* | The title of the Recorded Issue Document. | |
| Recorded Issue Type* | Select the Recorded Issue Type | |
| Receiving Date* (Only applicable for the Complaint Recorded Issue Type) | The date the complaint is received. | |
| Sites* | Select one or more sites. | |
| Document Type* | Select the relevant Document Type. This is often determined by the Recorded Issue Type. | |
| Department* | Select the relevant department. | |
| Process* | Select the relevant process. | |
| Severity | Self-defined, you may create your own value list for severity. | |
| Category | Self-defined, you may create your own value list for category. | |
| Root Cause | Self-defined, you may create your own value list for root cause. | |
| Changes In This Version | Mandatory or optional, depending on the selected document type. |
| Field name | Description | Note |
| Responsible Person(s)* | Select the responsible person(s). | You can select more than one. |
| Author(s)* | Select the author(s). | |
| Initial Reviewer(s) | If needed, select the initial reviewer(s). | |
| Quality Assurance Responsible* | Select the relevant QA Responsible. The QA Responsible is automatically assigned to the following roles on the CAPA (once it is created): Responsible Person, Initial Approvers and Approvers. The Quality Assurance Responsible can close a Recorded Issue without waiting for the CAPA to be closed. | The user must be a member of the Quality Assurance Responsible User Group. |
| Issue Handler* | Select the person who decides whether a CAPA is needed. | Must be a member of the CAPA Handler User Group |
| Reviewer(s) | If needed, select the reviewer(s). | |
| Approver(s)* | Select the approver(s). | |
| Due Date* | Select the date by which the RI must be completed (for example, for a Complaint, base the due date on the Receiving Date). | |
| Effective Date* | If you already know the effective date, select it. | Required before Route for Approval |
| Latest Review Close Date | Automatically filled with the latest date the review is closed. | Read-only |
| Field name | Description | Note |
| Related CAPA | Filled in automatically when a CAPA is created and related to the Recorded Issue. | |
| Result of Audit: | If needed, link to a relevant audit | |
| Relations | Select the relevant relations (for example, products, customers or suppliers). | |
| – Product* | Select the Product Item only if the NC is created through Step 3.1, Option 1. Pre-filled if the NC is created through Step 3.1, Option 2. | |
| – Product Item* | Select one or more products that are related to the Recorded Issue | Depending on Relations |
| – Product Lot List | If necessary, select one or more product lots. | Depending on Relations |
| – Product Item Lot Number | If needed, enter a lot number. | Depending on Relations |
| – Customer | If needed, add relations for the complaint. | |
| – Supplier | If needed, add relations for the supplier issue. | |
| Regulation Chapter | If needed, add relations for the complaint. | |
| – Supplier | If needed, add relations for the supplier issue. | |
| – Sub chapter | If necessary, link the issue to a chapter in your regulatory requirements. |
I. When you have filled in the information, click Create.
II. Your Recorded Issue form will now open in Word.
Step 3.3 – Complete Draft – Author
I. The Recorded Issue document is open in Word and assigned to the author
II. Complete filling out the relevant information of the RI Form, then check in the RI when drafting is complete.
III. In the Workflow section, the Author has the following options:
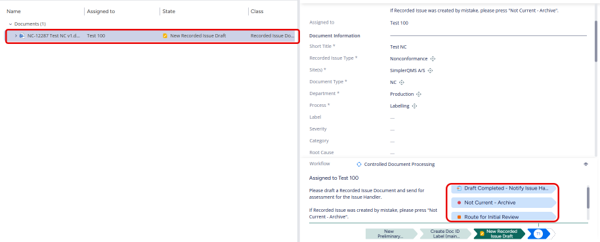
a. Draft Completed – Notify Issue Handler – this state should be clicked if the Recorded Issue is ready for CAPA Assessment. Proceed to Step 3.5.
b. Not Current – Archive – in the case that the recorded issue document was issued on accident or is no longer necessary, the author has the option to archive it
c. Route for Initial Review – involve more stakeholders in drafting the RI, by routing the document for an initial review before the Issue Handler’s CAPA Assessment.
Step 3.4 – Initial Review – Initial Reviewer
If the Recorded Issue Document is sent for initial review, the initial reviewer(s) can make modifications to the document in the same capacity as the author can.
I. Check out the Recorded issue document
II. Review the document and add changes if necessary
III. Save and close the document
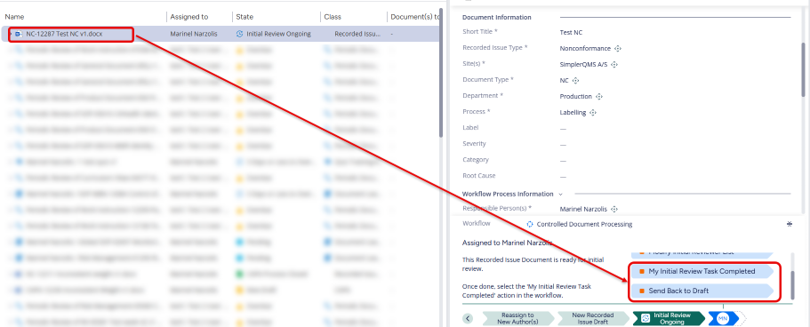
IV. When the review has been completed, click on “My Initial Review Task Completed” in the Workflow section.
a. If the review shows that many changes are needed, we recommend sending the Recorded Issue back to draft by clicking “Send Back to Draft”.
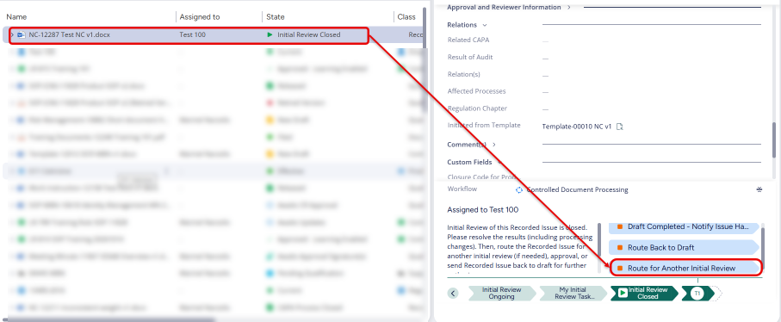
After the initial review is completed, the state changes to Initial Review Closed. In this state the author can route the Recorded Issue for another initial review if necessary.
Step 3.5 – Notify the Issue Handler – Author
Once all the necessary details have been captured in the Recorded Issue Document it is ready for issue handling. The Issue Handler assesses if the recorded issue should result in a CAPA or if it can progress to final closure.
I. Complete the final details about the recorded issue.
II. Check in the RI when drafting is completed. Under State Transition, click on Draft Completed – Notify Issue Handler
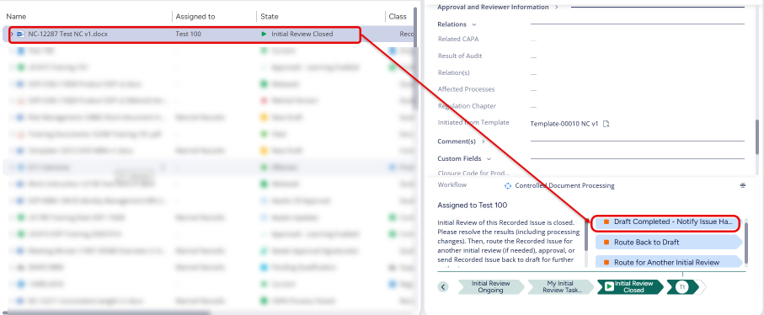
NOTE: The Responsible Person assigned to RI Document has editing access even after clicking Draft Completed – Notify Issue Handler.
Depending on the configuration of your Recorded Issue Types (Section 1), the Recorded Issue moves to either Reporting Pre-Assessment (go to Section 4) or Issue Handler Assessment (go to Section 5).
Section 4: Reporting Pre-Assessment – Issue Handler
If the selected Recorded Issue Type is set as reportable, the Issue Handler must determine whether this specific Recorded Issue is reportable. The Issue Handler is assigned a task to fill in the Vigilance Reporting section.
I. Complete the Vigilance Reporting section in the metadata card of the Recorded Issue.
| Field name | Description | Note |
| Is Reportable* | Select Yes or No to state whether the Recorded Issue must be reported outside SimplerQMS (for example, to the authorities). | |
| Justification of Decision* | Enter the justification for the reporting decision. | |
| Reporting Details | At this stage, it is not mandatory to provide further details about the reporting; however, any additional information can be added to this field. It will become mandatory in the Vigilance Reporting step. |
II. Click on Save
III. Click on Justification Complete in the Workflow section.
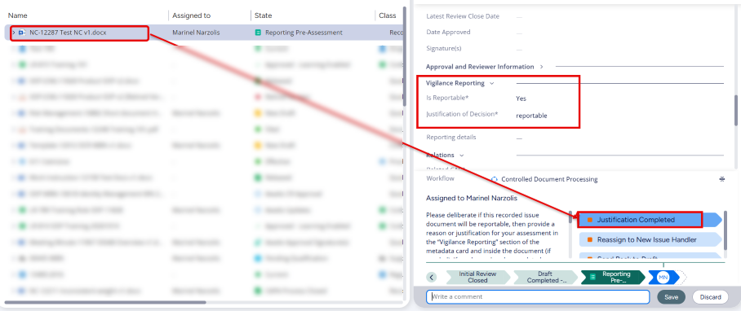
The remaining Vigilance Reporting details, and any changes to them, are completed after the need for a CAPA has been assessed. Refer to Section 8.
The state now changes to Issue Handler Assessment.
NOTE: If the recorded issue needs further details from the author, the Issue handler can route it back to draft before completing the Pre-Assessment.
Section 5: CAPA Assessment
In this section, the Issue Handler determines whether the Recorded Issue needs a CAPA.
Option 1: If CAPA is not needed
I. Select the RI and click Assessed – No CAPA Needed.
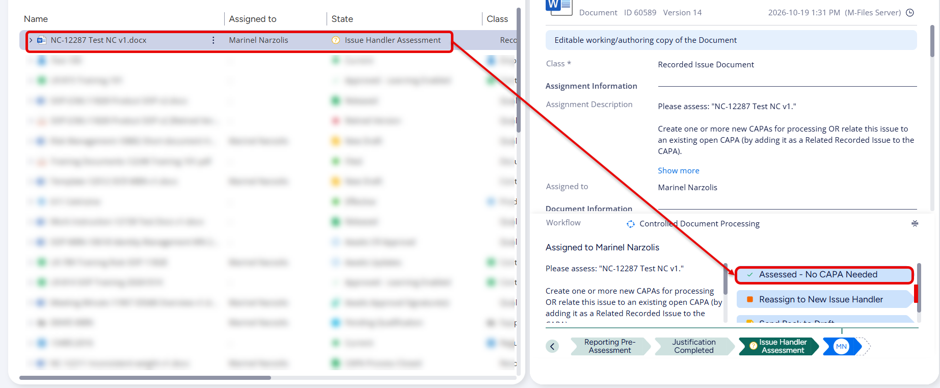
II. II. Sign with your electronic signature. You can add a reason in the signature dialog.
NOTE: If CAPA is not needed, the Recorded Issue proceeds to Vigilance Reporting.
Proceed to Section 8 to complete vigilance reporting.
Option 2: If a CAPA is needed
Proceed to Section 6 to learn how to create a CAPA. In this case, the Recorded Issue Document waits until the CAPA has been processed.
Closure of Recorded Issue with open CAPA- QA Responsible
If a CAPA is created, the Recorded Issue moves to the CAPA Processing state. It waits for the CAPA to be processed and closed before it can be closed itself.
If necessary, the Recorded Issue can be moved forward immediately, without waiting for the CAPA.
This option is not recommended. If the regulations you comply with permit it, make sure it is described in your company procedure. Only the QA Responsible can see and select the button ‘Allow Closure of Recorded Issue without CAPA Closure’ when the Recorded Issue is selected.
I. Select the recorded issue, under the Workflow section, click on “Allow Closure of Recorded Issue without CAPA Closure”.
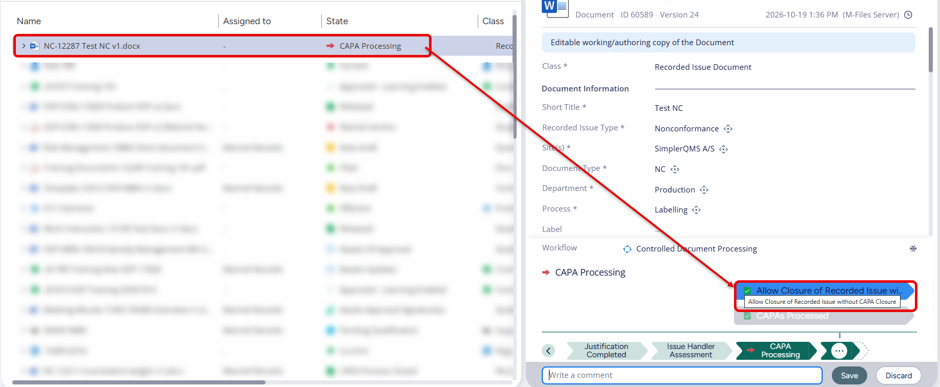
II. Enter the electronic signature to complete the closure
III. The Recorded Issue proceeds to Vigilance Reporting. Proceed to Section 8 to complete vigilance reporting.
IV. The recorded issue author can now send the document either for review, approval or back to draft
a. Even though the CAPA is still open (for example, in Draft), the state of the Recorded Issue becomes CAPA Process Closed.
V. The author can now send the Recorded Issue for review or approval, or back to draft.
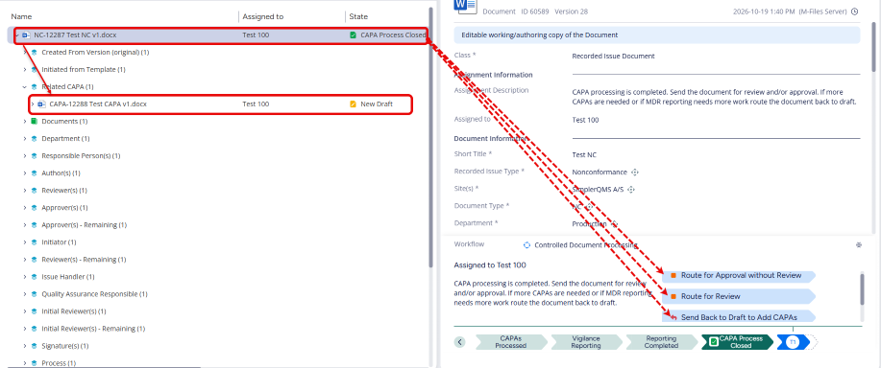
NOTE: The related CAPA continues through its normal steps until it is completed, without affecting the state of the Recorded Issue.
Section 6: Creating CAPA
Step 6.1 – Create CAPA – CAPA Handler
- Select the Recorded Issue Document you want to create a CAPA for. Click Actions and choose Create CAPA.
- Select the approved template for the CAPA Report and click Next.
- Pre-filled metadata fields:
- The Quality Assurance Responsible is copied from the Recorded Issue to the Responsible Person, Initial Approvers and Approvers of the CAPA.
- The Issue Handler is copied from the Recorded Issue to the Author of the CAPA.
- Relations are also linked automatically.
Step 6.2 – Fill out metadata card for CAPA
| Field name | Description | Note |
| Short Title* | The title of the CAPA. | |
| Sites* | Select one or more sites. | |
| Document Type* | The relevant Document Type (i.e. CAPA). | |
| Department* | Select the relevant department. | |
| Process* | Select the relevant process. | |
| Label | If needed, select one or more labels. | |
| CAPA Severity | If needed, select the severity of the CAPA. | |
| CAPA Status | Shows the CAPA status (its state in the workflow). | Read-only |
| Category | If needed, assign one or more categories. | |
| Root Cause | Self-defined, according to your own procedure. | Read-only |
| CAPA Effectiveness Assessment | Shows “CAPA not assessed” until assessment is completed. | |
| Changes in This Version | Mandatory or optional, depending on the selected document type. |
| Field name | Description | Note |
| Responsible Person* | Pre-filled, but can be edited. | QA Responsible from the RI |
| Authors* | Select the author. | |
| Initial Reviewers | If needed, select who should review initial plan. | |
| Initial Approvers* | The approvers of the initial CAPA plan is pre-filled but can be edited. | QA Responsible from the RI |
| Reviewers | If needed, select the reviewers. | |
| Approvers* | Approvers of the final CAPA is pre-filled but can be edited. | QA Responsible from the RI |
| Due date* | Select the due date for the CAPA. | |
| Effective Date | If you know the effective date, select it. | |
| Latest Review Close Date | Automatically filled in with the date the latest review was closed. | Read-only |
| Field name | Description | Note |
| Related Recorded Issue | Filled in automatically when the CAPA is created from the Recorded Issue. | Pre-filled |
| Relations | Select the relevant Relations (i.e., products, customers or suppliers). | |
| – Customer* | Select the relevant customer. This may be pre-filled, for example if the Complaint was created from a customer. | Depending on Relations |
| – Product Item* | Select one or more products that are related to the Recorded Issue. | Depending on Relations |
| – Product Item Lot Number | If needed, enter a Lot Number. | Depending on Relations |
| – Supplier | If needed, add relations for the supplier issue. | |
| – Regulation Chapter | If necessary, link the issue to a chapter in your regulatory requirements. | Pre-filled |
| Initiated from Template | If needed, link the issue to another document. | Pre-filled |
| CAPA Attachments | Filled in automatically when CAPA Attachments are created. | The short title refers to the main CAPA. |
| Related Actions | Automatically lists all actions related to the CAPA. |
Step 6.3 – Drafting the CAPA
The CAPA is now assigned to the Author and the Issue Handler, who complete the CAPA form with the information needed to address the Recorded Issue. The sections depend on the design of your own CAPA form.
When the document is complete, fill in the CAPA Conclusions section of the metadata card.
| Field name | Description | Note |
| Initial Conclusion | The initial conclusion of the CAPA plan | Mandatory before Initial Approval. |
| Conclusion of Closure | The closing conclusion of the CAPA. Do not fill this in now; fill it in before the final approval, as described in Step 6.6 – Review & Approval of the CAPA | Mandatory before the final approval. |
The state of the Recorded Issue Document now changes from ‘Issue Handler Assessment’ to ‘CAPA Processing’, while the new CAPA is in the ‘New Draft’ state.
At this stage, the author or the Issue Handler can create a CAPA Attachment from the Actions menu.
Step 6.4 – Routing for Initial Review and Approval – Author
I. The CAPA Author has the following Workflow section options:
a. Not Current Archive – if the CAPA is no longer needed
b. Route for Initial Approval without Review
c. Route for Initial Review
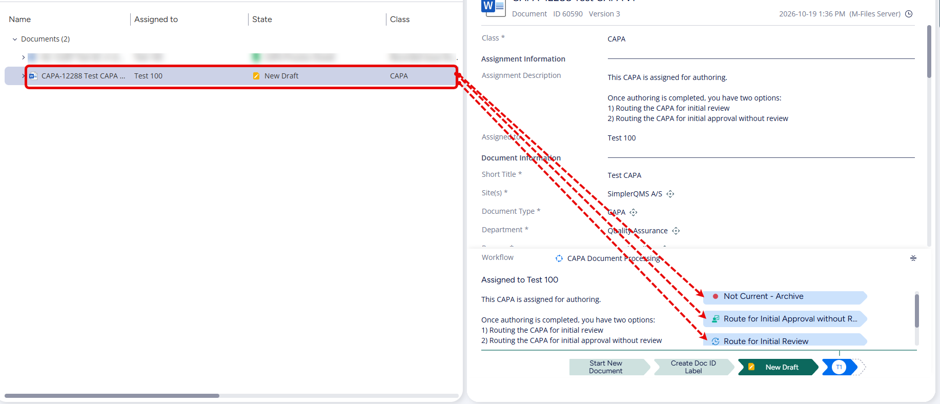
If there is a need to split the CAPA up into several parts (referred to as “CAPA attachments” in SimplerQMS, see Workflow Overview and for step by step instructions, go to Section 7 or to the WI for Managing Audits), these attachments can be created, drafted and reviewed/approved after the initial review and/or approval of the main CAPA has been completed.
When the drafting is done and document checked-in, follow the steps below to route for initial review and/or approval or start creating the CAPA Attachments.
II. Select the CAPA either from the complaint’s related records (right-click the complaint and select Open Workspace, or click the arrow beside the complaint to expand its related records), or go to Views > 2. Main views > 14. CAPAs.
III. Then click “Route for Initial Review” or “Route for Initial Approval without Review”.
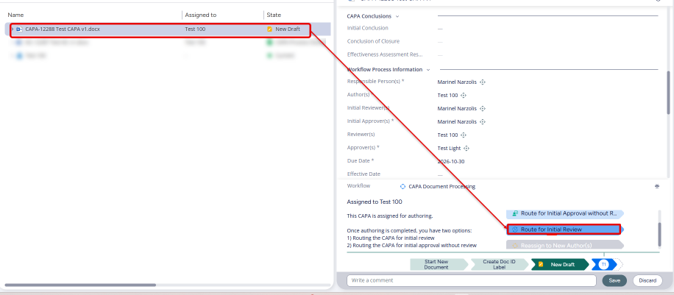
IV. If the CAPA has been routed for initial review, it now waits for all initial reviewers. Each reviewer must click “My Initial Review Task Completed” to move it forward for Initial Approval.
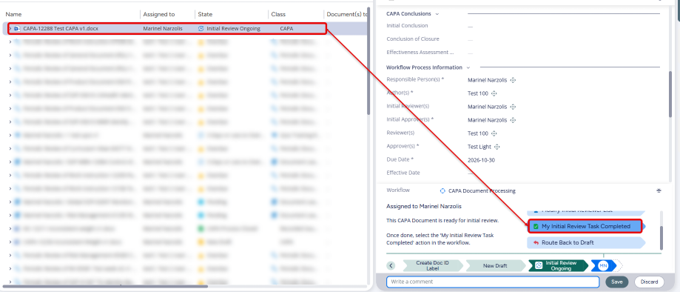
a. Alternatively, the CAPA Handler (or Process Manager) can click “Close Initial Review Immediately” and sign electronically to move it directly to Initial Approval.
V. Fill in the Initial Conclusion field on the metadata card and save it before clicking Route for Initial Approval.
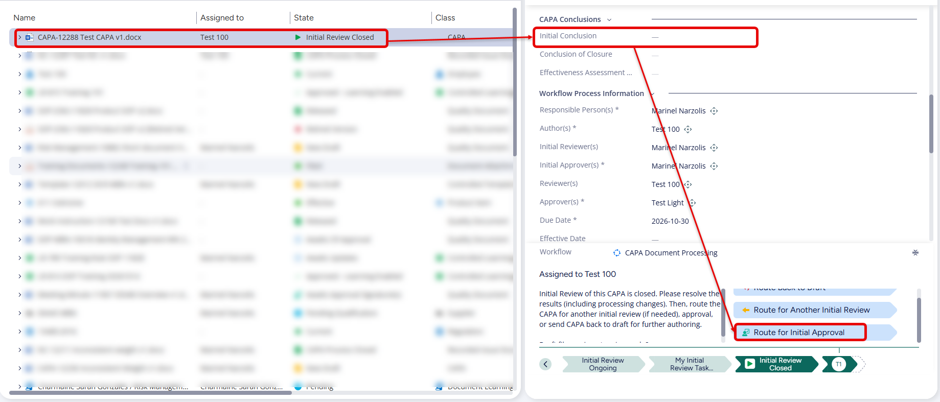
VI. The Initial Approver clicks Approve Initial CAPA and sign it to send it for further processing (the next state is Ready for Execution, see the flowchart in Section 2), or click Reject Initial CAPA to send it back to draft. If it is rejected, all changes made during the review are kept.
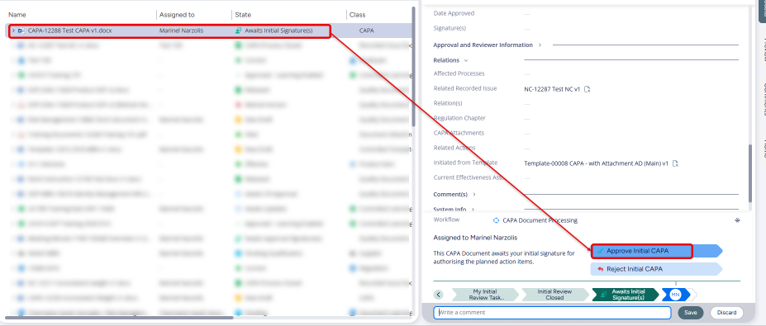
The CAPA then moves to the Ready for Execution state. If needed, create and process CAPA Attachments before continuing with the main CAPA.
Step 6.5 – Creating CAPA Action
You can create as many CAPA Actions as you need, based on what you have drafted, and assign them to different people. Pending CAPA Actions block the final approval of the CAPA until all related actions have been completed. This ensures that every planned action item is handled before the CAPA can be approved, which minimizes the risk of incomplete items.
The easiest way to create a CAPA Action is from the Actions menu of the CAPA:
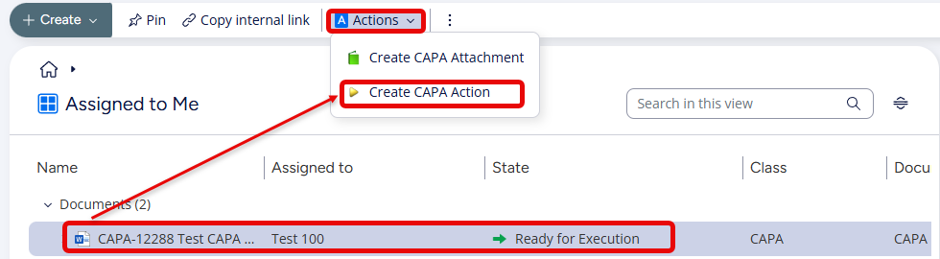
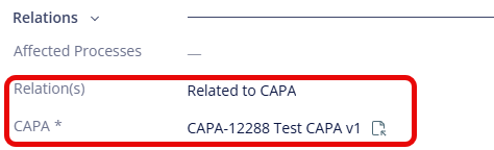
A relationship between the CAPA and the Action is created automatically in the Relations section of the Action. You can add more relationships to the Action, but make sure that the relationship to the CAPA is not removed:
For further information about the action metadata and management, refer to WI: Actions,
Periodic Tasks and Reminder Rule.
Once the Action is created, it is shown in the Workspace of the CAPA, where you can track its progress:
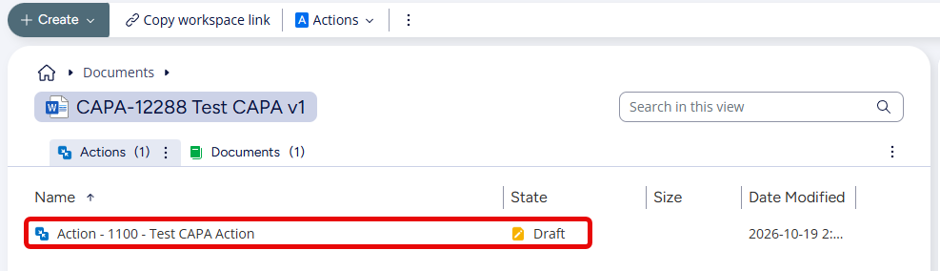
Once all the actions are completed, you can move on to the final approval of the CAPA.
NOTE : CAPA Actions can be used on any CAPA, regardless of the items included in
scope. They are a good way to track progress on action items that are not controlled in SimplerQMS.
Step 6.6 – Review & Approval of the CAPA
The CAPA can now be reviewed and approved. The review is optional. After the final approval, the CAPA is released and moves to the CAPA Pending Effectiveness state, awaiting the effectiveness assessment (see WI: Assessing Effectiveness of CAPA). The Recorded Issue can then be closed after its own review and approval (Section 9).
Fill in the Conclusion of Closure field on the metadata card. This is required before the CAPA can be approved and released.
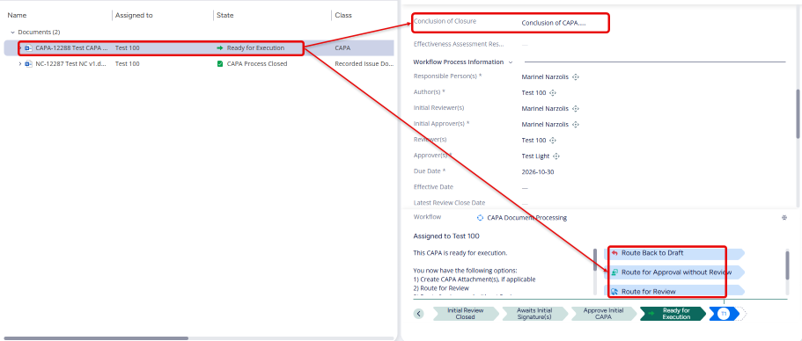
Then complete the review and approval:
I. Select the CAPA
II. Click Route for Review or Route for Approval without Review
III. If the CAPA was routed for review, each reviewer clicks “My Review Task Completed”
IV. Click Approve CAPA and Sign it or reject it
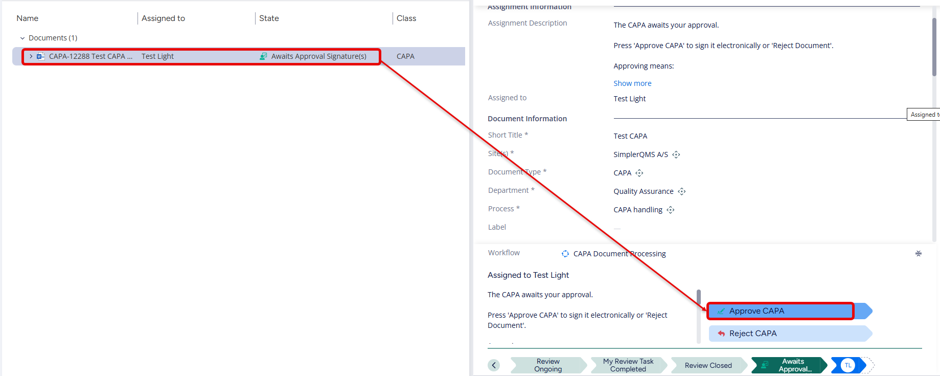
Approving and signing has the following effects:
I. The CAPA is released and moves to the ‘Pending Effectiveness Assessment’ state.

II. A periodic task ‘Assessment # for CAPA xx’ is created for the Effectiveness Assessment and assigned to the Responsible Person of the CAPA. You can see the task in the Open Workspace view.
III. The related Recorded Issue can now be closed by reviewing and approving it. You can find it in the Open Workspace view, or navigate to the relevant Recorded Issue view from Views > 2. Main views.
Step 6.7 – Rejecting the CAPA (if needed) – Approver
I. If the approver rejects the CAPA, it is sent back to Draft, and the full review and approval process must be repeated. All earlier changes to the document are kept.
Section 7: Create CAPA Attachments
CAPA Attachments are often used to split the CAPA process into several parts. It is usually easiest to manage all related CAPA documents from the Open Workspace view of the main CAPA.
A CAPA Attachment belongs to the Quality Document class and has its own Document Type. In the Relations section of its metadata card, the Parent Document field shows the main CAPA the attachment is linked to. In the same way, the CAPA Attachments field on the main CAPA shows the CAPA Attachments linked to it.
Once the CAPA Attachment has been reviewed and/or approved, the main CAPA can proceed to approval, as shown in the Workflow Overview (Section 2).
Step 7.1 – Create a CAPA Attachment – CAPA Author
I. To create a CAPA Attachment, click Create CAPA Attachment with the relevant CAPA selected. The CAPA msut be in the Ready for Execution state, which it moves to automatically after the Initial Approval.
a. If CAPA Attachments are created, they must be fully approved before the main CAPA can be sent for Review and Approval.
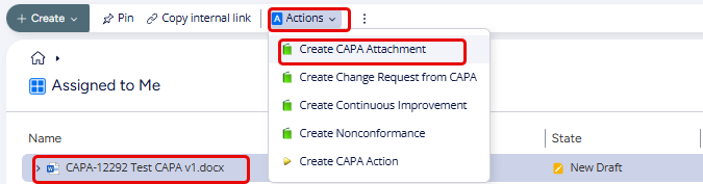
Search for the relevant template or select the class Quality Document. Then, select a template to base the CAPA Attachment on and click Next.
Step 7.2 – Create a CAPA Attachment – CAPA Author
| Field name | Description | Note |
| Short Title* | A suggested CAPA Attachment name is shown, which you can edit. | Pre-filled |
| Sites* | Select one or more sites. | |
| Document Type* | Predefined by the Template, but can be edited | Depending on Relations |
| Department* | Select the relevant department. | Depending on Relations |
| Process* | Select the relevant process. | Depending on Relations |
| Label | If needed, select one or more labels. | Pre-filled |
| Changes in This Version | Mandatory or optional, depending on the document type. |
| Field name | Description | Note |
| Requires Change Request | The document type determines whether a Change Request is required, so this property can only be changed by changing the document type. | |
| Requires Periodic Review | The document type determines whether a periodic review is required, so this property can only be changed by changing the document type. |
| Field name | Description | Note |
| Responsible Person* | Add or edit the Responsible Person. | Pre-filled with the QA Responsible from the RI |
| Authors* | Select the author. | |
| Reviewers | If needed, select the reviewers. | |
| Approvers* | Add or edit the Approvers. | Pre-filled with the QA Responsible from the RI, |
| Due date | Select the due date for the CAPA Attachment. | |
| Effective Date | If you already know the effective date, select it. |
| Field name | Description | Note |
| Relations | Select the relevant Relations (i.e., products, customers or suppliers) | |
| Regulation Chapter | If necessary, link the issue to a chapter in your regulatory requirements. | Pre-filled |
| Parent Document | The main CAPA that this CAPA Attachment is linked to. | Pre-filled |
| Initiated from Template | If needed, link the issue to another document. | Pre-filled |
| CAPA Attachments | Not used |
I. When you have filled in the information, click Create.
II. Your CAPA Attachment form will now open in Word.
After drafting is complete and the document has been checked in, the CAPA Attachment is shown as a “child” of the main CAPA and a “grandchild” of the Recorded Issue.
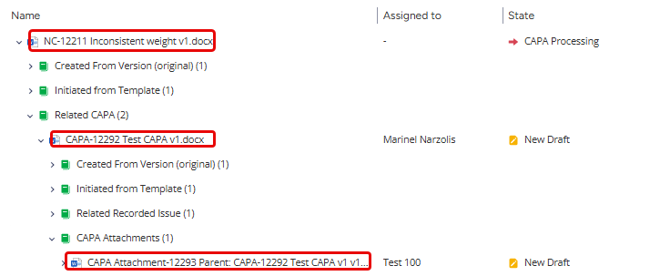
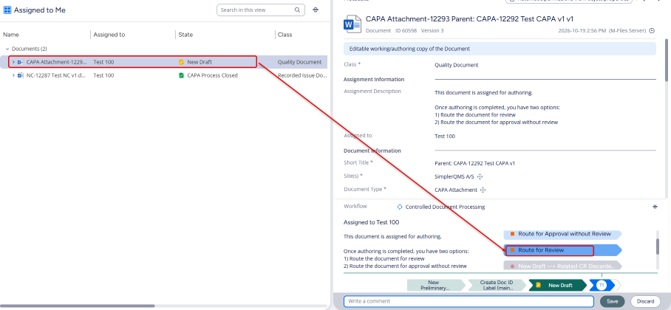
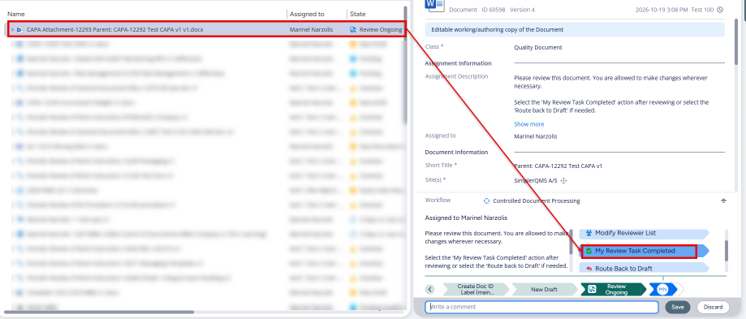
III. Route the CAPA Attachment for review. The reviewer checks out the document, adds any comments, saves and closes it, and then clicks My Review Task Completed in the Workflow section in SimplerQMS.
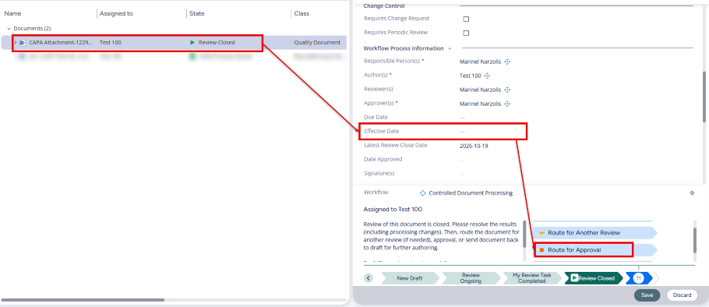
IV. Once the review is completed, the author makes the final changes to the document, sets the effective date and routes it for approval.
V. The approver approves the document with an electronic signature.
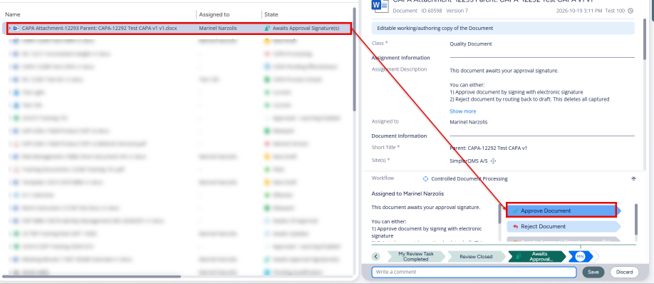
After the final signature, the CAPA Attachment moves to the Released state. The main CAPA can then proceed to final review and approval, as outlined in the Workflow Overview.
Section 8: Vigilance Reporting – Issue Handler
When the CAPA assessment is complete, with or without a CAPA, the Recorded Issue moves to the Vigilance Reporting state (if the RI Type is set as reportable).
The Vigilance Reporting fields can be edited, so that a re-evaluation after a more thorough CAPA investigation can be captured.
If the decision from the pre-assessment needs to be changed at this point, make sure that your procedures describe how to do this in line with the guidelines and regulations you comply with. This ensures that your vigilance reporting is accurate and appropriate. You may want to consult experts in your field or regulatory agencies to make sure you follow the correct procedures.
I. Complete the details in Vigilance Reporting Section, and click on Save.
II. In the Workflow section, click on Reporting Completed.
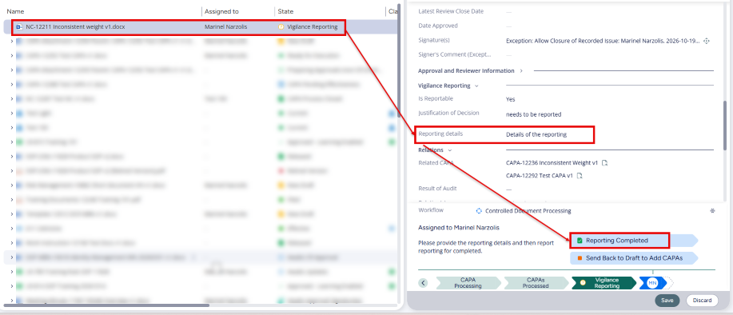
Once the reporting has been completed, the state becomes CAPA Process Closed.
NOTE: Reporting Details become mandatory if Is Reportable is set to Yes.
Section 9: Recorded Issue: Review & Approve
You reach this section after one of the following outcomes of Section 5: CAPA Assessment:
- The Issue Handler has assessed that no CAPA is needed.
- CAPA processing is complete, and the CAPA is now pending an effectiveness assessment.
Step 9.1 – Send Recorded Issue for review and approval-Author
You (i.e., the Complaint Handler) should now process the Recorded Issue by routing it for approval with or without review (Refer to WI: Managing Quality Documents)
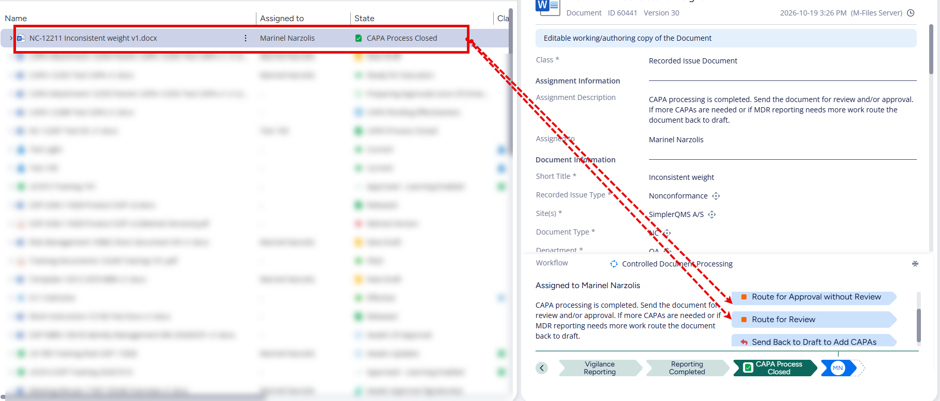
Remember that the Effective Date must be set before routing the document for approval.
Once the approval process is completed, the working copy of the Recorded Issue ends in the Released state.
The CAPA has moved into the “CAPA Pending Effectiveness” state. To assess the CAPA effectiveness, refer to WI: Assessing Effectiveness of CAPA.
Step 9.2 – Route Recorded Issues for Updates- Author/Responsible Person
When an update is needed, the Responsible Person can start it.
I. Select the Recorded Issue, click on Route for Updates in the Workflow section.
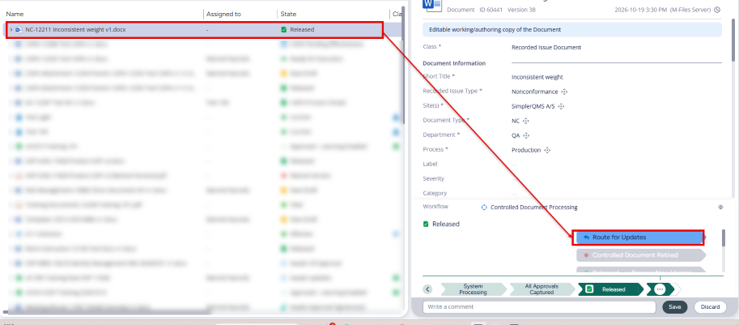
II. A new version of the Recorded Issue is created and assigned automatically to the Author. That state is now “Awaits Updates”.

III. The author receives a notification, and the document can be found in their “Assigned” tab. The author then drafts the document in the working copy, saves it and checks it in. The assignment description can be used as a guide.
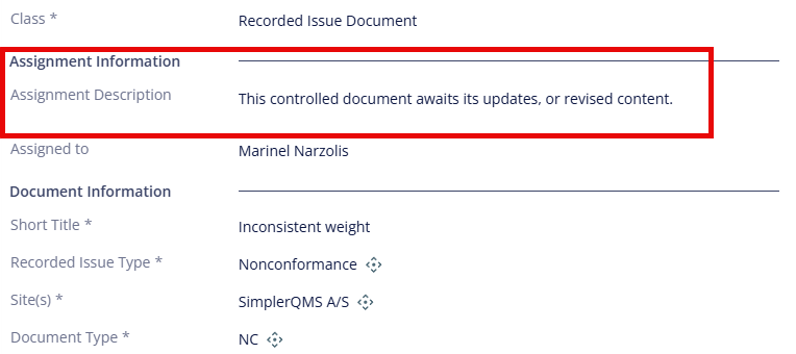
IV. Once the drafting is completed, the author can send the document for review or approval
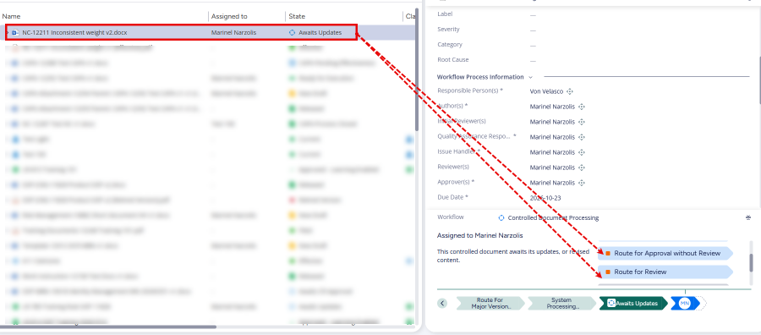
Make sure that the effective date is added before sendingthe document for approval.
V. Once all approvals have been captured, state is “Released”.

Section 10: CAPA Effectiveness Assessment
See WI – Assessing Effectiveness of CAPA for step-by-step instruction on how to manage the Effectiveness Assessment in SimplerQMS.
