Purpose
Learn how to:
- Manage and create quality documents with or without a Change Request in SimplerQMS
Expected Outcome
- Users are equipped to create quality document in SimplerQMS
- Be able to create quality document that does not require a Change Request
Prerequisites for all
- Must be logged in to SimplerQMS
- Must be a member of one of these ‘User Groups’ to view records:
- All internal and external users
- Must be a member of one of these ‘User Groups’ to create new records
- All Contributors
- Must be a member of one of these ‘User Groups’ to create or modify Document Types
- Metadata Administrator
Section 1: Workflow Overview
The flowchart below outlines the process of creating a quality document without Change Request (CR). To see how document processing changes due to a Change Request, refer to Work Instruction: Managing Change Request.
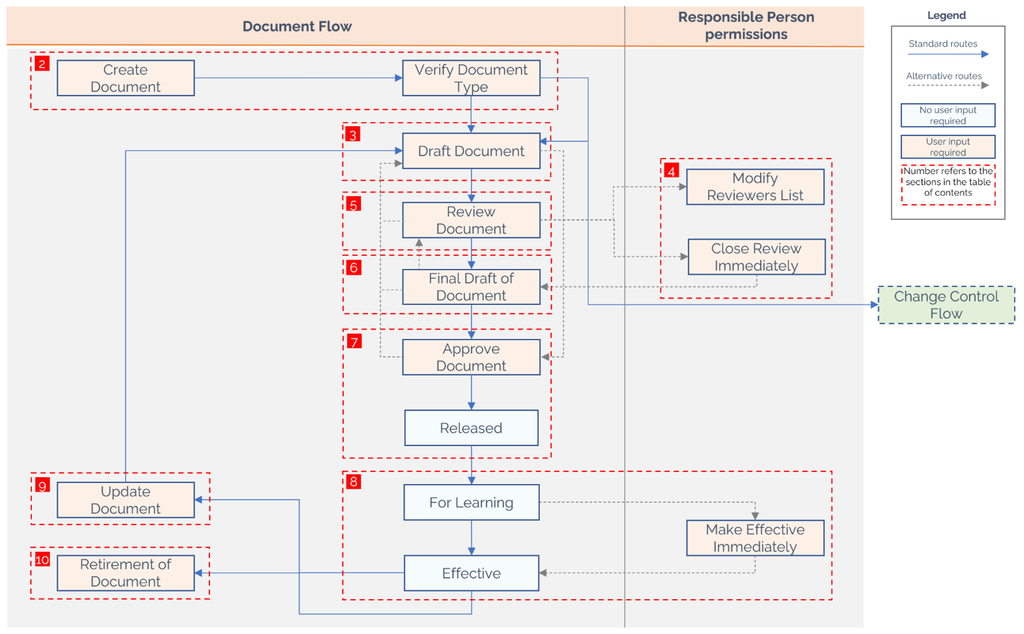
Document Conditions:
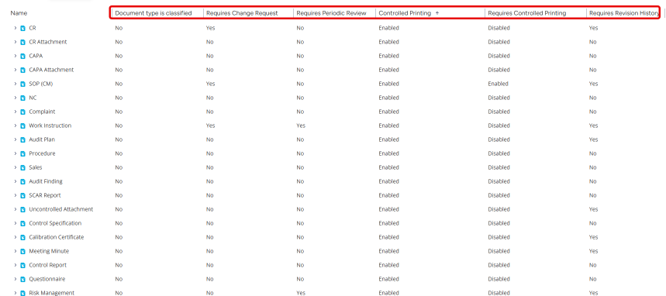
Documents are influenced by the selected document type. The following settings can be configured in the Metadata of the Document Type:
- Classified Document Type: Defines if the document is classified, restricting access to those with permissions for the classified document type.
- Change Request Requirement: Specifies whether the document requires a Change Request for initial approval and any future updates.
- Periodic Document Review: Sets a review schedule, prompting the author to review the document at specified intervals.
- Print Restriction: Determines if the document is restricted from regular printing and must be printed through the controlled printing dashboard.
- Revision History Requirement: Indicates if the metadata-based Revision History should record changes between document versions
Section 2: Creating a Quality Document
Step 2.1 – Create a Quality Document – Initiator / Author
Step 2.1 can be accomplished by a person who has the All Contributors User Group assigned to them.
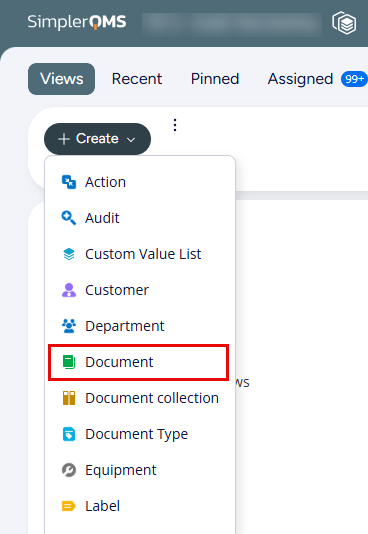
- On the left side of the screen, expand Create and click on Document
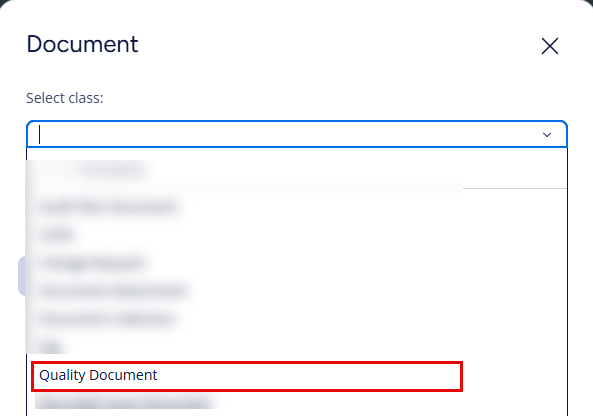
- To create a quality document from this selection, you need to define the Class as Quality Document
- Select the right template
A Metadata Card will pop up.
Step 2.2 – Fill in the Metadata Card
| Part 1: Document Information | ||
| Field name | Description | Note |
| Short Title* | Title of the document | |
| Site(s)* | The legal entity that the document is tied to | |
| Document Type* | Select the appropriate document type; The selection of the document type determines whether the quality document requires a Change Request or NOT and also determines if revision history is mandatory. | |
| Department* | Select the appropriate department | |
| Process* | Select the process that the document belongs to | |
| Label (formerly Archive) | Select a label if necessary | |
| Part 2: Change Control | ||
| Field name | Description | Note |
| Requires Change Request | This field will be filled by the system based on the document type you select. | By default, they are greyed out and you will see the checkmark once the document is created |
| Requires Periodic Review | This field will be filled by the system based on the document type you select. | |
| Part 3: Workflow Process Information | ||
| Field name | Description | Note |
| Responsible Person* | The person assigned to a specific document with broader access rights and the responsible for periodic review if the document type requires that. The responsible person can reassign the roles assigned on the metadata. | See Section 4 for additional details |
| Author(s)* | Person that drafts/authors the document | |
| Reviewers | This is optional if a review is needed for the document; this person has the same access/edit rights to the document as the author | |
| Approver(s)* | Person to approve the document, which is needed for its release | |
| Due Date | When a due date is set, the system will send out automatic notifications to the Responsible Person, author, and 3 days before the due date to notify the involved parties about the need to complete the document. | |
| Effective Date | The date on which the document becomes effective. Before this date, the document will automatically be released for learning. This cannot be a historical date. | |
| Part 4 and Part 5: Relations and Controlled Printing | ||
| Field name | Description | Note |
| Relation(s) | The choice you make here will determine what additional fields are populated on the metadata. You can use these field to establish relationships between the document created and any other item within SimplerQMS | By default, they are greyed out and you will see the checkmark once the document is created |
| Regulation Chapter | You can choose from a list of regulation chapters available in the system | |
| Initiated from Template | By default, this field will fill when the document is created with the reference to the template it was created from. | |
| Controlled Printing | This field is to show if your document is blocked from printing via the Controlled Printing module. If this module is turned on, document types will individually have to be assessed and the system will autofill this field either as disabled or enabled based on the settings you chose. | |
NOTE: If the Template is switched back to “Set Template to Require CR”, Change Control will automatically change its status to “Yes”. The Template can be processed without adding it to a CR, but after approval, it will not be released until it is associated with a CR that has been approved and closed.
- Click Create after filling out all necessary information on the metadata card
- Working copy of the new quality document launches in Word (or in other the applications where document was initiated)
- Modify or draft the document if needed
- Save and check in the document and go back to SimplerQMS
- The document will be in the state “New Draft”, and it should be assigned to the document author
- Unique ID number will be automatically assigned.
NOTE: If the document is controlled by a Change Request, the document ID will not be assigned until the CR Plan is approved.
- Select the quality document and read the assignment description in the metadata card. Pay attention to your selected Document type, as that defines whether the quality document requires CR or not
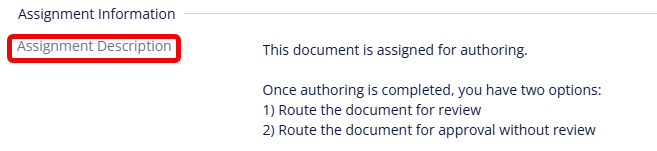
- If the document requires CR after it has been created, you will need to create a Change Request before moving on to the next steps.
- The Document will stay in the state “Pending Change Creation” until the Change Request Plan has been approved. After that is done, you can proceed to Section 3.
- To learn about creating a Change Request, refer to Work Instruction: Managing Change Requests.
Step 2.3 – Quality Documents, Change Request and Revision History
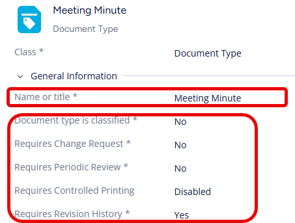
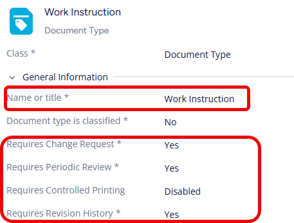
A quality document will require a Change Request and periodic review if the selected document type is defined to require a Change Request and periodic review in metadata administration. Furthermore, if revision history is enabled in the metadata card, capturing the version history becomes mandatory when routing the document for approval.
ONLY a Metadata Administrator can create and define the Document Type.
In this example, Meeting Minute is the document type selected, which does not require Change Request.
Without CR a document will automatically get a unique ID once the document is checked in.
In this example, Work Instruction is the document type selected, which requires Change Request, Periodic Review and Revision History.
A document controlled by CR will only get a unique ID once the CR Planning phase is completed.
Once a document is created, it will not move until the document is checked in, so you have the chance to review your document type before starting a draft.
NOTE: This Work Instruction will follow the flow of a Quality Document without Change Request, but you will find notes referring to the changes that a CR adds to the flow.
Section 3: Drafting a new Quality Document
NOTE: If the document is controlled by a Change Request, the CR Plan needs to be approved before moving on to the next steps!
If you wish to draft a Quality Document running on Change Request ahead of the CR Approval, the document needs to be put in the state “Edit Preliminary Document.” Refer to WI Managing Change Request for more information.
Step 3.1: Draft new quality document and route for review – Author
- Check out the document, launches in Word (or other applications the template was initiated from)
- Draft the document with all the necessary information
- Click Save and close the document, check in to SimplerQMS
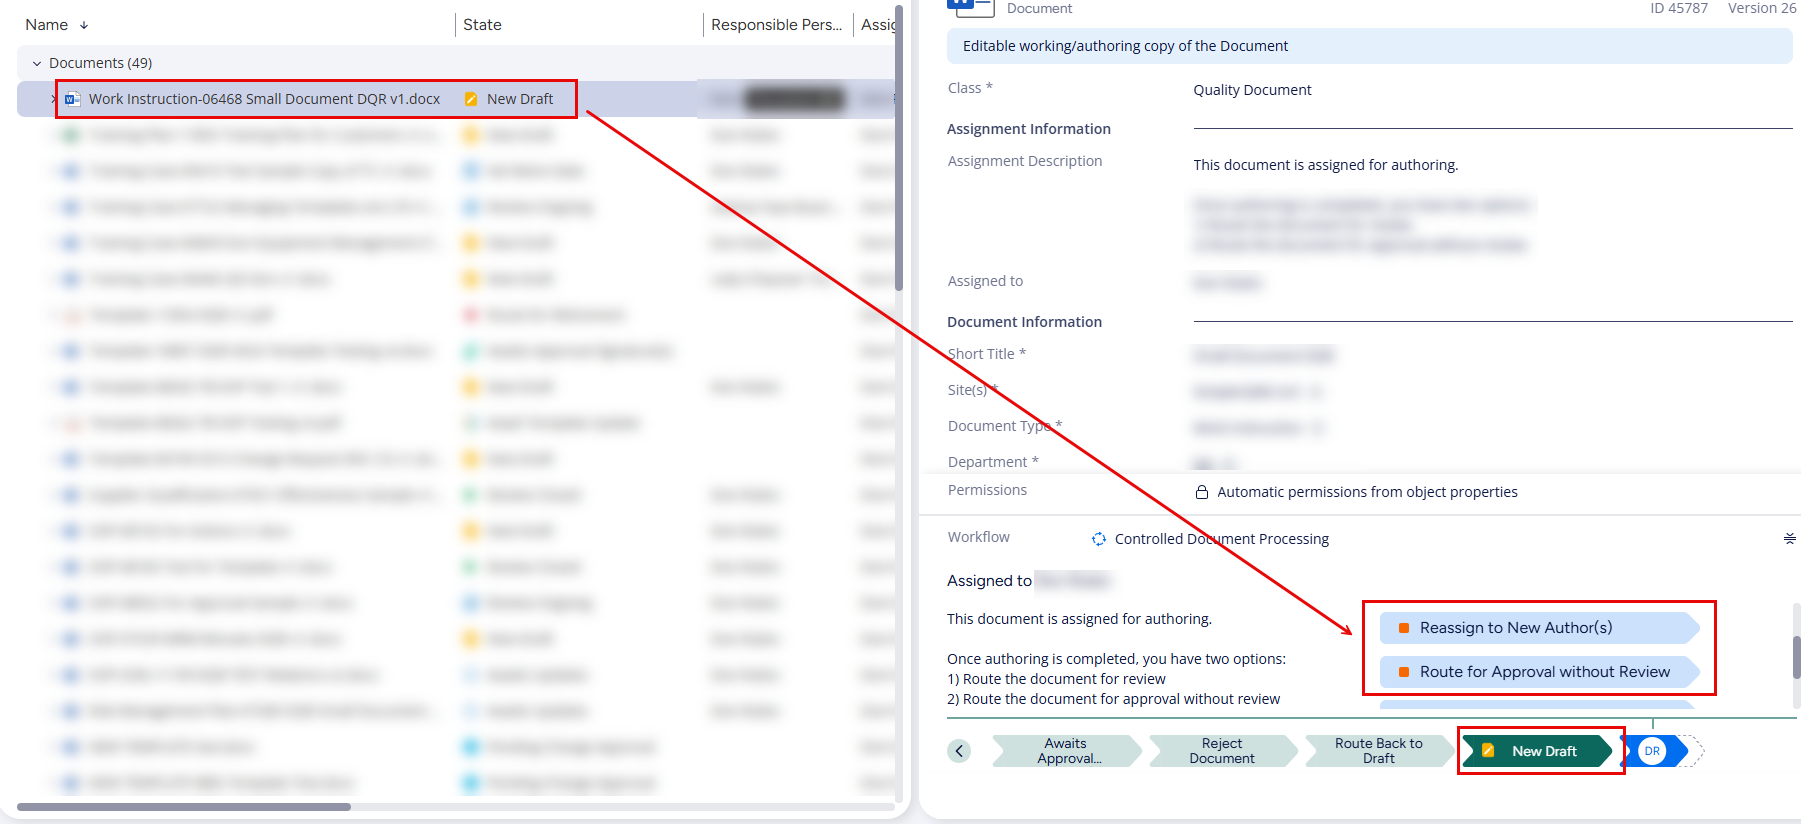
- Send the document for review, under State Transition, click on “Route for Review” (only when there is an assigned reviewer to the document)
- Alternatively, if no reviewer is assigned or the document ends up not needing a review, click on “Route for Approval without Review”
Section 4: Additional State Transitions for a Responsible Person under Review
(Skip this Section if there is no reviewer assigned to document, and proceed to Section 6)
The Responsible Person has the following two options:
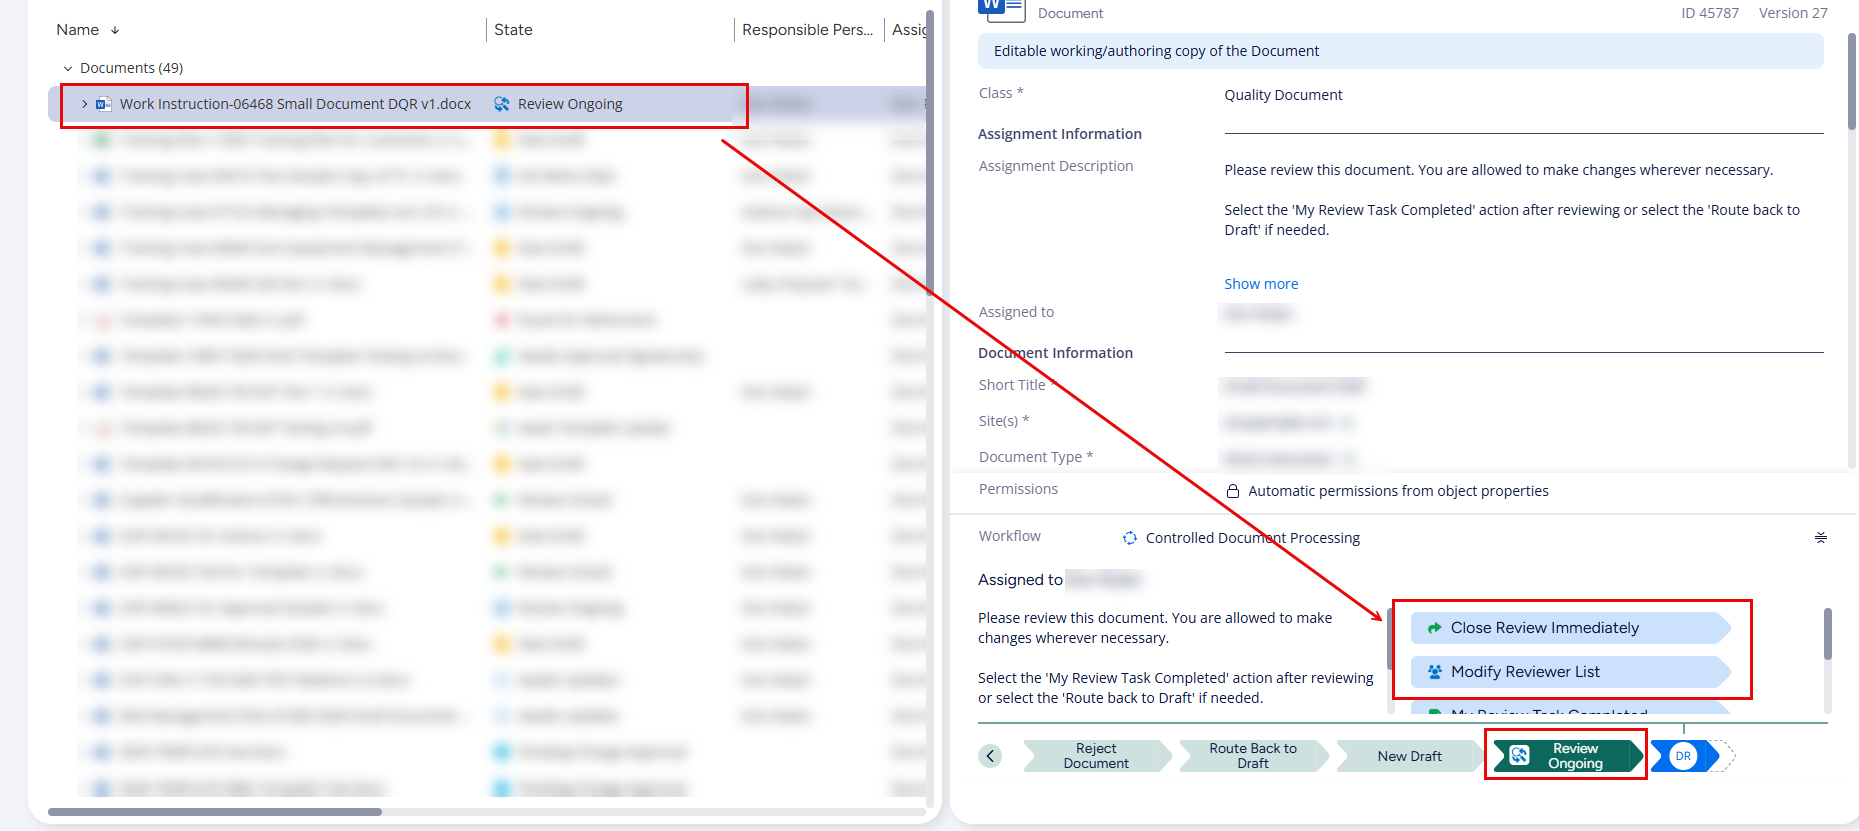
Step 4.1 – Close Review Immediately
If there are multiple reviewers assigned and one or more reviewer(s) cannot complete their task, the Responsible Person or Process Manager can end the review process without the need for all reviewers to press “My Review Task Completed”.
- Click on “Close Review Immediately” under State Transition
- This will require an electronic signature
- The document will be assigned back to the author and can move on to approval
Step 4.2 – Modify Reviewers List
When the document has been routed for a review, and the assigned reviewer(s) need to be changed, the Responsible Person can modify the reviewers list.
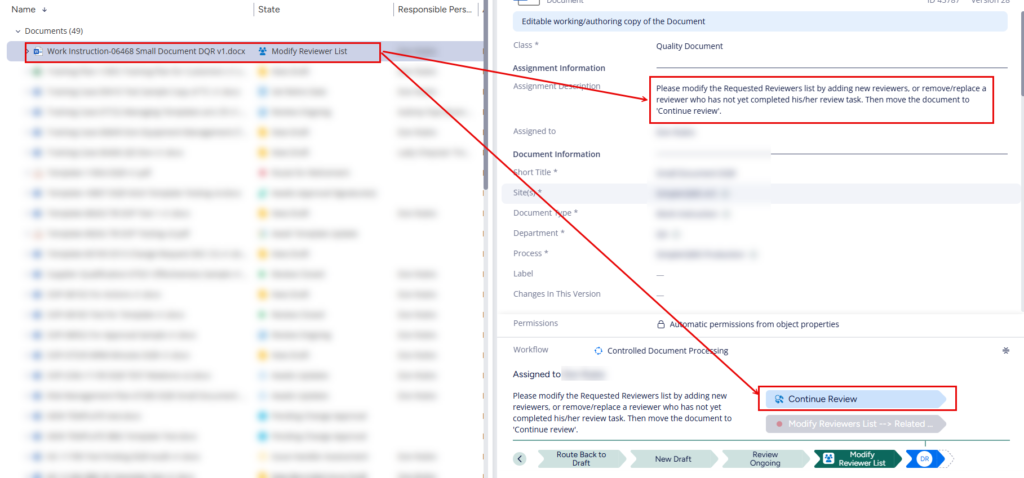
- Click on “Modify Reviewer List” under State Transition
- At this stage you can add other reviewer(s), remove, and reassign reviewer(s) on the metadata. You can see this highlighted on the Assignment Description.
- Once done, click on “Continue Review” under State Transition
Section 5: Reviewing the Quality Document
(Skip this section if no review is necessary)
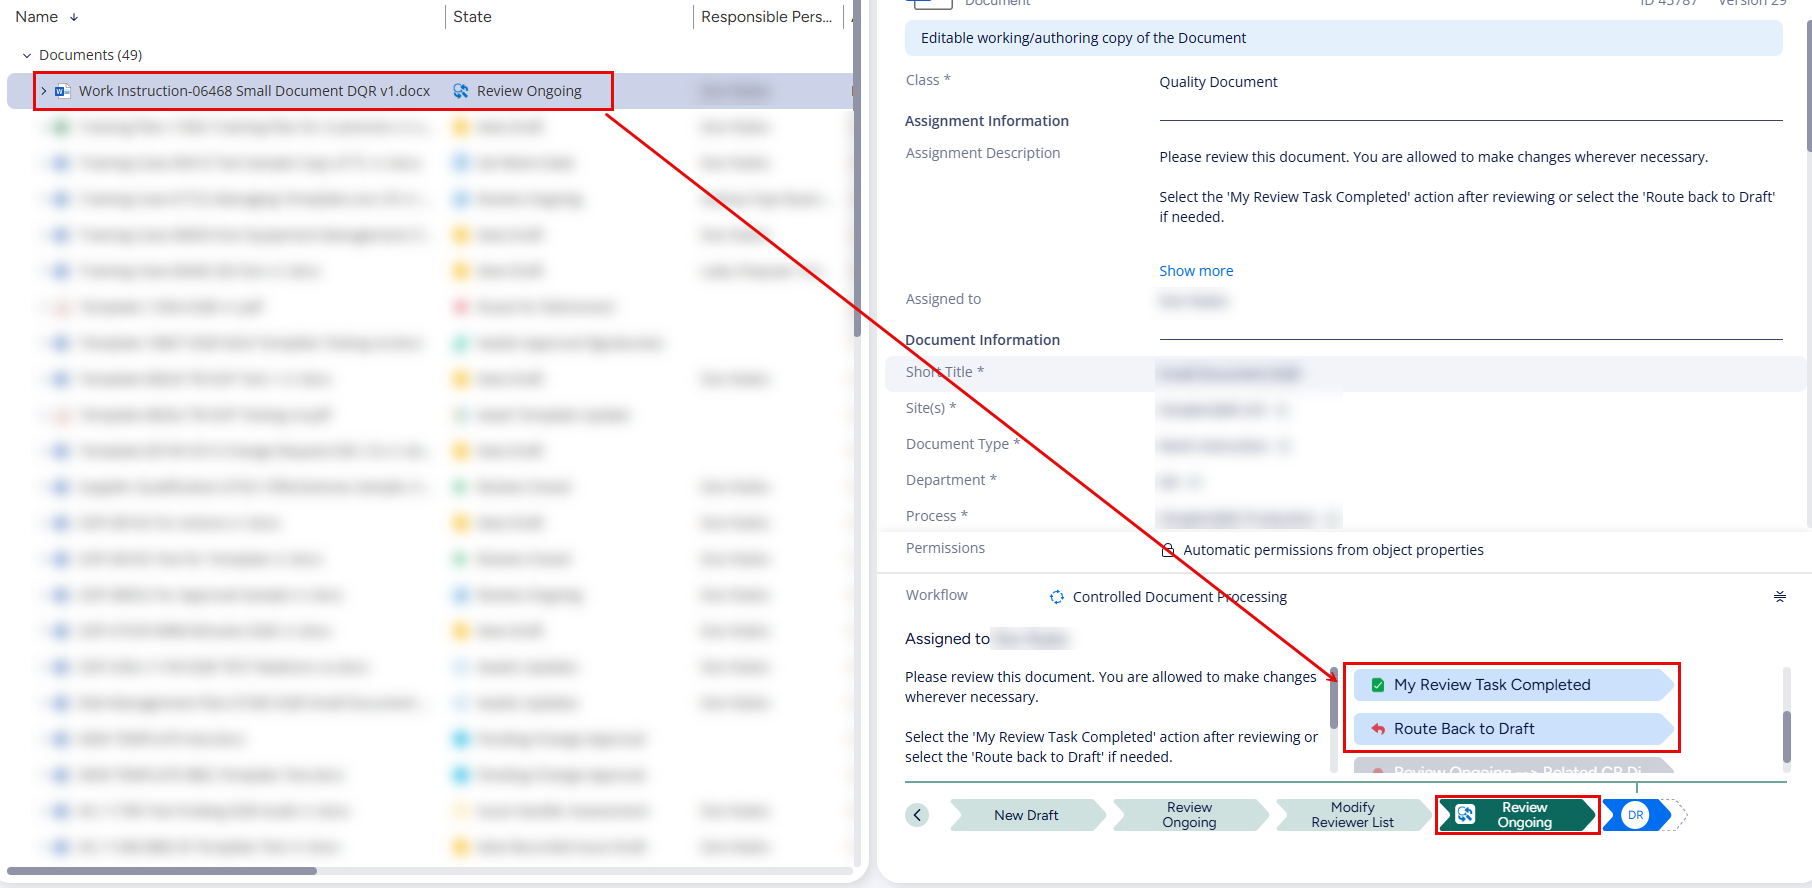
When the document has been routed for a review, it assigns to the document Reviewer and the State in the metadata is “Review Ongoing”.
- Check out the document, launches in Word (or other applications the document was initiated from).
- Review the document
- Document reviewer has the same level of access rights to the document as the author when it is on the “Review Ongoing” state
- Save and close the document. Check in to SimplerQMS.
- When the review has been completed, click on “My Review Task Completed” under State Transition if the number of modifications needed are acceptable
- If there are too many modifications needed after the review process, it is recommended to route the document back to draft by pressing “Route Back to Draft”
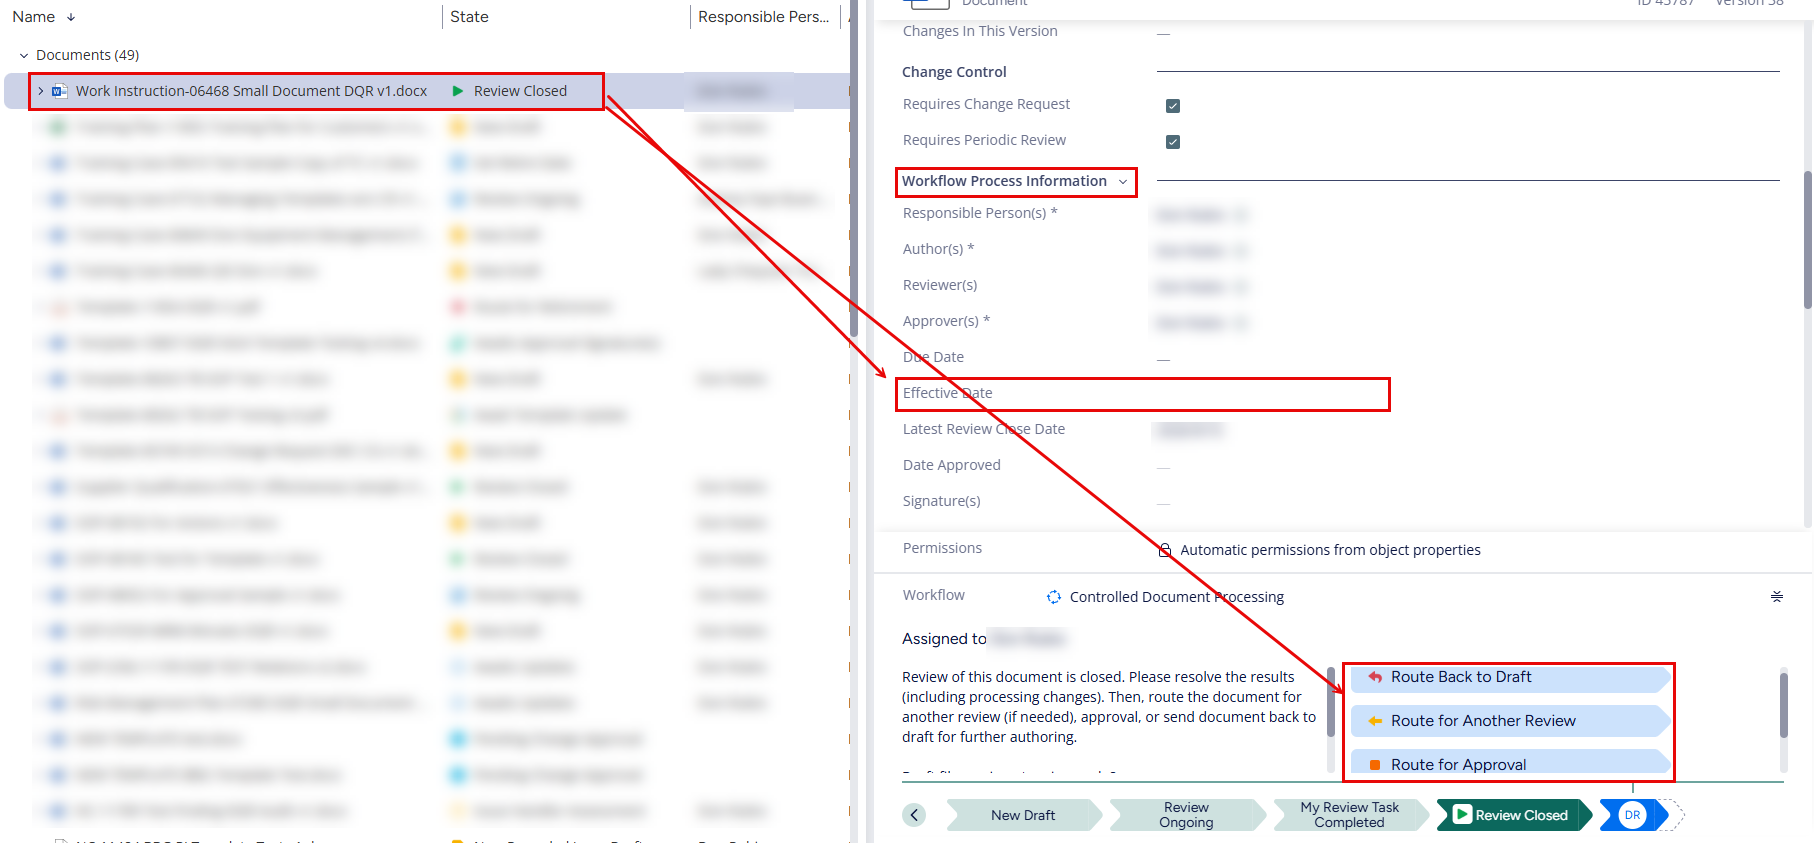
State should change to “Review Closed”

Section 6: Finalizing the Quality Document
Step 6.1 – Final draft of the Quality Document – Author
When the document has been reviewed, it assigns back to the author to finalize the drafting of the document and route it for approval.
- Check out the document, launches in Word (or other applications the template was initiated from).
- Write the final changes in the document.
- Save and close the document. Check in to SimplerQMS.
- Set the effective date in the metadata card (document cannot be routed for approval without the effective date).
- Under the State Transition, the author has the options to
- “Route Back to Draft” – if the author is not satisfied with the look of the document, they can restart the process from Section 3 by pressing this button
- “Route for Another Review” – if too many changes have been made in the document, it is recommended to send it for another review
- “Route for Approval” – to move forward with the document and proceed to Section 7
NOTE: If your document is controlled by a Change Request, it is not mandatory to set an effective date for the document before sending for approval, as the effective date of the Change Request will be carried over to the document once the CR has been closed. Additionally, if revision history is enabled for your document, filling out the revision history is required before routing it for approval.
Section 7: Approving or Rejecting the Quality Document
The document should now be assigned to the Approver(s) and the state is” Awaits Approval Signature(s)”. At this stage, no changes can be made on either the document or the metadata.
Step 7.1 – Approve the Quality Document – Approver
- Select the document and under State Transition click on “Approve Document”.
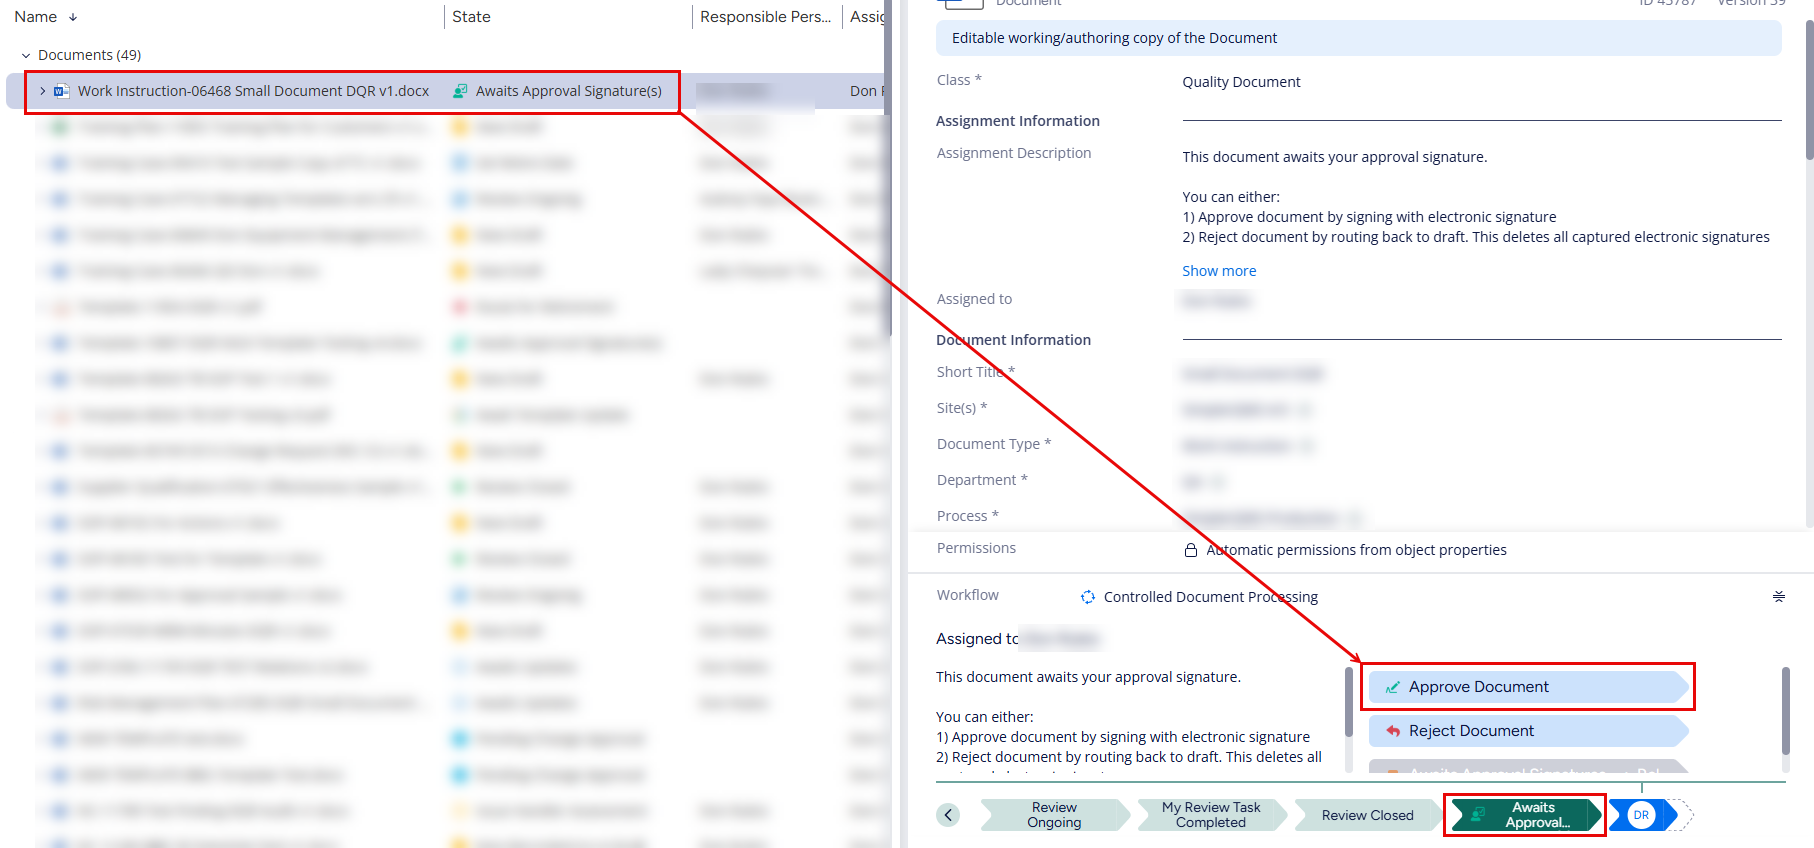
- Approve the quality document with your electronic signature using your SimplerQMS log-in and password
- If the Approver is not satisfied with the content or the layout of the document, they can reject the document which will go back to draft and the process from Section 3 starts all over again.
- In case of multiple approvers, it is enough if only one of them rejects the document for it to go back to draft and be reassigned to the author.
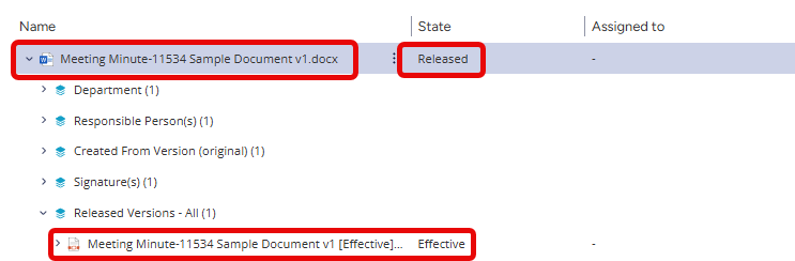
- If the effective date is set to be on the day of approval, the document will be released as a PDF and in state “Effective”.
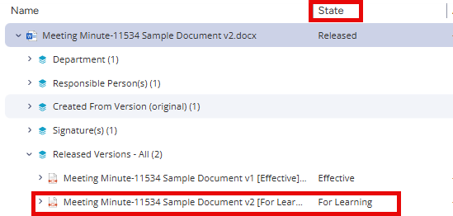
- If the effective date is set in the future, the working copy will be released but the PDF copy will be on the state “For Learning”. Proceed to Section 8.
NOTE: If your document is controlled by a Change Request, the document will be under the state “Awaits CR Approval”. You can now proceed with Implementation and Closure of the Change Request. Refer to Work Instruction: Managing Change Request, Section 6 and onwards. The document will become effective once the Entire Change Request has been approved and released.
Section 8: Making effective immediately – Responsible Person
(Skip this section if the effective date is not set in the future)
If the effective date of your document was set in the future, the PDF copy of the document will not be released until the effective date is reached. This will put the document in “For Learning” state.
The “For Learning” state allows the training manager to create a learning rule. Refer to Work Instruction: Training and Learning for further instructions about learning rules.
If the document is needed to be released earlier than the set effective date, the Responsible Person has the option to make the document effective immediately.
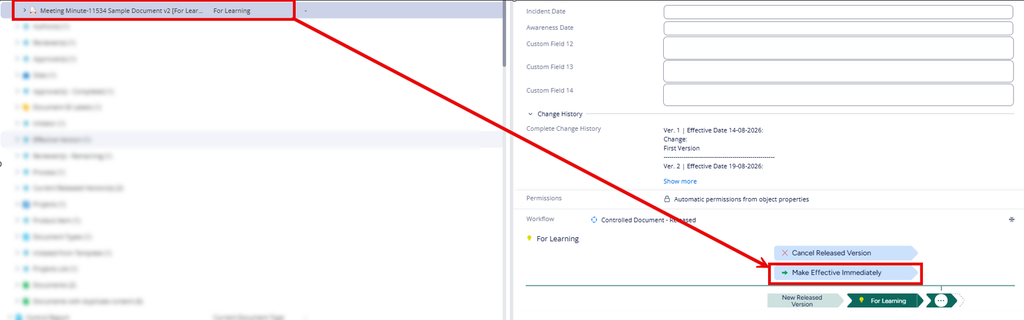
- Click onthe PDF version of the document. It should be on state “For Learning”.
- Under State Transition click on “Make Effective Immediately”
- Enter your electronic signature and then click OK.
- An “Exceptions” box is available to write an explanation as to why the document needs to be effective immediately.
- This will release the quality document as a PDF and in state “Effective”.
- The working copy of the document will keep the original effective date, but the released version will update to the date when it was made effective immediately.
Section 9: Routing for Update – Author / Responsible Person / Process Manager
These commands are available for the author, responsible person, and process manager.
- If the document needs to be updated to a new version, select the working copy (Word file) and under State Transition click on “Route for Updates”.
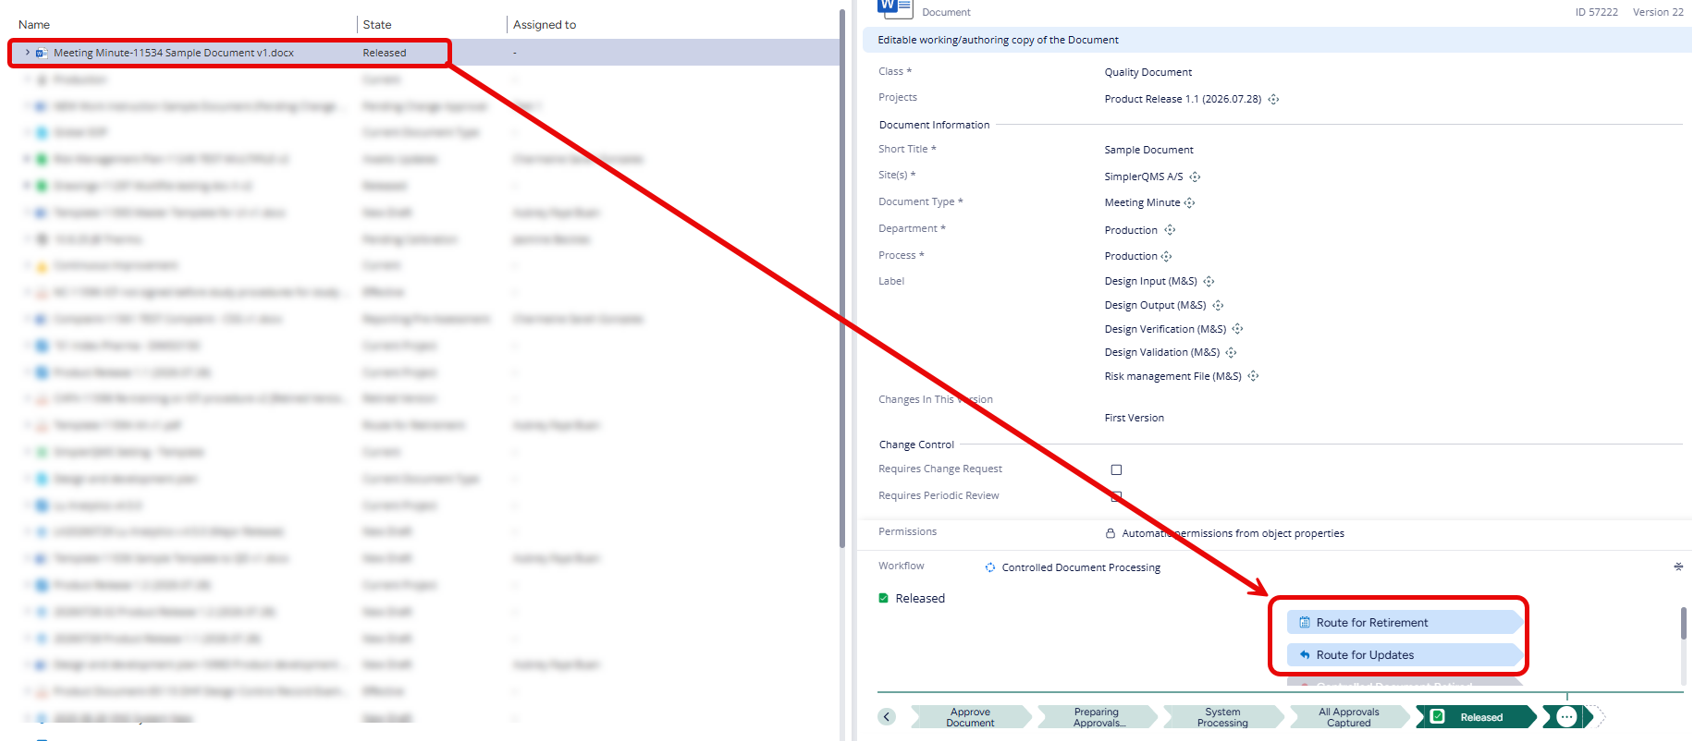
- The state should change to “Awaits Updates” and the title should update to include the next version number (e.g., v2)
- The document to update is assigned to the author. Go through the actions described in Section 3, 5, 6, and 7.
NOTE: If your document is controlled by a Change Request, updating it will require you to creat a new Change Request. You will need to go through the entire Change Request flow for an update. Editing the document will only become available once the Change Request Plan has been approved.
Furthermore, if revision history is enabled in the metadata card, altering the version history becomes mandatory when routing the document for approval.
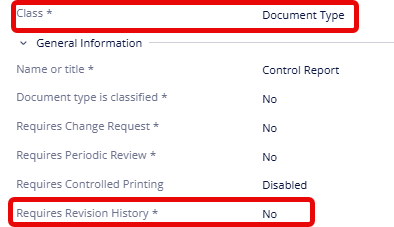
ONLY a Metadata Administrator can create and define the Document Type.
In this example, Control Report is the document type selected, which does not require Revision History.
With this, the “Changes in this version” field does not appear in the metadata card.
In this example, Meeting Minute is the document type selected, which requires a Revision History.
Since Revision History is required, ‘Changes in this version’ is a mandatory field before routing it for approval, as Revision history is enabled.
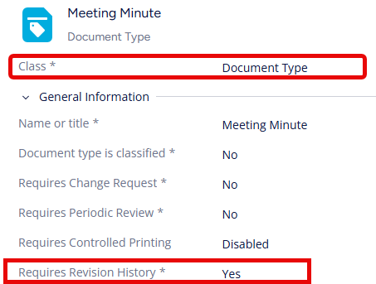
Since Revision History is required, ‘Changes in this version’ is a mandatory field before routing it for approval, as Revision history is enabled.
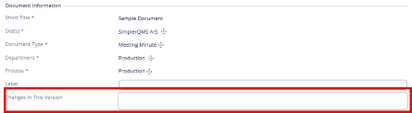
Once changes are recorded, the full Change History is stored in a metadata field and included in the released PDF document, appearing just before the signature page.

Section 10: Routing for Retirement – Responsible Person / Process Manager
- If the document needs to be retired, select the working copy (Word file) and under State Transition click on “Route for Retirement”.
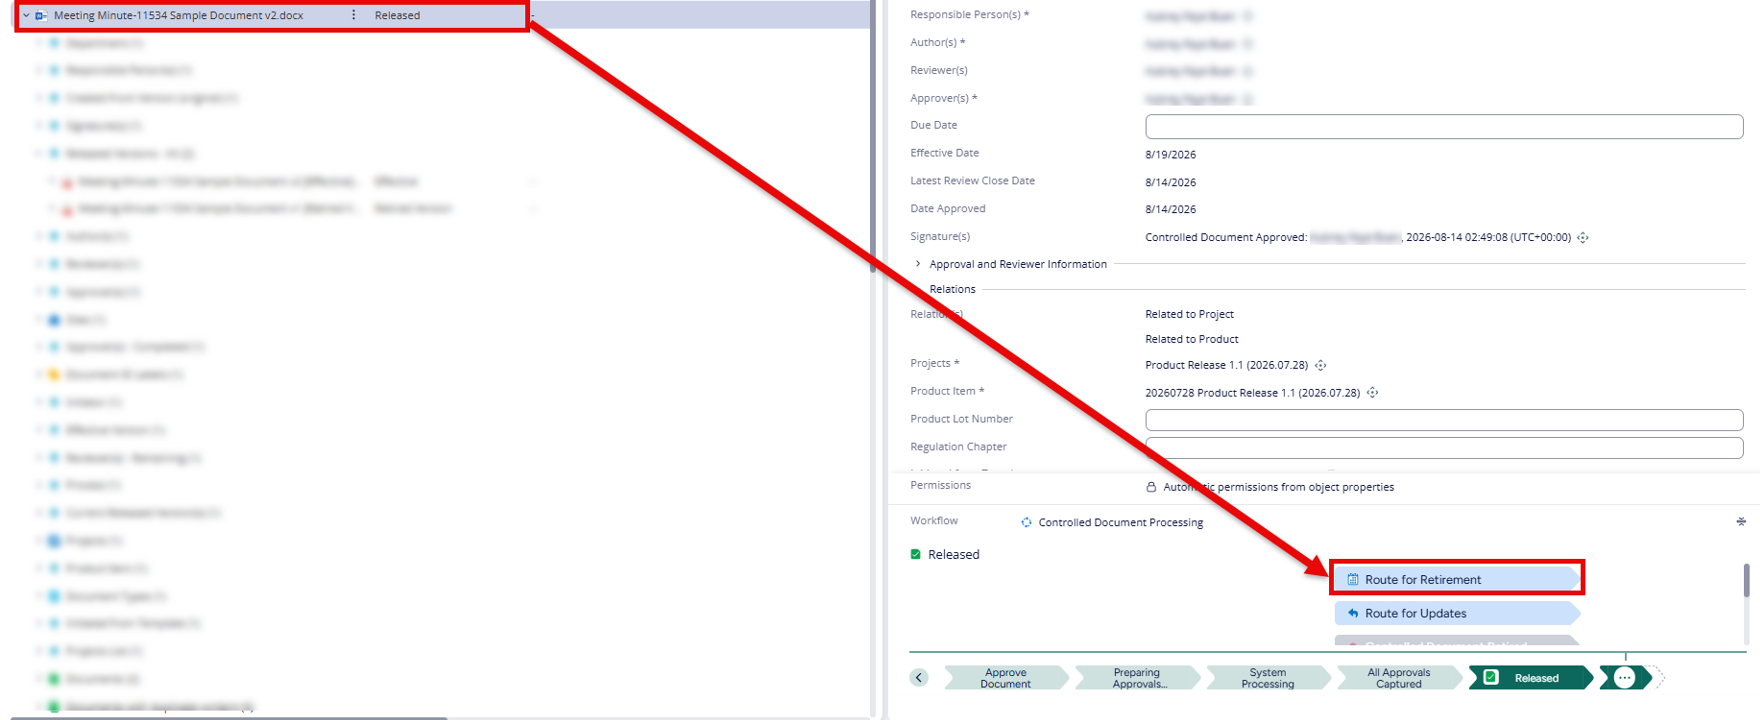
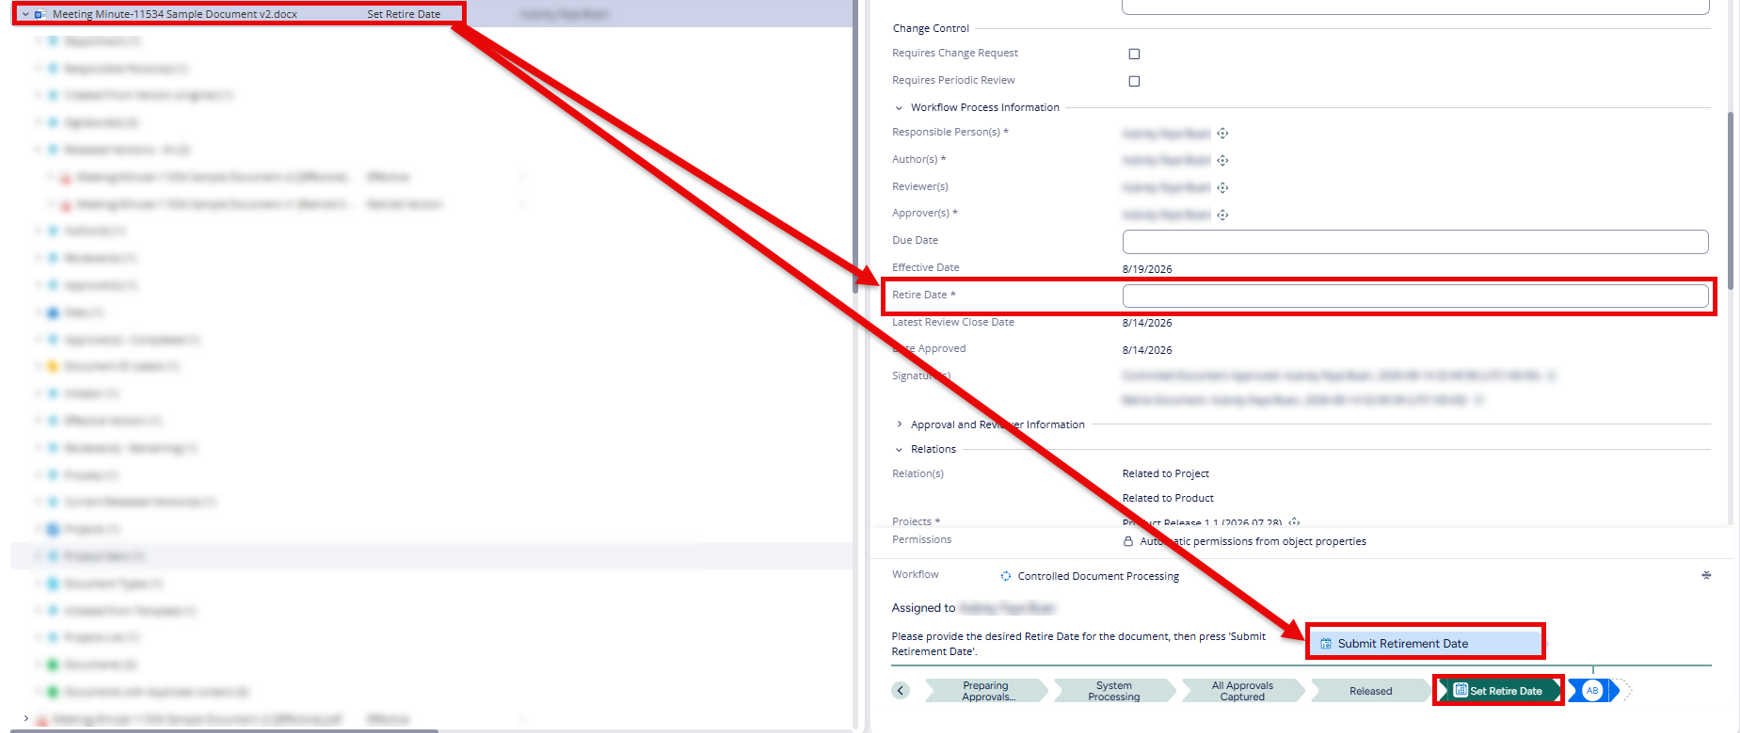
- A Retire Date will need to be entered in the metadata
- Click on Submit Retirement Date under State Transition.
- The state should change to “Document Retired”
NOTE: If your quality document is controlled by a Change Request, retiring it will require you to create a Retire Request. You will need to go through the entire Change Request flow for the retirement but will not need to process the quality document as the system will automatically move it to state “Controlled Document Retired” once the CR is approved.
