Purpose
Learn how to:
- Manage Product Item implementation in SimplerQMS with Change Request
- Create and manage Product Item Lots and Product Contact Persons
Expected Outcome
- Users are equipped to handle Change Requests for Product Items in SimplerQMS
- All new Product Items and Product Item updates are implemented by creating a Change Request
Prerequisites for all
- Must be logged in to SimplerQMS
- Must be a member of one of these ‘User Groups’ to view records:
- All internal and external users
- Must be a member of one of these ‘User Groups’ to create new records
- All Contributors
Prerequisites for creating Product Items
- Must be a member of one of these ‘User Groups’
- Product Manager
Prerequisites for creating Product Type
- Must be a member of one of these ‘User Groups’
- Metadata Administrator
Prerequisites for creating Change Request
- Must be a member of one of these ‘User Groups’:
- Change Manager
Section 1: Product Item requirements
Product Items created in SimplerQMS are always required to run under a Change Request. This has five implications:
- After a Product Item is created, it is not eleased until the Change Request process is complete.
- When Product Items are added to a Change Request for updates, their metadata fields are locked and cannot be edited directly. This ensures that all updates are controlled through Change Requests and prevents unauthorized modifications.
- If you to make significant changes to a Product Item, it is recommended that you retire the old Product Item and replace it with a new one. This approach is particularly relevant for extensive modifications, as it simplifies the update process and provides a clear version history.
- Product Update Action: Minor product updates, such as typo corrections or changes to the Product Type or Description, are made through this dedicated action, which strengthens control and approval of the type or description. Item must be linked to the Change Request, and the action is pre-populated with the existing product details for the assignee. The assignee then modifies the product values through the Action metadata card.
- Product Items can only be retired through a Change Request.
This Work Instruction describes how to create, update and retire Product Items, and how to manage Product Item Lots and Product Contact Persons. For the Change Request steps, refer to Work Instruction: Managing Change Request.
Section 2: Creating a Product Item – Product Manager
Step 2.1 – Create a Product Item
The person to create a Product Item in SimplerQMS must be a member of the Product Manager User Group.
To create a Product Item in SimplerQMS:
I. Click (+) Create and choose Product from the dropdown list
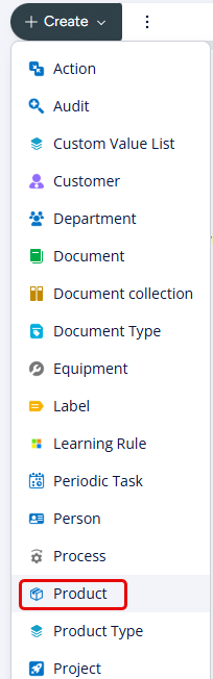
A Metadata card opens.
Step 2.2 – Fill in the Metadata Card
| Field name | Description | Note |
| *Class | To create a Product Item, set the value to “Product Item” | This option is only available to members of the Product Manager User Group. |
| *Product Item Number | A unique number assigned to the Product Item. | |
| *Product Item Title | The name of the Product Item | |
| *Site(s) | Site that the Product Item belongs to | |
| Product Type | Classifies Product Items by their stage or purpose in the manufacturing process, for example to support inventory management. | Members of the Metadata Administrator User Group can create new Product Types by clicking “Create + Product Type”. |
| Effective Date | Filled in automatically by the system when the Change Request that implements the Product Item is released. | |
| Retire Date | Filled in automatically by the system when the Change Request that implements the Product Item is released. | |
| Description | Optional field to describe the Product Item |
I. Click Create after filling in all required information in the metadata card.
II. The Product Item is created in the “New Draft” state.
To move your new Product Item forward, you must create a Change Request to control it. You can add the Product Item to a Change Request together with templates and documents. For instructions on how to do this, refer to Work Instruction: Managing Change Request in the Modern UI and follow Steps 1-7.
Alternatively, you can create a Change Request that controls only the Product Item, as described in Step 2.3. This option is only relevant when you introduce new Product Items.
Step 2.3 – Create Change Request to control Product Item Only – Change Manager
I. Select the new Product Item you want to move forward.
II. Under Actions, click on “Create Change Request to Update”
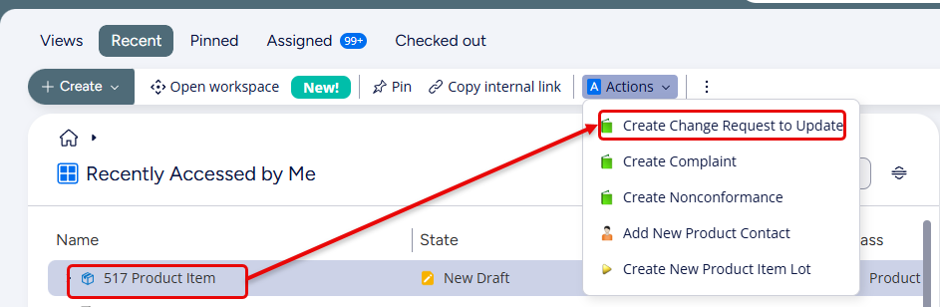
III. Choose the appropriate Change Request template and fill in the metadata card.
a. For an explanations of each field, please refer to Section 2.2 of Work Instruction: Managing Change Request.
The Change Type is automatically set to “New Change Request”, because you are creating the Change Request to introduce a new Product Item.
The Change Scope automatically includes the Product Item from which the Change Request was initiated. You can still expand the Change Scope to include other Product Items or other records.
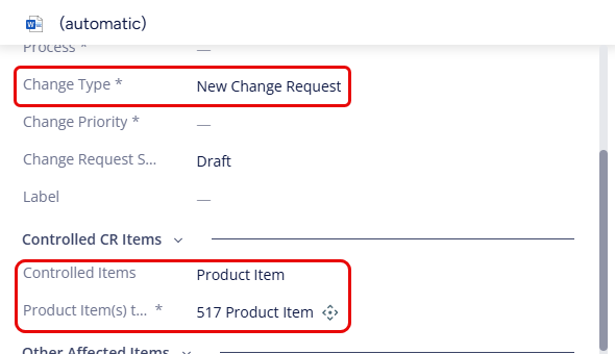
For instruction on how to process a Change Request refer to Work Instruction: Managing Change Request and follow Steps 3-7.
As the Change Request progresses from Plan to Implementation and Closure, the Product Item changes state to “Ready for Approval”. You do not need to take any action on the Product Item itself; simply continue with the Change Request.

When the Change Request is released, the Product Item also becomes effective, and its Effective Date field is automatically filled with the effective date of the Change Request.

Section 3: Updating a Product Item – Change Manager
Step 3.1 – Create Change Request to update Product Item Only – Change Manager
After a Product Item has been created in the system, you can no longer edit its metadata fields directly, even when it is included in a Change Request for update. To update Product Item information, create a Product Update Action related to the Change Request (see Step 3.2).
If the Product Item only needs to be referenced in the Change Request because its related documentation is being modified, add it through the Relations field. Only include Product Items as Controlled CR Items if the Product Item itself is being modified and requires a new effective date or a Product Update Action.
A released Product Item can be included in a Change Request for updates or for the creation of Product Item documents. You can initiate the Change Request directly from the Product Item by clicking “Create Change Request to Update” under Actions.
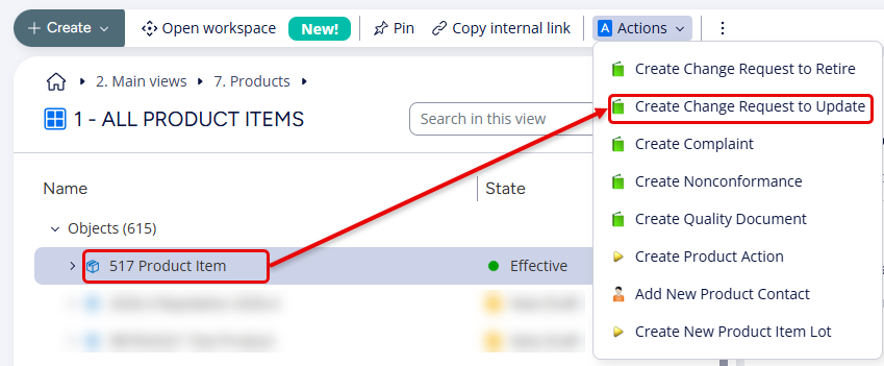
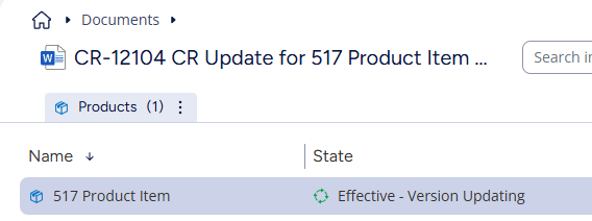
After a released Product Item is linked to a new Change Request, its state changes to “Effective – Version Updating”, but its metadata does not become editable. Any modification to the Product Item requires a Product Update Action.
Step 3.2 – Create Product Update Action
Product updates are managed through Change Requests to ensure controlled modifications and minimize the risk of unauthorized changes. Product Update Actions can be used to modify Product Item metadata as part of an approved Change Request, but only for minor adjustments like correcting typos or updating Descriptions or Product Type. If you change the title or number of a Product Item, thoroughly evaluate all related documentation to prevent inconsistencies and compliance risks.
Note: Updating existing product items through Product Update Actions is not recommended to manage version control, as it may introduce significant compliance risks, including loss of auditability, data inconsistencies, and regulatory breaches. To ensure clear traceability and compliance, always create new product items for each version change, rather than modifying existing ones.
To create a Product Update Action in SimplerQMS:
I. Locate the relevant Change Request
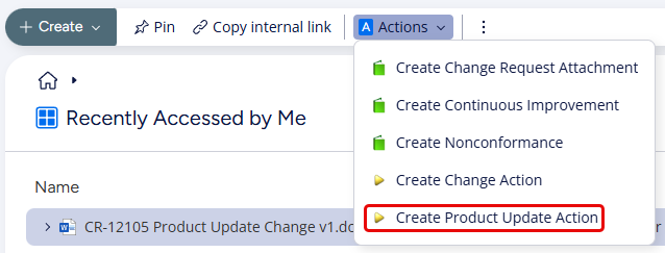
II. Under the “Actions” , click “Create Product Update Action”
III. Fill in the metadata card
| Field name | Description | Note |
| * Short Title | Product Update Action Name | |
| Action Description | A brief description of the product updates included in the action, based on the Change Request, so that the assignee knows what to change. | |
| Resolution | Optional field used to document the resolution or outcome of the action, especially if it’s related to a problem or issue. | This field can be filled in by the assignee before the action is completed. |
| Responsible Person | The person ultimately accountable for the completion of the action and its product updates. | Automatically populated with the user who creates the action. |
| Assignee(s) | One or more individuals tasked with carrying out the specific updates outlined in the action. | |
| * Mandatory for All | Indicates whether all assignees must complete their tasks before the action is considered complete. | If ‘Yes’ is selected, all users listed in the Assignee(s) field must complete the assignment. |
| * Requires e-signature | Specifies whetehr an electronic signature is required to close the action. | Set to ‘Yes’ for quality-criticial cases where the assignee must sign electronically. |
| * Site(s) | The specific site(s) where the product update will be applied. | Automatically populated. |
| Action Type | Identifies the type of action. Standard Action: Choose this option to create an assignmetn for users that is not related to specific objects. Product Update: Choose this option if you wish to make updates to a Product Item. | When you click “Create Product Update Action”, the “Product Update” option is selected automatically. |
| Reason for Rejection | Used to document the reason(s) if the action is rejected during the approval process. | Mandatory if the action is rejected. |
| Field name | Description | Note |
| *Change Request | The Change Request that this Product Update Action belongs to. | When you create the Product Update Action from Actions on the Change Request, the system links it to the Change Request Automatically. |
| *Product Item to Update | The Product Item that will be modified through this action. | This list is filtered to display only the relevant products item(s) related to the change request. |
| Field name | Description | Note |
| *Due Date | The date by which the Product Update Action must be completed. | |
| *Grace Period | Time allotted for finishing the action before the due date. | |
| *Grace Period Unit | The unit of time used for the Grace Period (for example, days). | |
IV. Click Create.
Note: The responsible person can edit all metadata except for the “Product Fields to Update” group.
Step 3.3 – Complete the Product Update Action
To complete the Product Update Action:
I. The assignee reviews the Change Request details to confirm which product updates are intended.
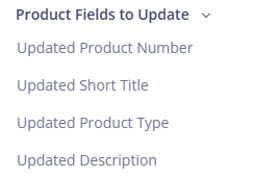
II. The assignee opens the “Product Fields to Update” group and makes the necessary changes based on the Change Request.
a. The “Product Fields to Update” group is pre-filled with the current values from the Product Item, which the assignee can edit:
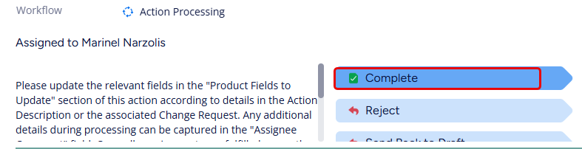
III. When all updates are done, the assignee marks the action as complete in the Workflow section.
Note: As an assignee, if you want to revert a field to the original Product Item value, clear the field. The original value will then be shown.
The Change Request can then be routed for review or approval. The Product Item(s) will only be released once the CR is released and will inherit a new effective date from the Change Request.
For instruction on how to process a Change Request refer to Work Instruction: Managing Change Request in the Modern UI and follow Steps 3-7.
Section 4: Retiring a Product Item – Change Manager
A Product Item can only be retired through a Change Request. To retire a Product Item, select it, click “Create Change Request to Retire” under Actions and complete the Change Request process for retirement. Alternatively, add the Product Item to an existing Change Request for retirement.
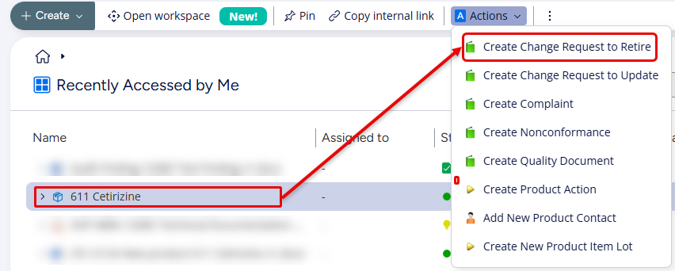
Refer to Work Instruction: Managing Change Requests Section 8.2 for a description of this process.
Section 5: Creating Product Item Lot – Product Manager / All Contributors
After a Product Item has been created, you can create Product Item Lots for it. To create a Product Item Lot, you must be a member of the All Contributors or Product Manager User Group.
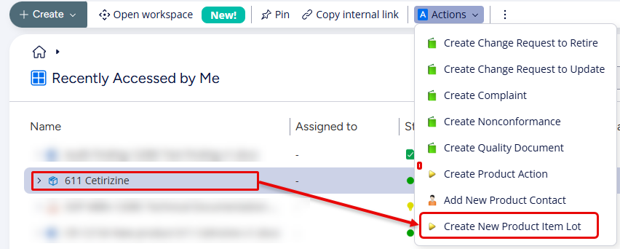
I. Select the Product Item that you would like to create the Product Item Lot number for.
II. Under Actions, click on “Create New Product Item Lot”.
III. In the metadata card, all values are populated automatically except “Lot Number or Serial Number”, “Product Lot Expiry Date” and “Description”. Type the Lot Number or Serial Number and, optionally, add a description.
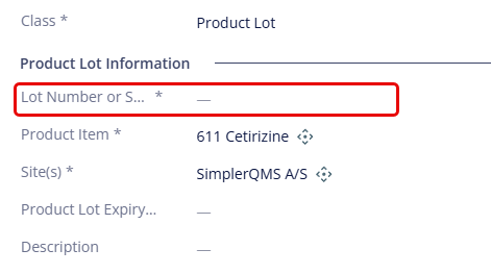
a. If the product lot has an expiry date, enter it in the “Product Lot Expiry Date” field. Section 7 describes what happens when the expiry date is reached.
IV. Click Create.
Note: A single Product Item can have more than one Product Item Lot. The Product Item name is also linked to the lot number.
Section 6: Making a Product Item Lot “Not Current” – Product Manager / All Contributors
When a Product Item Lot is no longer needed, you can move it to the “Not Current – Archive” state.
I. In the Browse window, on your Home Screen, open the “2. Main Views” view
II. Select “7. Products” and then the “6. Product Lots” view.
III. Choose the Product Item Lot that you want to archive.
IV. On the bottom right corner of the Metadata, in the Workflow section, click “Not Current – Archive”.
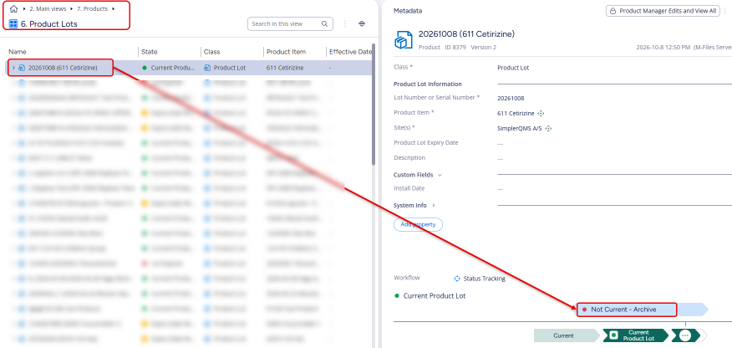
Archiving a Product Item Lot does not affect the Product Item.
Section 7: Expired Product Item Lot – Product Manager
When the expiry date of a Product Item Lot is reached, the lot moves to the “Expiry Date Reached” state and is assigned to the members of the Product Manager User Group:
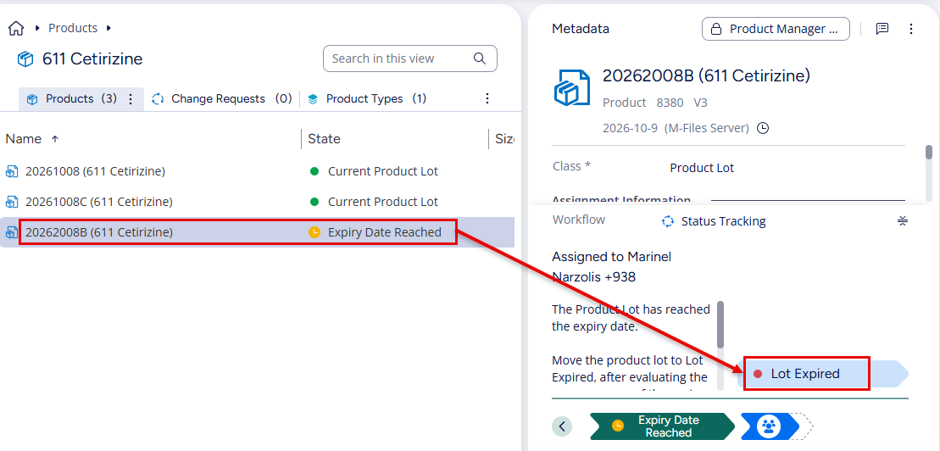
After handling the expired lot according to your procedures, Product Managers can move the lot to the “Lot Expired” state. This removes it from their “Assigned to me” view.
The lot can still be related to documentation after it has been moved to the “Lot Expired” state.
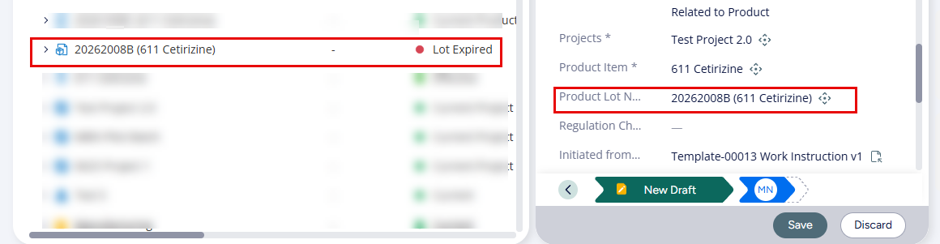
To prevent the expired lot from being related to documentation, make it Not Current by following the steps in Section 6.
Section 8: Creating a Product Contact Person – Product Manager
Step 8.1 – Add New Product Contact Person
I. Select the Product Item.
II. Click “Add New Product Contact” under Actions.
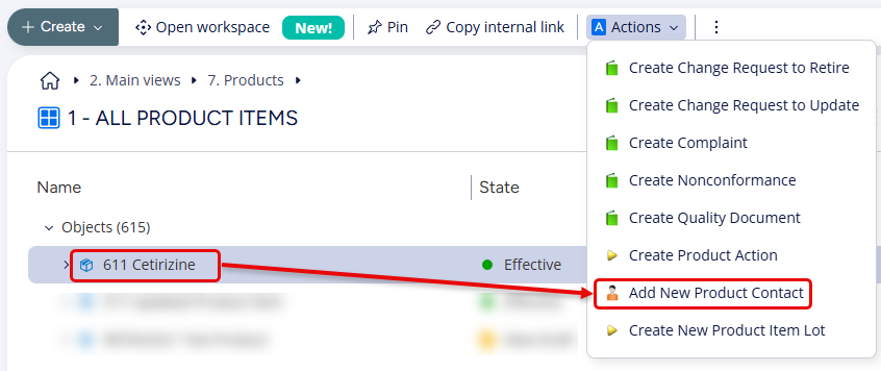
A Metadata card opens.
Step 8.2 – Fill out Metadata Card for the Product Contact Person
| Field name | Description | Note |
| *Class | Set to “Product Contact Person”. | |
| *Product Item | Automatically populated with the selected Product Item. | |
| *Site(s) | The site(s) the Product is related to | |
| Field name | Description | Note |
| *Responsible Person | The person responsible for the Contact | |
| *Contact Type | Define what type of relationship your organization has with the Product Contact Person. | |
| Department | The Department of the Contact. | This field is not linked to your internal department list. |
| *First Name | The First Name of the Contact | |
| *Last Name | The Last Name of the Contact | |
| Job Title | The Job Title of the Contact | |
| Phone | The phone number of the Contact | |
| Email Address | The email address of the Contact | |
| Address | Automatically compiled from the individual address fields of the Product Contact Person. | |
| Other Contact Info | Any additional contact details. |
III. Click Create.
