Purpose
Learn how to:
- Learn how to manage metadata in SimplerQMS
Expected Outcome
- Users are equipped to handle all aspects of creating and maintaining metadata in SimplerQMS
Prerequisites for all
- Must be logged in to SimplerQMS
Prerequisites for creating and configuring metadata
- Must be a member of one of these ‘User Groups’:
- Metadata Administrator
Section 1: Masterdata Views
Metadata is used to further describe documents and objects in SimplerQMS. Together, we refer to them as Masterdata.
All documents in SimplerQMS are tagged with metadata. Metadata makes it easier to find the information you are looking for in the vault. Regardless of how documents are saved to SimplerQMS, you must always fill in the metadata card before saving the document.
All users can view the metadata, but only members of the Metadata Administrator User Group can create, edit and configure the metadata structure.
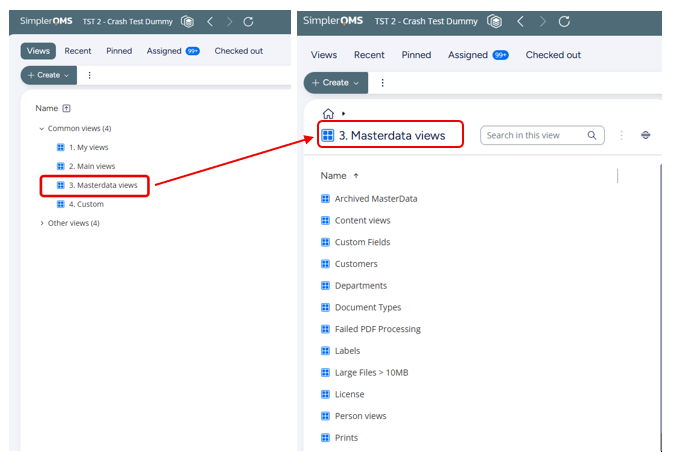
To access the list of masterdata in SimplerQMS:
- On the Home screen, under Common Views, double–click “3. Masterdata Views”.
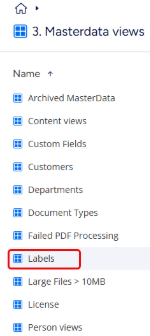
- This view shows all the sub-views that help you navigate the metadata.
Section 2: Custom Fields
Custom Fields let you tailor and organize data according to your organization’s specific needs, giving you a high degree of flexibility in defining the information captured on metadata cards. The Metadata Administrator can customize the settings. This feature is optional and does not affect any metadata cards unless it is enabled.
Step 2.1- Enabling Custom Field Configurations
To start configuring custom fields, navigate to 3. Masterdata Views > Custom Fields > Custom Field Configurations > All Custom Field Configurations.
- Open the configuration that matches the class you want to set up custom fields for.
- In the Workflow section, click Draft Configuration.

- The metadata card becomes editable. Fill in the metadata card with the settings you want for the selected target class.
| Part 1: General Information | ||
| Field name | Description | Note |
| Class* | Set by default to Custom Field. | |
| Target Class* | Set by default to the target class that this configuration applies to. | |
| Responsible Person | To delegate the configuration to another user, name them as the Responsible Person. This person will have access to the configuration and can make changes, just like the Metadata Administrator. | The user must be a member of the All Contributors User Group and have a Named or Concurrent license. |
- By default, all unused configurations are collapsed on the metadata card. Click the arrow beside the field you want to configure to start editing it.

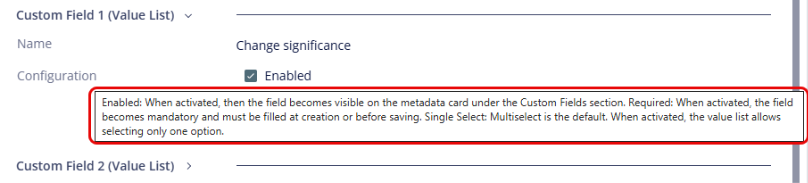
- The following descriptions are also shown in the system as tooltips when you hover over the fields.
| Part 2: Custom Fields | ||
| Field name | Description | Note |
| Name | The entered name will be shown on the metadata card as the property label. Use a clear and concise name that reflects the purpose or desired content. | |
| Custom Field 1-5 (Value Lists) Configuration | Enabled: When activated, the property becomes visible on the metadata card of the target class, under the Custom Properties section. Required: When activated, the property becomes mandatory for the target class and must be filled in at creation or before saving. Single Select: By default, Value List fields are multi-select, so more than one value can be selected in the dropdown. When this setting is activated, only one value can be selected. | |
| Custom Field 6-9 (Number) Configuration | Enabled: When activated, the property becomes visible on the metadata card of the target class, under the Custom Properties section. Required: When activated, the property becomes mandatory for the target class and must be filled in at creation or before saving. | |
| Custom Field 10-11 (Date) Configuration | ||
| Custom Field 12-15 (Text) Configuration | Enabled: When activated, the property becomes visible on the metadata card of the target class, under the Custom Properties section. Required: When activated, the property becomes mandatory for the target class and must be filled in at creation or before saving. Short Text: By default, Text fields are Long Text, allowing up to 10,000 characters over multiple lines. When this setting is activated, the text is limited to 100 characters on a single line. | |
- Once the configuration is completed, click Save in the bottom right corner of the metadata card.
- To activate the configuration, click Activate Configuration in the Workflow section.

When the configuration reaches the Active Configuration state, the newly enabled custom fields are available on the metadata card of the target class.

Step 2.2- Using Custom Fields
Once custom fields are configured and activated, they appear on the standard metadata card in a section called “Custom Fields”. There, they can be used like standard metadata and filled in according to your needs:
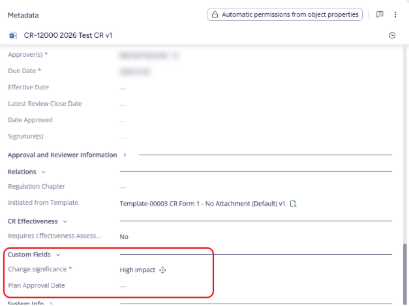
Who can edit the fields depends on the permissions of the target object. For example, if you have enabled custom fields for Suppliers, they can be used by members of the Purchasing User Group and by any Responsible Persons named on the Supplier metadata card.
Objects created before the Custom Fields were configured also inherit the new configuration. This means that when these objects are updated, any fields marked as mandatory also become mandatory for the pre-existing data.
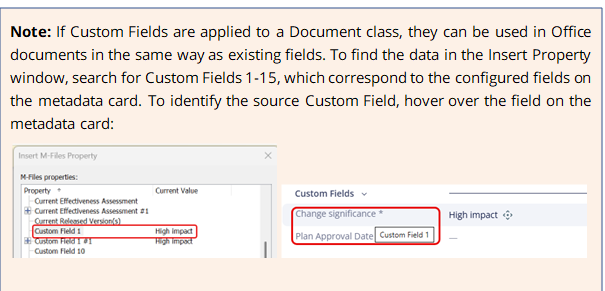
Step 2.3- Changing or Emptying Custom Field Configurations
To avoid data confusion, SimplerQMS strongly advises against emptying configurations or reusing Custom Fields that have been used before. Take care when disabling custom properties that were previously enabled on records.
Disabling a custom field or fully emptying the configuration will not remove the applied data within it on the target objects. This historical data may cause confusion because it may no longer match the current context. If the field will be reused in the future, clean out all existing data first.
Before changing Custom Fields that are already in use, we recommend that you navigate to Masterdata Views > Custom Fields > Objects with Content in Custom Fields > Custom Field you want to deactivate or reuse. Here, you can evaluate the impact of the change on your existing data and start any necessary cleanup.
When you have thoroughly analyzed the impact of the Custom Field changes, you can make the changes.
You can make changes to individual fields. You can also empty a configuration completely if Custom Fields should no longer be used for a specific target class.
- Navigate to the configuration you want to empty. If it is not in draft, set it to the Draft Configuration state.
- Click Empty Configuration.

An electronic signature is required.
- After emptying the configuration, click Activate Configuration to apply the changes.

Step 2.4- Creating Custom Value Lists
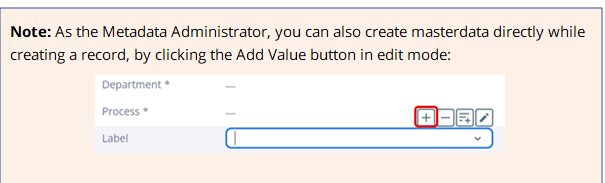
When Custom Fields 1-5 are enabled, you must create Custom Value Lists before they can be used. You can do this either with the Create (+) button or directly on a metadata card with the Add Value [+] button when the field is in use. Only the Metadata Administrator can create new Custom Value Lists.
The Create button is most useful when you want to set up a complete value list immediately after configuring the Custom Fields. Creating values while the field is in use helps minimize errors, because each value is created directly in the value list where it will be used.
Option 1: Create Button
- When you use the Create button, you must specify the class you are creating a value list for. This should correspond to the Custom Value where you want the dropdown options to appear:
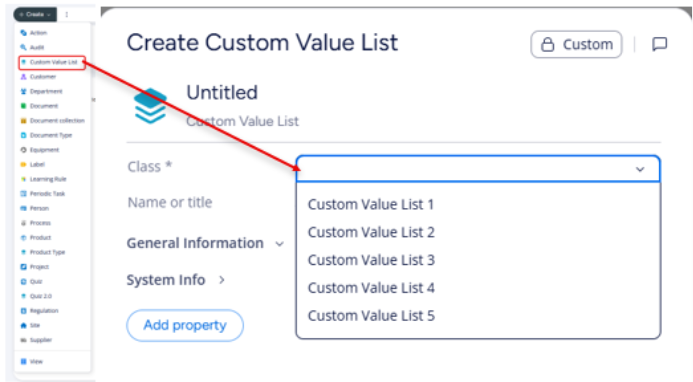
- Fill in the rest of the metadata card.
Option 2: Add Field on Target Class Metadata Card
- When you create a new value from within an active value list, the metadata card automatically selects the Class where the value will be used.
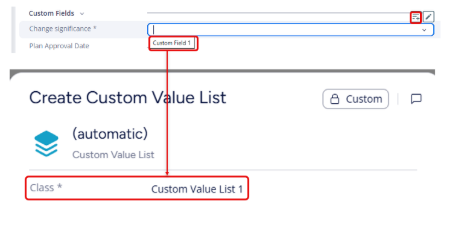
- Fill in the rest of the metadata card.
| Part 1: General Information | ||
| Field name | Description | Note |
| Value Name* | The entered name is shown as the value in the dropdown. Use a clear and concise name that reflects the desired content. | |
| Target Class(es)* | The class or classes where the value should be visible. If you select multiple target classes, the value is shared across all of them within the same Custom Value. | The availability of a value is determined by the combination of its Class and Target Classes. |
| Responsible Person | To delegate the management of the value to another user, name them as the Responsible Person. This person can retire the value and make changes, just like the Metadata Administrator. | The user must be a member of the All Contributors User Group and have a Named or Concurrent license. |
| Description | Optional description of the value. | |
The values you create are available for selection in the dropdown:
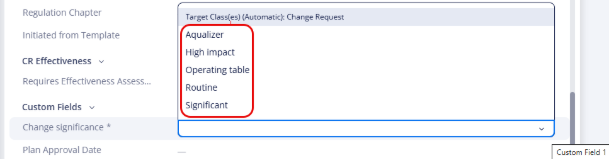
Step 2.5- Managing Custom Values
Metadata Administrators and assigned Responsible Persons have full control over the values created for each Custom Value List. For an overview of all custom values created for a specific Custom Field and target class, navigate to Masterdata Views > Custom Fields > Custom Value Lists > By Value List & Target Class.
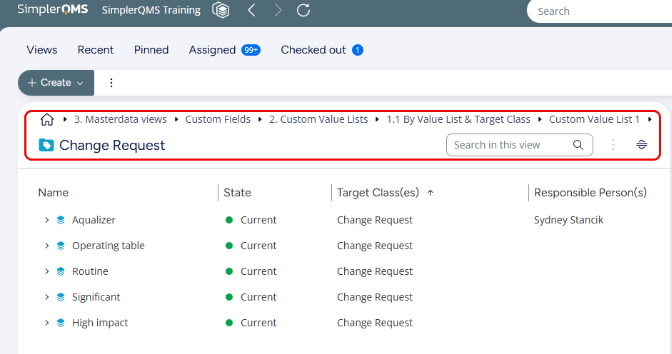

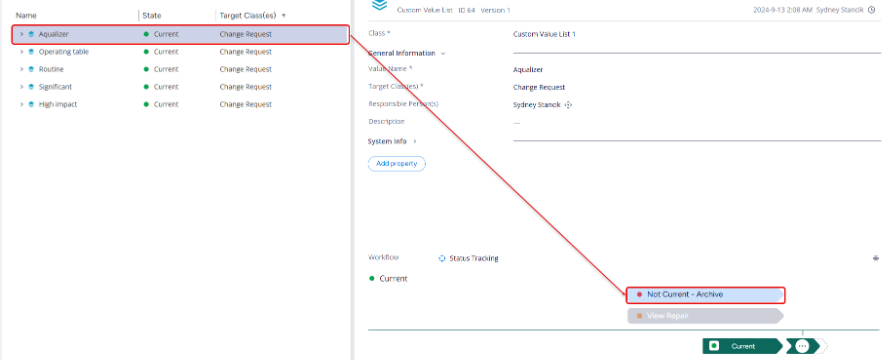
Values that are no longer used can be set to Not Current, which removes them as options in the dropdown. A disabled value is not removed from metadata cards where it has already been used.
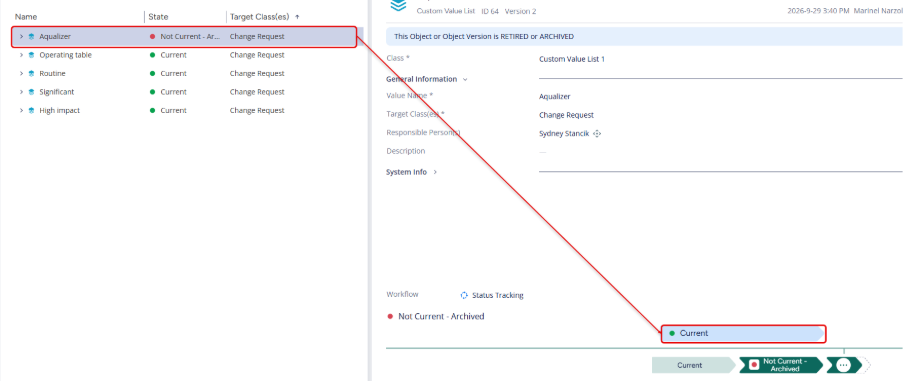
Previously disabled values can be reinstated by setting them to Current again:
Section 3: Managing Departments
Departments in SimplerQMS correspond to the departments in your organizational chart. Each document implemented in the system should specify the department it belongs to.
Step 3.1- Create a New Department
To create a Department in SimplerQMS:
- Click the Create (+) button and click Department in the drop-down list.
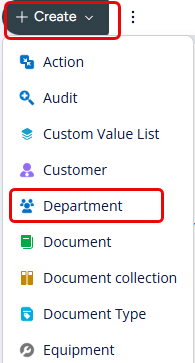
A metadata card opens.
Step 3.2- Fill out metadata
| Part 1: General Information | ||
| Field name | Description | Note |
| Class* | Set by default to Department. | |
| Name or title* | Type in the name of the department. | |
| Owning Department | If this department belongs under another department, select the owning department. | |
| Description | Optionally, type in a description of the department. | |
Click Create after filling in all required information in the metadata card.
The state of the department in the metadata card should now be “Current”.
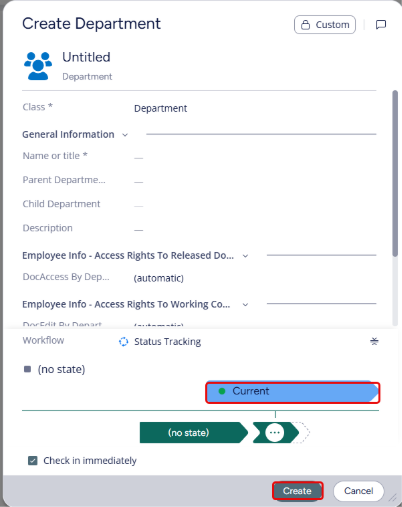

Step 3.3- Edit an existing Department
- In the Browse window, on your Home Screen, open the “3. Masterdata Views” view.
- Select “Departments” and then choose the department you want to edit. The metadata card appears on the right side of the screen.
- As a Metadata Administrator, you have edit access to all fields. Click the value you want to change and edit it.
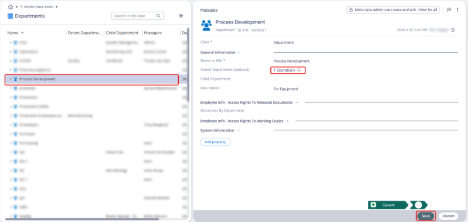
- Click Save after editing.
Step 3.4- Make a Department “Not Current”
When a department is no longer needed or no longer active, the Metadata Administrator can move it to the “Not Current – Archive” state.
- In the Browse window, on your Home Screen, open the “3. Masterdata Views” view.
- Select “Departments” and then choose the department you want to archive.
- In the bottom right corner of the metadata card, in the Workflow section, click “Not Current – Archive”.
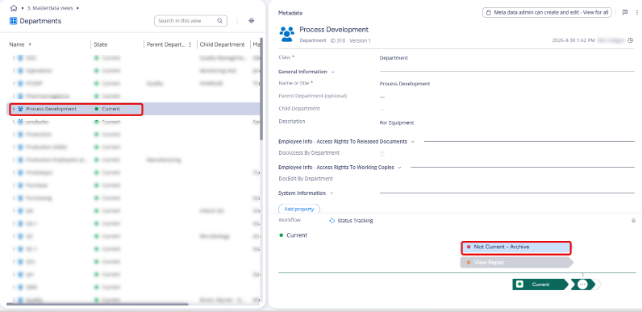
When the department is no longer current, all documents associated with it remain active and visible to users. When you update these documents or create new ones, select an active department.
Section 4: Managing Document Types
- Document Types have several functions in SimplerQMS and play an important role in managing your system. The document type you choose in the metadata of a document becomes part of the document name that the system generates, together with the unique ID and the Short Title you specify.
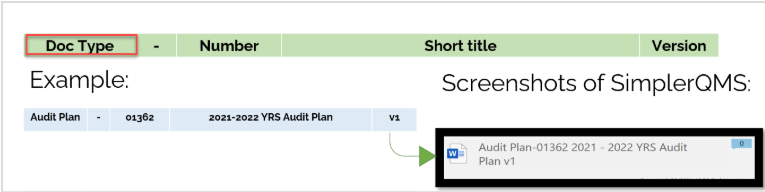
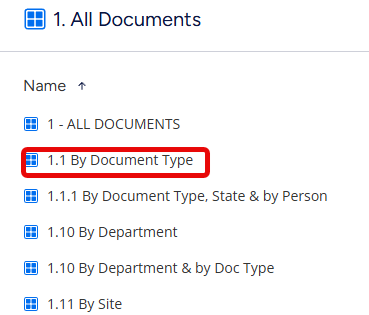
- You can also filter documents by Document Type. In the “All Documents” view, choose “By Document Type” (among other grouping options) to see documents grouped by their Document Type.
- The settings of a document type control important properties of all documents that use it:
- Document Type – Classified
- If you set this value to Yes, all documents that use this document type are only accessible to users who have specifically been given access to the document type.
- This is the highest restriction level for documents: unless they are given permission, users cannot see documents that use this document type. The exception is a person who is related to the document through the Relations field.
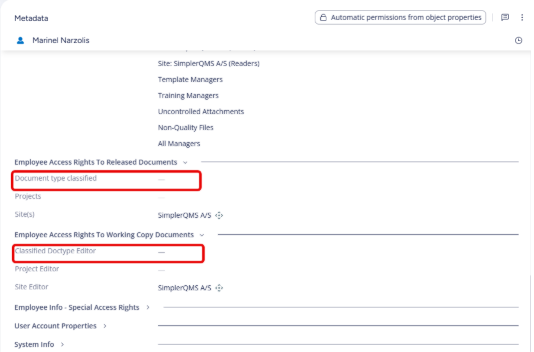
- To give access to a Classified Document Type, open the person’s record in the system. In the “Employee Access Rights to Released Documents” and “Employee Access Rights to Working Copy Documents” sections, enter the Classified Document Types the user should have access to in the fields “Document type classified” and “Classified Doctype Editor”.
- Document Requires Change Request
- This value controls whether documents of this type require a Change Request before processing. To read more, refer to Work Instruction: Managing Quality Documents.
- Document Requires Periodic Review
- This value controls whether a periodic review is generated automatically for documents of this type after they are created. To learn more about periodic reviews, refer to Work Instruction: Actions, Periodic Tasks and Reminder Rules.
- Requires Controlled Printing
- This value controls whether documents of this type can only be printed through the controlled printing feature. This value can only be edited if the global controlled printing settings are enabled for Quality Documents. Refer to WI: Controlled Printing to learn more.
- To enable or disable the global Controlled Printing settings, contact the SimplerQMS team.
- Requires Revision History
- If enabled, users must fill in the “Changes in This Version” field before sending documents of this type for approval, so that the details of the latest changes are captured.
- The full Change History is stored in a metadata field and included in the released PDF document, just before the signature page.
- To read more, refer to Work Instruction: Working with SimplerQMS / M-Files.

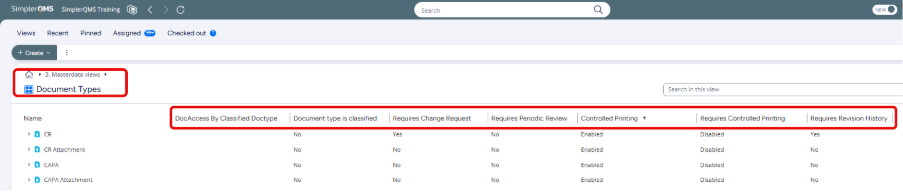
To have a full overview of all your document type settings, navigate to the document type views: 3. Masterdata Views > Document Types
Step 4.1- Create a New Document Type
To create a Document Type in SimplerQMS:
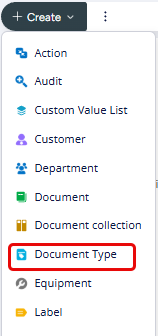
Click the Create (+) button and click Document Type in the drop-down list.
A metadata card opens.
Step 4.2- Fill out metadata
| Part 1: General Information | ||
| Field name | Description | Note |
| Class* | Set by default to Document Type. | |
| Name or title* | Type in the name of the document type. | |
| Document Type is Classified* | Select Yes or No to define whether the document type is for classified documents. | |
| Requires Change Request* | Select Yes or No to define whether documents of this type require a Change Request. | |
| Requires Periodic Review* | Select Yes or No to define whether documents of this type require a periodic review. | |
| Requires Revision History* | Select Yes or No to define whether a revision history must be tracked for documents of this type. | Refer to Section 19 of WI: Working with SimplerQMS/M-Files |
| Requires Controlled Printing* | Set to Disabled by default if the controlled printing module is disabled. Select Enabled or Disabled to control whether documents of this type can only be printed through controlled printing. | Refer to WI: Controlled Printing |
| Description | Optionally, type in a description of the document type. | |
- Click Create after filling in all required information in the metadata card.
- Click OK when you see the following message: “With the selected permissions, you will not have permission-change access to this object. Continue?”
The state of the document type in the metadata card should now be “Current Document Type”.
Step 4.3- Update an existing Document Type
- In the Browse window, on your Home Screen, open the “3. Masterdata Views” view. Select “Document Types” and then choose the document type you want to edit.
- As a Metadata Administrator, click “Update Document Type” in the Workflow section in the lower right corner.
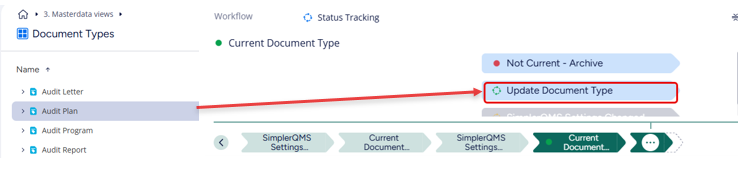
- The metadata card on the right side of the screen becomes editable, and you can make your changes. Click Save after editing.
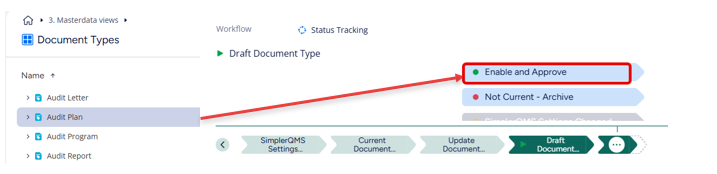
- To apply the new settings, click “Enable and Approve Settings” in the Workflow section.
Step 4.4- Make a Document Type “Not Current”
When a document type is no longer needed or no longer active, the Metadata Administrator can move it to the “Not Current – Archive” state.
- In the Browse window, on your Home Screen, open the “3. Masterdata Views” view.
- Select “Document Types” and then choose the document type you want to archive.
- In the bottom right corner of the metadata card, in the Workflow section, click “Not Current – Archive”.
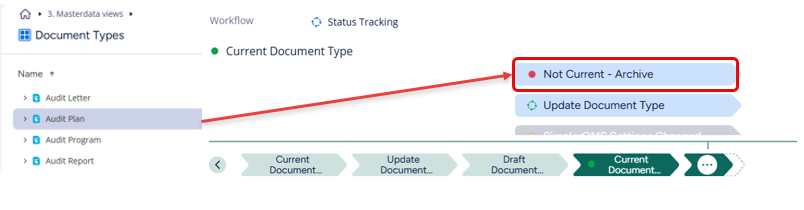
When the document type is no longer current, all documents associated with it remain active and visible to users. When you update these documents or create new ones, select an active document type.
Section 5: Managing Labels
Labels are used for navigation and to build a file hierarchy. By including records in Labels, you can create a clearer file structure. For example, you can create a label titled “Design History File” and include all your DHF documentation in it.
Labels are also often associated with Project Management in SimplerQMS. Refer to Section 3 of Work Instruction: Managing Projects and Labels.
Step 5.1- Create a New Label
To create a Label in SimplerQMS:
Click the Create (+) button, then click Label in the drop-down list.
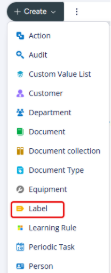
A metadata card opens.

Step 5.2- Fill out metadata
| Part 1: General Information | ||
| Field name | Description | Note |
| Class* | Set by default to Label. | |
| Name or title* | Type in the name of the label. | |
| Responsible Person* | Select the Responsible Person (RP) of the label. This does not give the selected user additional access rights. | |
| Description | Optionally, type in a description of the label. | |
| Parent Label | To create a sub-label, relate your label to a parent label in this field. | |
| Child Label | Automatically lists all child labels that have been related to this label. | |
| Description | Optionally, type in a description of the label. | |
- Click Create after filling in all required information in the metadata card.
The state of the label in the metadata card should now be “Current”.

Step 5.3- Edit an existing Label
- In the Browse window, on your Home Screen, open the “3. Masterdata Views” view.
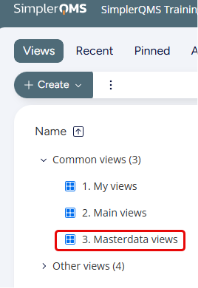
- Select “Labels” and then choose the label you want to edit. The metadata card appears on the right side of the screen.
- As a Metadata Administrator, you have edit access to all fields. Click the value you want to change and edit it.
- Click Save after editing.

Step 5.4- Make a label “Not Current”
When a label is no longer needed or no longer active, the Metadata Administrator can move it to the “Not Current – Archive” state.
- In the Browse window, on your Home Screen, open the “3. Masterdata Views” view.
- Select “Labels” and then choose the label you want to archive.
- In the bottom right corner of the metadata card, in the Workflow section, click “Not Current – Archive”.
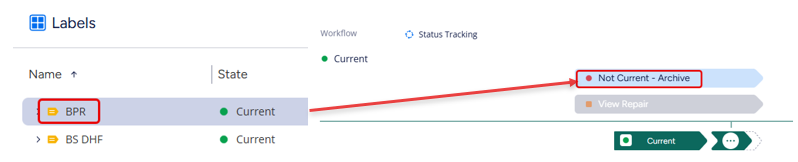
When the label is no longer current, all documents associated with it remain active and visible to users. When you update these documents or create new ones, select an active label.
Section 6: Managing Persons – Human Resources
Person records are used to give specific persons (employees) ownership of, and access rights to, documents and records.
Persons can ONLY be created in Microsoft Entra ID (formerly Azure Active Directory). They are then synchronized to SimplerQMS, where you can manage their other details.
Step 6.1- Update an existing Person record
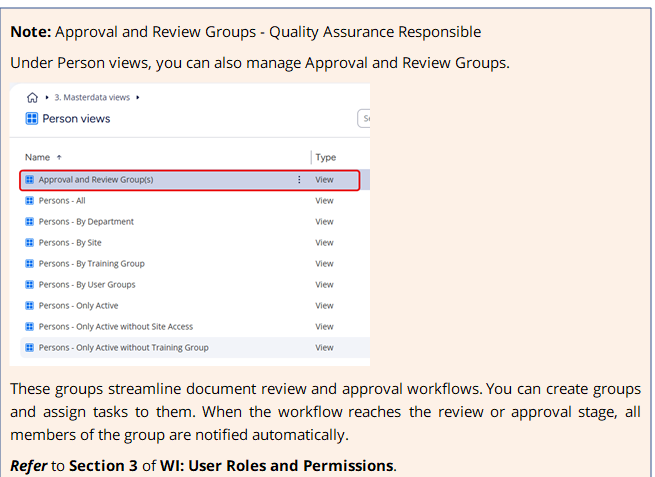
Only members of the Human Resources User Group can edit the metadata of a person. They can edit the employee’s access rights to released and working copy documents, and the employee’s information card – most importantly, assigning or removing the job roles used for setting up learning rules.
- In the Browse window, on your Home Screen, open the “3. Masterdata Views” view.
- Select “Person views”, then the relevant category (for example, Persons – All), and then choose the person record you want to edit. The metadata card appears on the right side of the screen.
- Edit the relevant fields:
| Part 1: Employee Information | ||
| Field name | Description | Note |
| Class | Set by default to Employee. | |
| License Type | Automatically set from the license assigned to the employee (user). | |
| First name | The first name of the employee. | |
| Last name | The last name of the employee. | |
| Job title | The employee’s job title. | |
| Training Group | The training group assigned to the user. It is used for assigning training records. | For further details, refer to WI: Training & Learning |
| Supervisor | The employee’s supervisor. This must be an active user in the system. | |
| Other Contact Info | Any other contact details. | |
| Phone | Add information if necessary. | |
| Fax | Add information if necessary. | |
| Address Street Name | Add information if necessary. | |
| Address Postal Code | Add information if necessary. | |
| Address City | Add information if necessary. | |
| Country | We recommend adding the country, as this can refresh the synchronization of the Microsoft Entra ID information to M-Files. | |
| Part 2: User groups (System-wide Roles) | ||
| Field name | Description | Note |
| User groups | The list of user groups assigned to the employee in Microsoft Entra ID. | This section cannot be edited, as it is synchronized with the directory. |
| Part 3: Employee Access Rights to Released Documents | ||
| Field name | Description | Note |
| Document type classified | The dropdown lists all the document types that have been classified. 1st Access Restriction Priority: The user will have access to all current and future documents related to this classified document type. | For further information, refer to Section 4 |
| Projects | The dropdown lists all the projects that have been created in the system. 2nd Access Restriction Priority: The user will have access to all current and future documents related to this project. Only applies if the document is not in scope for Priority 1. | For further information, refer to Section 9 |
| Site(s) | (Mandatory) – to give full access to all released documents The dropdown lists all the sites that have been created in the system. 3rd Access Restriction Priority: The user will have access to all current and future documents related to this site. Only applies if the document is not in scope for Priority 1 or 2. | For further information, refer to Section 11 |
| Department | The dropdown lists all the departments that have been created in the system. 3rd Access Restriction Priority: The user will have access to all current and future documents related to this department. Only applies if the document is not in scope for Priority 1 or 2. | For further information, refer to Section 3 |
| Part 4: Employee Access Rights to Working Copy Documents | ||
| Field name | Description | Note |
| Classified Doctype Editor | The dropdown lists all the document types that have been classified. 1st Access Restriction Priority: The user will have access to all current and future documents related to this classified document type. | For further information, refer to Section 4 |
| Project Editor | The dropdown lists all the projects that have been created in the system. 2nd Access Restriction Priority: The user will have access to all current and future documents related to this project. Only applies if the document is not in scope for Priority 1. | For further information, refer to Section 9 |
| Department Editor | The dropdown lists all the departments that have been created in the system. 3rd Access Restriction Priority: The user will have access to all current and future documents related to this department. Only applies if the document is not in scope for Priority 1 or 2. | For further information, refer to Section 3 |
| Site Editor | (Mandatory) – to give full access to all working copy documents The dropdown lists all the sites that have been created in the system. 3rd Access Restriction Priority: The user will have access to all current and future documents related to this site. Only applies if the document is not in scope for Priority 1 or 2. | For further information, refer to Section 11 |
Click Save after adding or editing the employee’s information.
Step 6.2- Change Person’s status
When a user is created in Microsoft Entra ID, their default status is Current. Members of the Human Resources User Group can change this status.
Reasons to change a person’s status from Current:
- When the person is unavailable, for example on a long leave of absence
- When the person is unavailable and cannot acknowledge or sign training records
- When the person is no longer part of the company
- In the Browse window, on your Home Screen, open the “3. Masterdata Views” view.
- Select “Person views”, then the right category you are looking for (e.g. Persons – All) and then choose the person record you want to edit.
- In the Workflow section, click either “Former Employee” or “Unavailable”.

Former Employee – When an employee is set to Former Employee, the user may also have been deleted from Microsoft Entra ID. If you want to keep all employee records, even for people who are no longer part of the company, keep them as Former Employee. No further actions will apply to them.
Unavailable – The “Unavailable” status lets you mark an employee as temporarily unavailable for training assignments while keeping their user account active in the system. This is useful for situations such as a leave of absence or other extended absence.
When an employee is set to “Unavailable”:
- Training assignments: No new training records are assigned to the user.
- A “Leave End Date” field appears on the employee’s metadata card. On the Leave End Date, the system automatically changes the user’s status back to “Current”, so no manual update is needed when the employee returns.
- If the employee returns before the Leave End Date, remember to set their status back to “Current” so that they receive new training assignments.
- If the employee’s return is delayed, update the Leave End Date, so that the automatic status change does not trigger unintended training assignments.
Former Employees and Unavailable users cannot be assigned roles on future documents until they are made Current again.
Section 7: Managing Processes
Processes are defined by your organization, based on the regulations you follow. All documents created in the system should have a process assigned to them.
When you create a process, the assigned Process Manager gets additional permissions on all records in that process:
- A Process Manager can implement a template without a Change Request. Refer to Work Instruction: Managing Templates
- When a released document is in the “For Learning” state, the Process Manager can make the document effective immediately.
- When a released document is in the “For Learning” state, the Process Manager can cancel the released version.
- When a document is in the “Review Ongoing” state, the Process Manager can modify the list of reviewers or close the review immediately.
- When a document that does not require a Change Request is released and effective, the Process Manager can route the document for updates or set a retire date. Refer to Work Instruction: Managing Quality Documents

Step 7.1- Create a New Process
To create a Process in SimplerQMS:
Click the Create (+) button and click Process in the drop-down list.
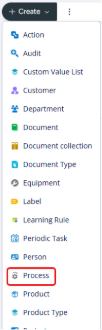
A metadata card opens.

Step 7.2- Fill out metadata
| Part 1: General Information | ||
| Field name | Description | Note |
| Class* | Set by default to Main Process. | |
| Name or title* | Type in the name of the process. | |
| Managers* | Select the Process Manager who manages the process. | Keep in mind that this person will have additional permissions system-wide. |
| Description | Optionally, type in a description of the process. | |
| Owning Main Process | If applicable, select a parent process. | |
Click Create after filling in all required information in the metadata card.
The state of the process in the metadata card should now be “Current”.
Step 7.3- Edit an existing Process
- In the Browse window, on your Home Screen, open the “3. Masterdata Views” view.
- Select “Processes” and then choose the process you want to edit. The metadata card appears on the right side of the screen.
- As a Metadata Administrator, you have edit access to all fields. Click the value you want to change and edit it.
- Click Save after editing.
Step 7.4- Make a Process “Not Current”
When a process is no longer needed or no longer active, the Metadata Administrator can move it to the “Not Current – Archive” state.
- In the Browse window, on your Home Screen, open the “3. Masterdata Views” view.
- Select “Processes” and then choose the process you want to archive.
- In the Workflow section, click “Not Current – Archive”.

When the process is no longer current, all documents associated with it remain active and visible to users. When you update these documents or create new ones, select an active process.
Section 8: Managing Product Types
Product Types let you classify Product Items by their stage or purpose in the manufacturing process, so that your data is better organized. You can create custom classifications to fit your specific needs.
Step 8.1- Create a New Product Type
To create a Product Type in SimplerQMS:
Click the Create (+) button and click Product Type in the drop-down list.
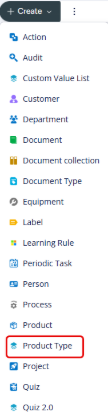
A metadata card opens.
Step 8.2- Fill out metadata
| Part 1: General Information | ||
| Field name | Description | Note |
| Class* | Set by default to Product Type. | |
| Name or title* | Type in the name of the Product Type. | |
| Responsible Person | Optionally, assign a person responsible for managing this Product Type (for example, a product manager or an engineer). | |
| Description | Provide a detailed description of the product type and its purpose in the manufacturing process. This helps others understand the specific products categorized under this type. | |
Click Create after filling in all required information in the metadata card.
The state of the Product Type in the metadata card should now be “Current”.
Step 8.3- Edit an existing Product Type
- In the Browse window, on your Home Screen, open the “3. Masterdata Views” view.
- Select “Product Type” and then choose the Product Type you want to edit. The metadata card appears on the right side of the screen.
- As a Metadata Administrator, you have edit access to all fields. Click the value you want to change and edit it.
- Click Save after editing.
Step 8.4- Make a Product Type “Not Current”
When a Product Type is no longer needed or no longer active, the Metadata Administrator can move it to the “Not Current – Archive” state.
- In the Browse window, on your Home Screen, open the “3. Masterdata Views” view.
- Select “Product Type” and then choose the Product Type you want to archive.
- In the Workflow section, click “Not Current – Archive”.

Section 9: Managing Projects
Projects in SimplerQMS are mainly used to manage design and development documentation. They also help you filter labels for technical documentation.
Step 9.1- Create a New Project
To create a Project in SimplerQMS:
Click the Create (+) button and click Project in the drop-down list.
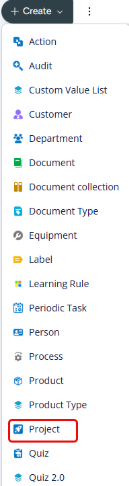
A metadata card opens.
Step 9.2- Fill out metadata
| Part 1: General Information | ||
| Field name | Description | Note |
| Class* | Set by default to Project. | |
| Owning Project | If applicable, select the parent project. | |
| Name or title* | Type in the name of the project. | |
| Site(s)* | Select the site the project belongs to. | |
| Responsible Person* | Select the Responsible Person (RP) of the project. This does not give the selected user additional access rights. | |
| Description* | Type in a description of the project. | |
Click Create after filling in all required information in the metadata card.
The state of the Project on the metadata should be “Current”.
Step 9.3- Assigning Access Rights to Private Projects
If a project is set to Private, only authorized users can access its documentation. Permissions for private projects are managed through the Project Metadata Card. To grant access to a private project:
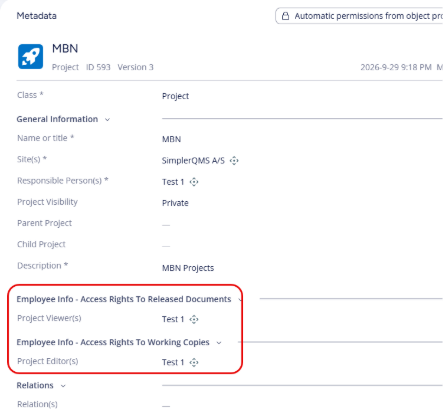
- Navigate to Employee Info – Access Rights to Released Documents and Working Copies
- Expand the section to change the access settings.
- Select the user who needs access to the working copy documents and released documents of the project.
- Click Save
Step 9.4- Edit an existing Project
- In the Browse window, on your Home Screen, open the “3. Masterdata Views” view.
- Select “Projects” and then choose the project you want to edit. The metadata card appears on the right side of the screen.
- As a Metadata Administrator, you have edit access to all fields. Click the value you want to change and edit it.
- Click Save after editing.
Step 9.5- Make a Project Private or Public
Project visibility controls who can access all documentation within a project. By default, all projects are set to Private, meaning only users with assigned project permissions can access them.
By changing the visibility, administrators can quickly adjust access to all documents in the project.
- Choose the project you want to update.
- On the lower right side of the screen, in the Workflow section, select one of the following:
- Set Project to Public – allows access to all users within the relevant Site or Department.
- Set Project to Private – restricts access to users with specific project permissions.
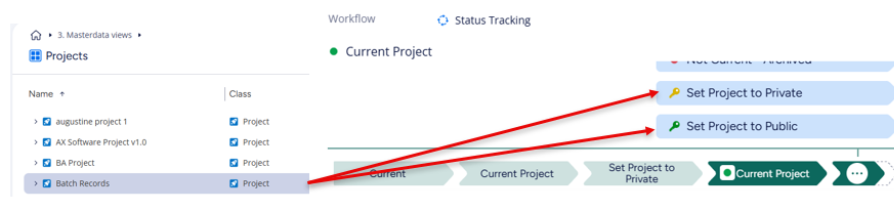
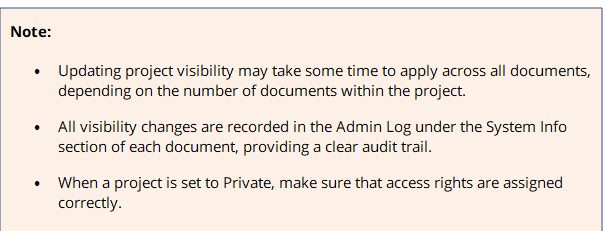
- Confirm the change as prompted.

Step 9.6- Make a Project “Not Current”
When a project is no longer needed or no longer active, the Metadata Administrator can move it to the “Not Current – Archive” state.
- In the Browse window, on your Home Screen, open the “3. Masterdata Views” view.
- Select “Projects” and then choose the project you want to archive.
- In the Workflow section, click “Not Current – Archive”.
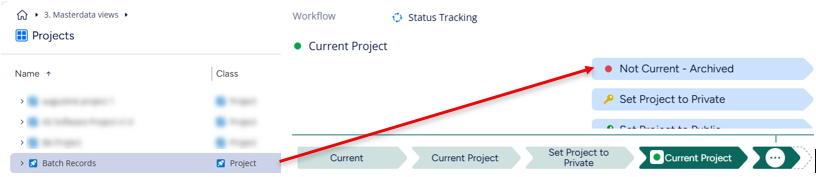
When the project is no longer current, all documents associated with it remain active and visible to users. When you update these documents or create new ones, select an active project.
Section 10: Recorded Issue Types
The Metadata Administrator can edit Recorded Issue Types. Changes affect the workflow of the recorded issues that use them.
- Open 3. Masterdata Views and select Recorded Issue Types.
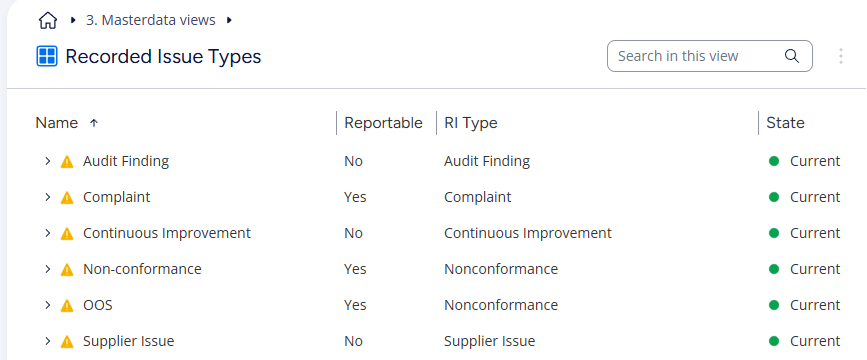
For more information on how to work with Recorded Issues, refer to WI: Recorded Issues and CAPAs
Step 10.1- Changing Recorded Issue Type Settings
The metadata card of a Recorded Issue Type contains the following fields:
| Part 1: General Information | ||
| Field name | Description | Note |
| Class* | Set by default to Recorded Issue Type. | |
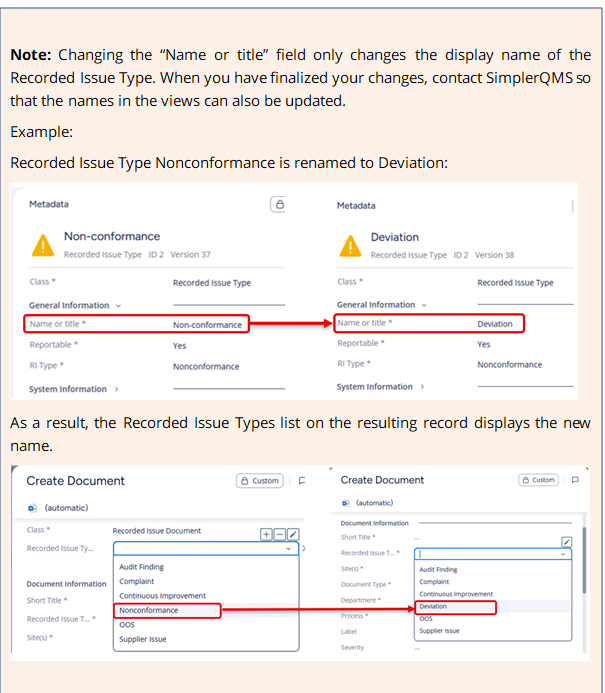
| Name or title* | The display name of the Recorded Issue Type. Changing it does not change the RI Type, only the name that the recorded issue is displayed with. | |
| Reportable* | If you choose Yes, every record created with this Recorded Issue Type must go through an assessment for vigilance reporting. You can still decide that the individual record does not need to be reported, but the assessment steps must be completed to show that appropriate measures were considered. (This replaces the MDR Reporting step previously used on Nonconformances and Complaints.) | For more information, refer to WI: Recorded Issues and CAPAs |
| RI Type* | Set by default to the value that points to the workflow the item initiates. The system uses this value to identify the type of RI to create in its workflow. | |
To change a setting:
- Click the Recorded Issue Type you want to change.
Edit the field in the metadata card and click Save.
Section 11: Managing Sites
A site in SimplerQMS represents a legal entity of your organization. Site is the primary level of access that you give a user, so that they can view, access and edit released and working copy documents.
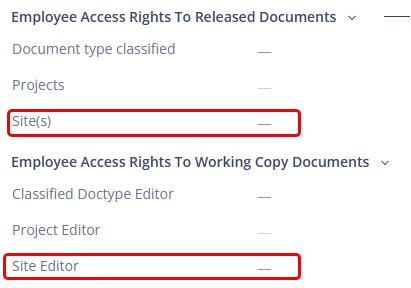
If a new user cannot see any records in the system, first check whether a Site has been assigned to their person record. To assign a Site:
- Open the person’s record in the system.
- Navigate to the “Employee Access Rights to Released Documents” and “Employee Access Rights to Working Copy Documents” sections.
- Add the applicable site(s) in the fields “Site(s)” and “Site Editor”.
We recommend keeping your documents to one site to begin with, but an organization can have more than one site if necessary. Make sure that the correct sites are assigned to each user. If users only have access to one site, add all relevant sites in the metadata of records that should be shared between sites.
Step 11.1- Create a New Site
To create a Site in SimplerQMS:
Click the Create (+) button and click Site in the drop-down list.
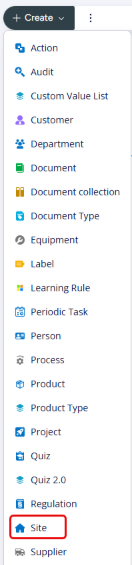
A metadata card opens.
Step 11.2- Fill out metadata
| Part 1: General Information | ||
| Field name | Description | Note |
| Name or title* | The legal name of the company or the location of the site. | |
| Address | Automatically generated from the address fields below. | |
| Address Street Name | The address of the organization or of the site. | |
| Address Postal Code | ||
| Address City | ||
| Country | ||
| Description | Optionally, type in a description of the site. | |
- Click Create after filling in all required information in the metadata card.
- Click OK when you see the following message: “With the selected permissions, you will not have permission-change access to this object. Continue?”
The state of the site in the metadata card should now be “Current”.
Step 11.3- Edit an existing Site
- In the Browse window, on your Home Screen, open the “3. Masterdata Views” view.
- Select “Sites” and then choose the site you want to edit. The metadata card appears on the right side of the screen.
- As a Metadata Administrator, you have edit access to all fields. Click the value you want to change and edit it.
- Click Save after editing.
Step 11.4- Make a Site “Not Current”
When a site is no longer needed or no longer active, the Metadata Administrator can move it to the “Not Current – Archive” state.
- In the Browse window, on your Home Screen, open the “3. Masterdata Views” view.
- Select “Sites” and then choose the site you want to archive.
- In the Workflow section, click “Not Current – Archive”.
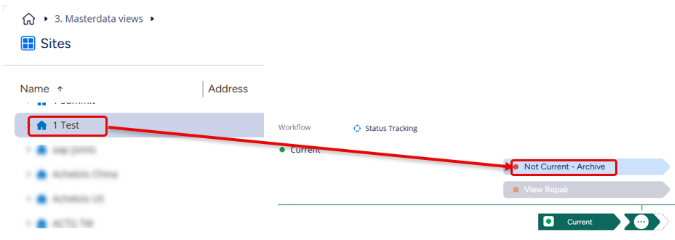
When the site is no longer current, all documents associated with it remain active and visible to users. When you update these documents or create new ones, select an active site.
Section 12: Managing Regulations and Regulation Chapters
By default, SimplerQMS includes the ISO 13485:2016 standard and all its chapters. Other regulations and regulation chapters are also pre-loaded in the system. To see the full list of available regulations, go to 3. Masterdata Views > Regulations.
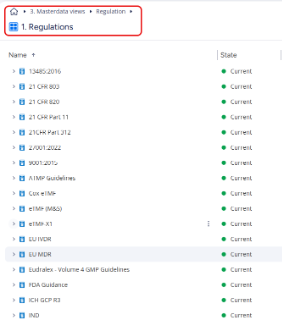
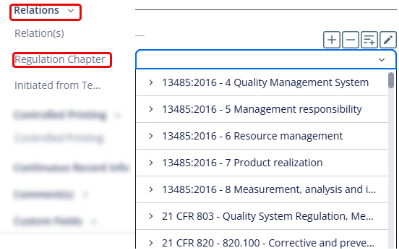
Regulations and Regulation Chapters can be used to navigate your QMS, by relating Regulation Chapters to records through the Relations field:
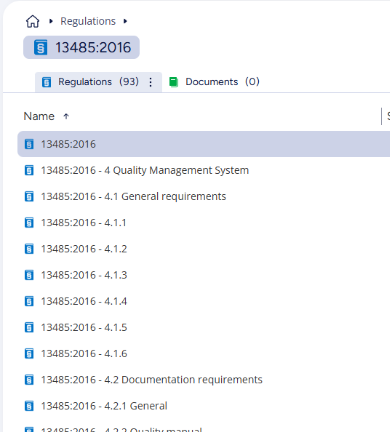
When regulation chapters are assigned to a regulation, a virtual folder with the name of the regulation is created. It contains all the regulation chapters of that regulation.
To access these, click the “3. Masterdata views”, then “Regulations.” Choose the regulation you want to open. A list of its regulation chapters appears.
To view all records related to a regulation chapter, select the regulation chapter and click “Open Workspace” in the top bar.
The workspace opens. Click Add tab to show a specific type of related record in its own tab.
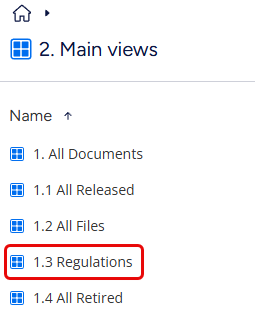
A dedicated view for all regulation-related documents is also available under “2. Main views > 1.3 Regulations”.
Step 12.1- Create a New Regulation or Regulation Chapter
To create a Regulation or Regulation Chapter in SimplerQMS:
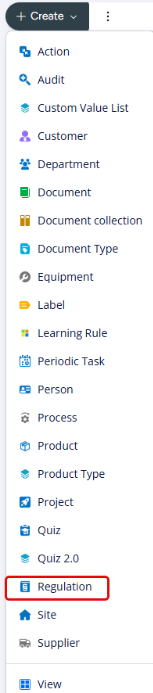
Click the Create (+) button and click Regulation in the drop-down list.
A metadata card opens.
Step 12.2- Fill out metadata
Option 1: Regulation
| Part 1: General Information | ||
| Field name | Description | Note |
| Class* | Select Regulation. | |
| Short title* | Type in the name or number of the regulation. This is also used as the name of the virtual folder. | |
| Responsible Person* | Select the person responsible for upholding this regulation in your organization. This does not give the selected user additional access rights. | |
| Description | Optionally, type in a description of the regulation. | |
| Main Level | Used to define the highest level of the Regulation Chapter hierarchy. These are the main headings of regulations. | |
Click Create after filling in all required information in the metadata card.
The state of the regulation in the metadata card should now be “Current”.
Option 2: Regulation Chapter
| Part 1: General Information | ||
| Field name | Description | Note |
| Class* | Select Regulation Chapter. | |
| Short title* | Type in both the section reference and the title of the regulation chapter. | |
| Responsible Person | Optionally, select the Responsible Person (RP) of the regulation chapter. This does not give the selected user additional access rights. | |
| Description | Optionally, type in a description of the regulation chapter. | |
| Subchapter | Automatically filled in by the system with any levels below this chapter in the regulation hierarchy. | Read Only |
| Subchapter of | Used to define the chapters that are below the currently clicked chapter in the hierarchy. | |
Click Create after filling in all required information in the metadata card.
The state of the regulation chapter in the metadata card should now be “Current”.
Step 12.3- Edit an existing Regulation / Regulation Chapter
- In the Browse window, on your Home Screen, open the “3. Masterdata Views” view.
- Select “Regulations” and open the relevant virtual folder.
- Choose the regulation or regulation chapter you want to edit. The metadata card appears on the right side of the screen.
- As a Metadata Administrator, you have edit access to all fields. Click the value you want to change and edit it.
- Click Save after editing.
Step 12.4- Make a Regulation / Regulation Chapter “Not Current”
When a Regulation or Regulation Chapter is no longer needed or no longer active, the Metadata Administrator can move it to the “Not Current – Archive” state.
- In the Browse window, on your Home Screen, open the “3. Masterdata Views” view.
- Select “Regulations” and open the relevant virtual folder.
- Choose the regulation or regulation chapter you want to archive.
- In the Workflow section, click “Not Current – Archive”.

When the regulation or regulation chapter is no longer current, all documents associated with it remain active and visible to users. When you update these documents or create new ones, select an active regulation chapter.
When a regulation is no longer current, its virtual folder also disappears, provided that no regulation chapters are assigned to it.
