Purpose
Learn how to:
- Create new equipment
- Create qualification documentation for equipment
Expected Outcome
- Users are equipped to handle equipment in SimplerQMS
Prerequisites for all
- Must be logged in to SimplerQMS
- Must be a member of one of these ‘User Groups’ to view records:
- All internal and external users
- Must be a member of one of these ‘User Groups’ to create new records
- All Contributors
Prerequisites for creating Equipment
- Must be a member of one of these ‘User Groups’
- Manufacturing
Section 1: Workflow
The workflow outlines the actions you can take with the Equipment item in SimplerQMS.

Section 2: Creating Equipment Record – Initiator
To create Equipment Records, the initiator needs to be part of the Manufacturing User Group.
Step 2.1 – Create new equipment
There are multiple ways to create an equipment in SimplerQMS:
I. Click on the Create (+) next to the Home tab and choose Equipment from the
dropdown list
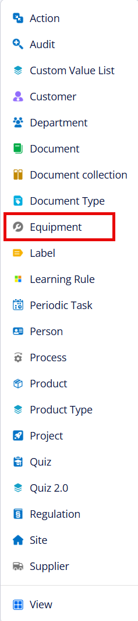
A Metadata Card will pop up.
Step 2.2 – Fill out the metadata card
| Field name | Description | Note |
| Equipment Number* | The self-defined number of the equipment | |
| Equipment Name* | The specific name of the equipment | |
| Equipment Serial Number | Aside from the self-defined equipment number value, the serial number of the equipment can also be captured | |
| Attribute List 1 | Editable attribute list 1 related to equipment | Defined by Organization |
| Attribute List 2 | Editable attribute list 2 related to the equipment | Defined by Organization |
| Site(s)* | The legal entity the equipment is in / tied to | |
| Department* | The department the equipment is related to | Multi-select |
| Responsible Person* | The person who is responsible for the equipment management and will be notified about pending calibration / review task | |
| Calibration Status | Will change according to the calibration workflow steps | |
| Quality Category | Filled automatically by the system when Quality Critical or Standard Equipment has been chosen |
| Field name | Description | Note |
| Relation(s) | Choose any relations from the dropdown list and a corresponding field will pop up for defining the specific relationships | |
| Supplier | Supplier(s) related to the equipment | |
| Customer | Customer(s) related to the equipment | |
| Product Item | Customer(s) related to the equipment |
These fields will be filled automatically:
| Field name | Description | Note |
| Period End Date | The date when the periodic calibration / review is due for completion | |
| Activation Date | The date when the calibration / review is assigned to the responsible person as a notification that a calibration task is upcoming |
Determine the schedule of Recalibration / Review
| Field name | Description | Note |
| Interval | The combination of these two fields determines the interval that specifies how often the recalibration / review needs to take place | |
| Time Unit | The combination of these two fields determines the interval that specifies how often the recalibration / review needs to take place | |
| Time to Complete | The combination of these two fields determines how early before the end of the recalibration / review end date should the notification be sent to the responsible person | |
| Activation Time Unit | The combination of these two fields determines how early before the end of the recalibration / review end date should the notification be sent to the responsible person | |
| Period Start Date | When the periodic recalibration / reviews schedule was last completed |
When you are done filling in the relevant fields, then click Create.
Section 3: Classifying Equipment – Responsible Person
Select the new equipment you just created.
In the Workflow section, the following options are available:
I. “Quality-Critical” or
II. “Standard”
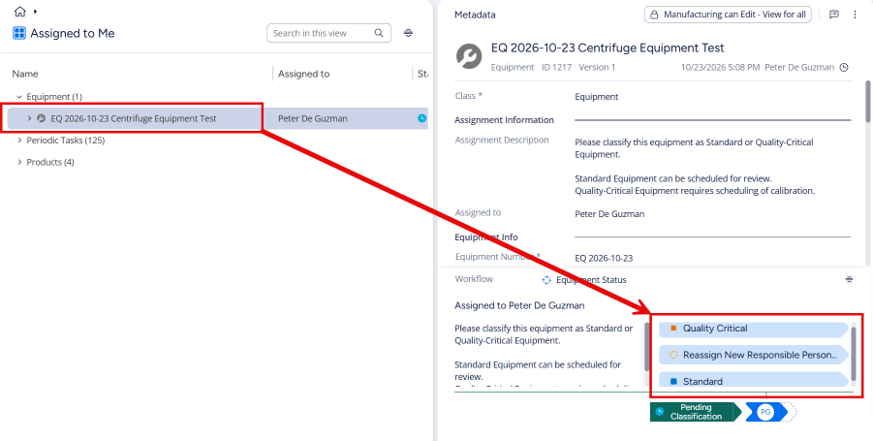
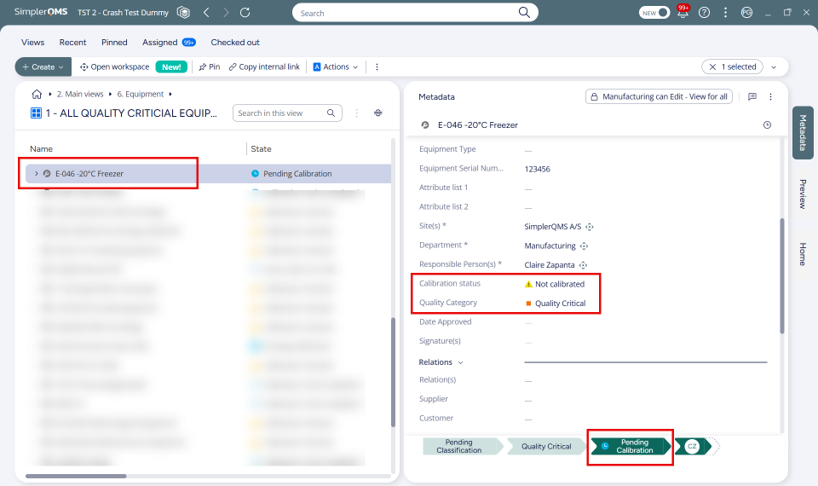
If this is a calibrated equipment, then click Quality-Critical in the Workflow section:
- The state should be “Pending Calibration”
- Calibration Status should be “Not Calibrated”
- Quality Category should be “Quality Critical”
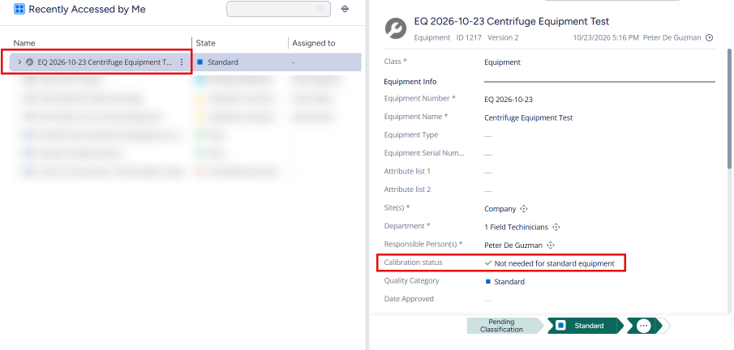
If this is a Standard equipment, click Standard in the Workflow section.
Calibration Status should be “Not needed for standard equipment”
Quality Category should be “Standard”
Section 4: Calibrating an Equipment – Responsible Person
Step 4.1 – Equipment Calibration
Complete this step to finish the equipment calibration.
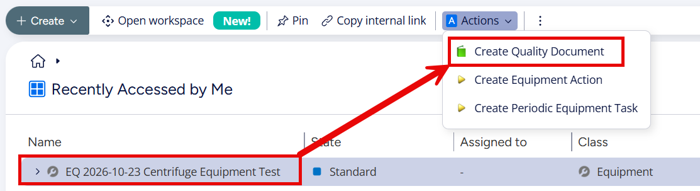
I. Select the relevant equipment and click “Create Quality Document” under “Actions “on the left side of the screen.
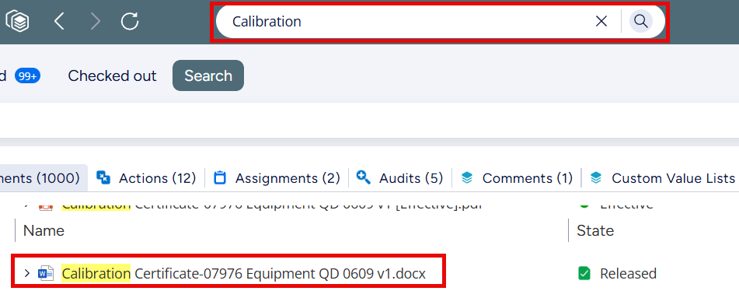
II. Search for the Equipment Calibration Template in the overview, which then pops up and select the template.
III. Alternatively, external document can be filed as a quality document or document attachment as proof of the calibration.
Click Next.
Step 4.2 – Completing Equipment Calibration
To complete the Equipment Calibration, consult the company’s procedures on what relevant documentation need to be filed. A supporting document can be added linked to the Equipment by following the below steps.
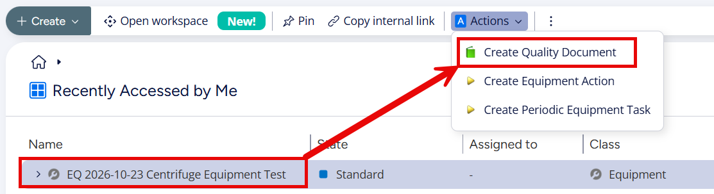
To directly link your Equipment to a Quality Document:
- Open the Equipment and under the Actions; click on Create Quality Document.
Refer to the instructions from “Work Instruction: Managing Quality Documents” on how to work with Quality Documents.
After completing the quality document, go back to the equipment you are working on, click “Calibration Task Completed” in the Workflow section to complete the calibration task.
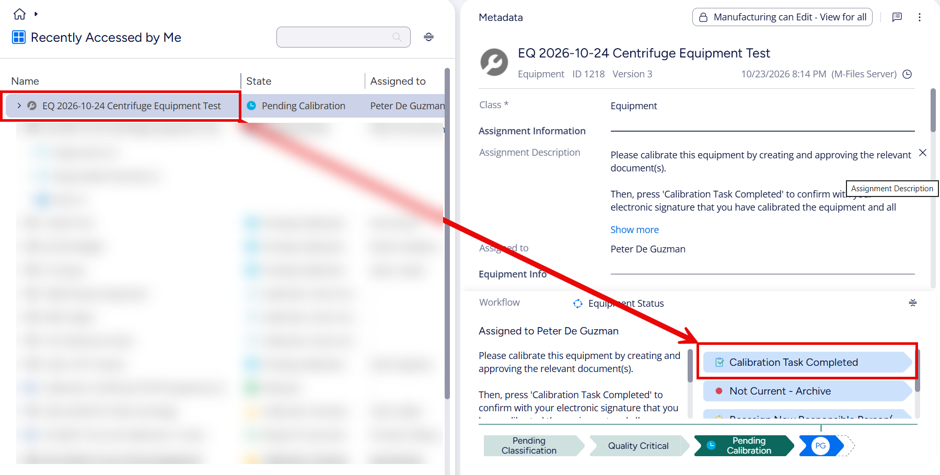
Enter your electronic signature and click Sign to complete Calibration Task.
After completing this step, the equipment is now classified as a qualified equipment.
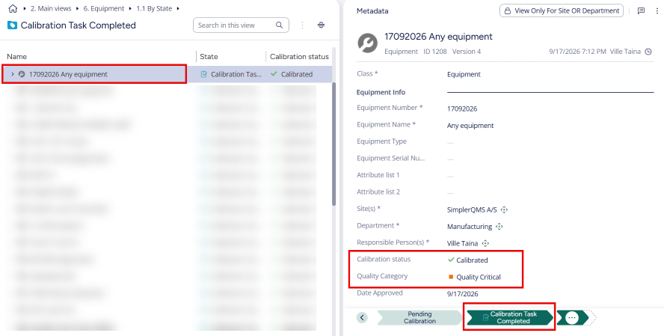
Note: It is not possible to complete the calibration task if the scheduling values are empty.
Periodic Review
In the metadata card, a Periodic schedule referred as Scheduling Values under “Recalibration/Review Schedule” are automatically populated and defaulted to values as shown below. The “Upcoming Dates” are based on the scheduling values as below:
This means that the responsible person will be notified on the activation date for re-qualification and recalibration is expected to be completed on the Period End Date.

Section 5: Set Quality Critical Equipment on Hold
In case a quality critical equipment cannot be used temporarily, the Responsible Person can set Quality Critical equipment on hold by clicking on “Quality Critical Equipment on Hold” in the Workflow Section.
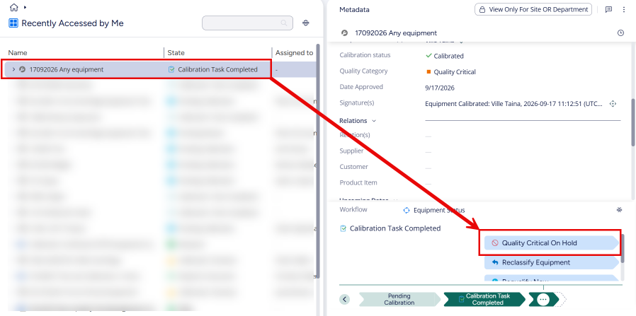
Add “On Hold Reason” on the metadata card, then click on Save.
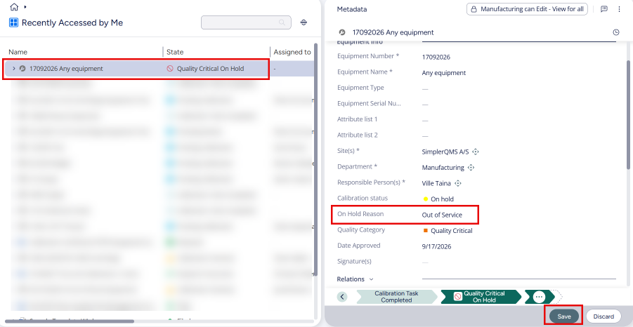
Step 5.1 – Assess after On Hold – Responsible Person
When the equipment is ready to be used again or should be retired, 4 choices are available to reactivate / disable the equipment.
Click on Assess after On Hold in the Workflow section.
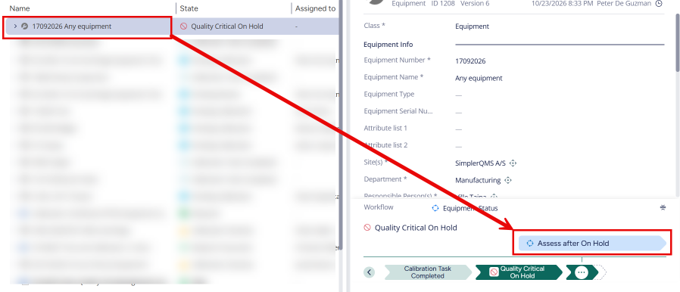
The status should be “Assess after On Hold” and equipment is assigned to the Responsible Person
Responsible Person has the following options under state transition:
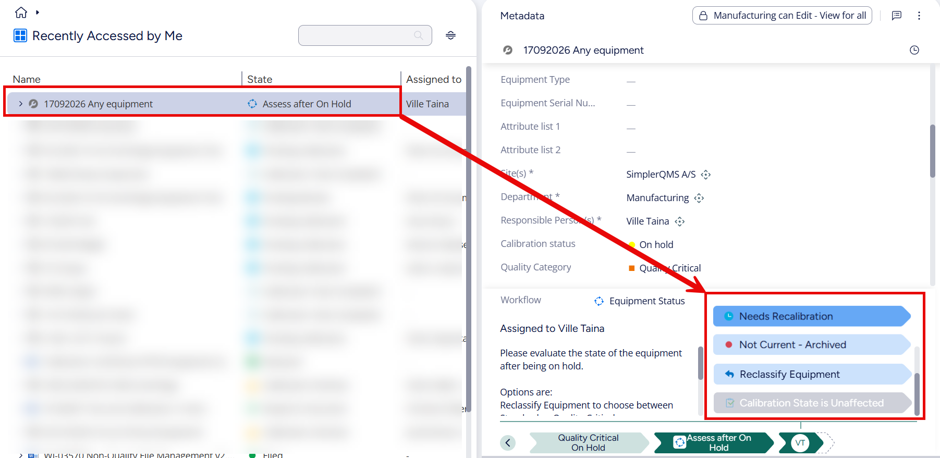
- Calibration State is Unaffected – when the equipment state remains as quality critical.
- This means that the equipment will go back on its original qualification schedule set from before being on hold
- Needs Recalibration – when the equipment needs to be recalibrated as a quality critical equipment
- This means that you intend to either change the metadata only for the schedule or information, or want to issue new calibration record(s)
- No Current – Archived – when the equipment needs to be discontinued
- Reclassify Equipment – when the equipment needs to be reviewed for reclassification. Refer to Section 5 for Reclassifying of an Equipment.
Section 6: Reclassifying an Equipment – Responsible Person
In case the equipment changes status from being Quality-critical Equipment or vice versa, it can be reclassified by following these steps:
I. Search for the equipment and select the equipment
II. In the Workflow section, click Reclassify Equipment.
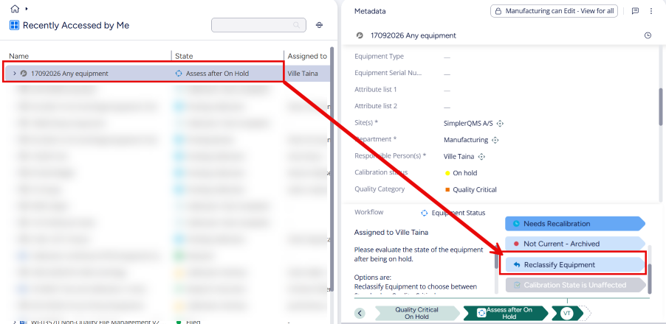
III. In the Workflow section, choose Standard or Quality-Critical and go to Section 3
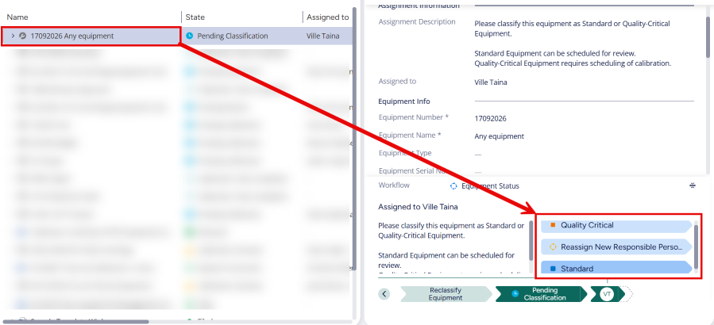
Section 7: Reviewing a Standard Equipment – Responsible Person
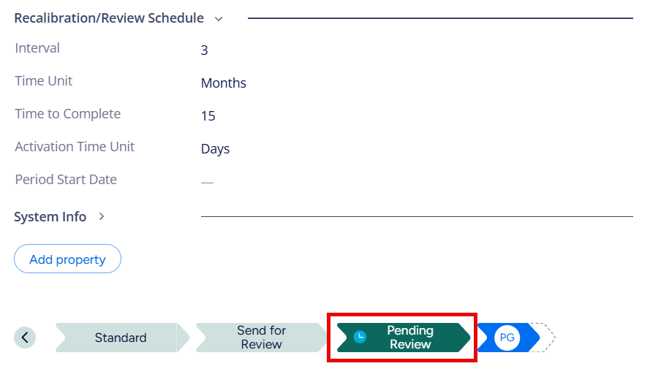
When a responsible person sends the equipment for review, Periodic Maintenance task will show up under the Recalibration/Review Schedule on a default setting as shown below:
Find the equipment that needs to be reviewed and click on “Send for Review”.
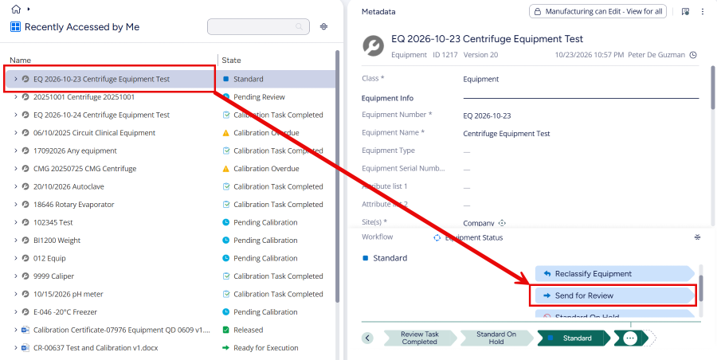
State should be “Pending Review” and the scheduling values can now be edited and set.
When the scheduling values are set to the desired figures, click on “Review Task Completed”
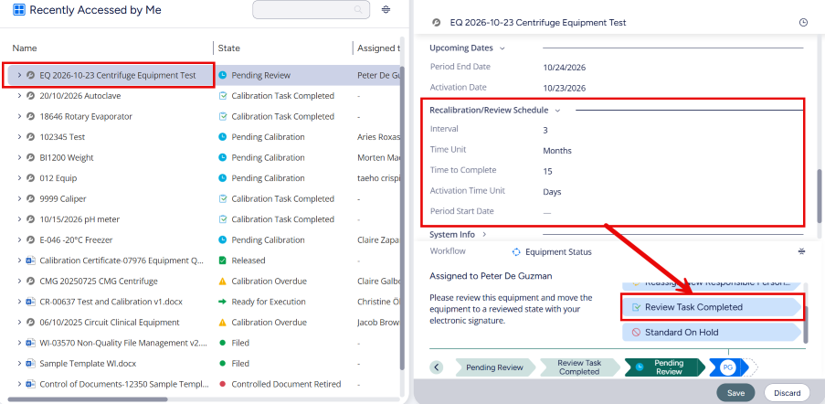
Enter your electronic signature and then click OK.
The state should now be “Review Task Completed”, and the next qualification dates have been set.
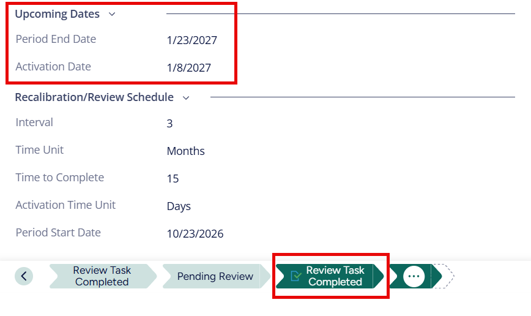
Note: The equipment review can be on the state of “Review Overdue!” when it is past the Period End Date. The responsible person will receive a notification 3 days before it goes on overdue. In this case, the review must be completed immediately by clicking on “Review Task Completed” and then enter the electronic signature.
Section 8: Set Standard Equipment on Hold
In case a standard equipment cannot be used temporarily, the Responsible Person can mark it as Equipment on Hold.
Set standard supplier on hold by clicking on “Standard Equipment on Hold” in the Workflow section.
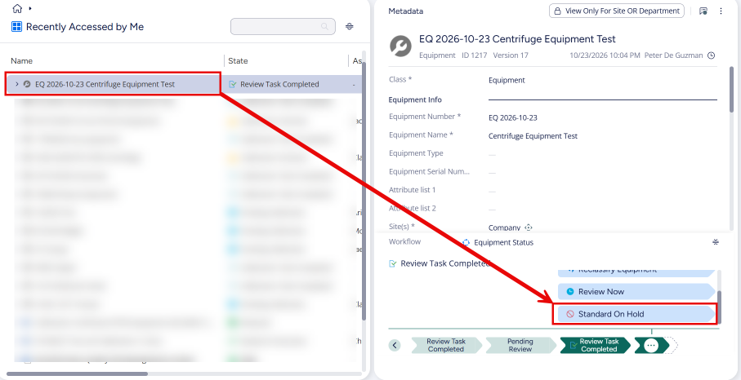
Add “On Hold Reason” on the metadata card, then click on Save.
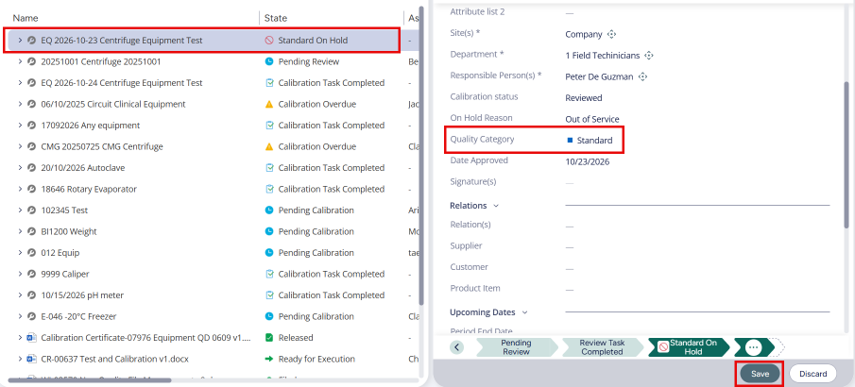
The equipment will stay on hold status until it is turned back to Standard by the Responsible Person when it can be used as an equipment again.
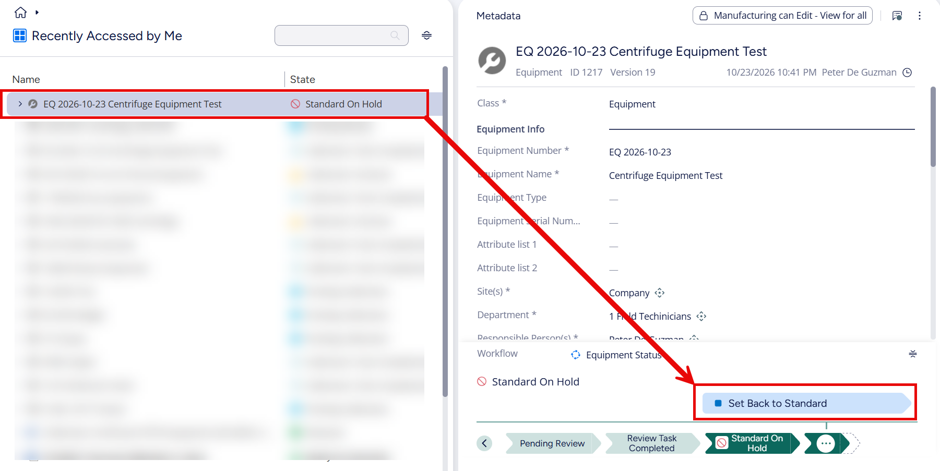
Note: If the Standard Equipment was on review before being set on hold, the previous review schedule will not be reinstated. Instead, there is a need to send the standard equipment for review again.
Section 9: Making the Equipment Not Current – Responsible Person
If the equipment is no longer used, it needs to be marked as Not Current – Archive.
I. Search for the equipment and select it.
II. In the Workflow section, click “Not Current – Archive”.
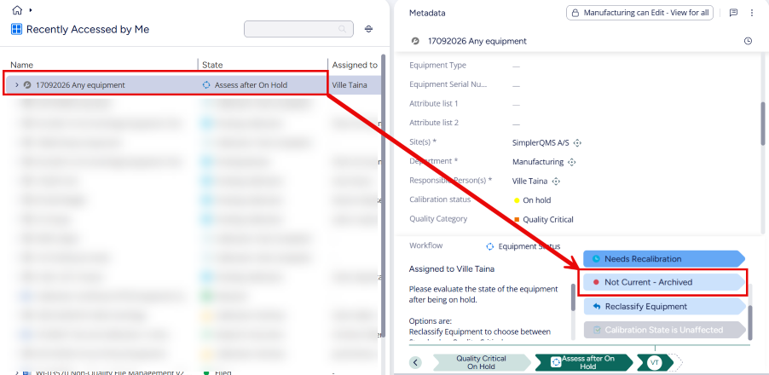
III. The equipment is now marked as Not Current – Archived and can no longer be related to documents, products etc.
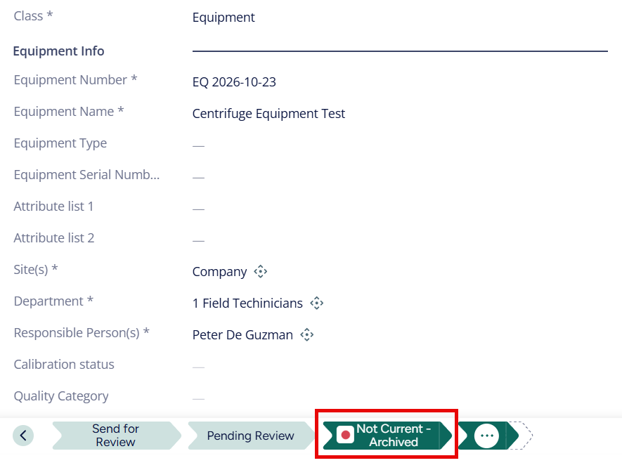
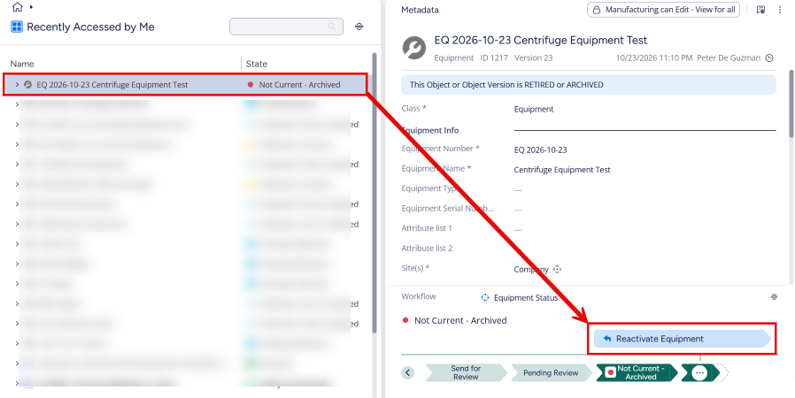
If the equipment is to be used again, after it was marked obsolete, then:
I. Search for and select the equipment.
II. In the Workflow section, click Reactivate Equipment
Section 10: Adding a Periodic Task to the Equipment
Creating a periodic task for equipment is useful for capturing of regular maintenance tasks. Periodic tasks run on a self-defined schedule and will ask for an electronic signature at completion. A new task will be created with the same schedule each time the current one is completed.
To create and manage periodic tasks refer to Work Instruction: Actions, Periodic Tasks and Reminder Rule.
Search for the equipment and under Actions, click on “Create Periodic Equipment Task”.
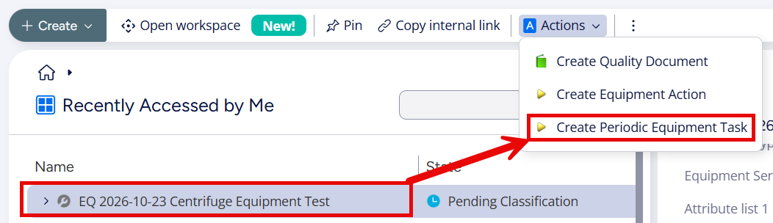
Ensure that the periodic task is related to the equipment when creating it to establish the relationship between the two.
Section 11: Adding an Action to an Equipment – Responsible Person
When an action is created for an equipment, the person assigned to it will be notified to make updates or changes. The task to carry out is defined by the initiator of the action in the Assignment Description of the metadata card.
Search for the equipment and under Actions, click on “Create Equipment Action”.
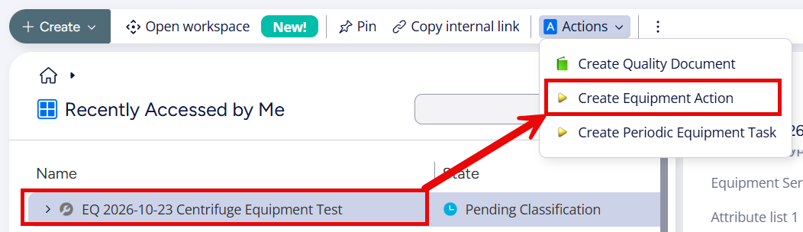
For further instructions, refer to Work Instruction: Actions, Periodic Tasks and Reminder Rule
