Purpose
Learn how to:
- Create and manage a Project and Labels
- Navigate SimplerQMS based on Projects and Labels by building a multi-level hierarchy
- Add and show documents related to Project and Labels in different views
Expected Outcome
- Users are equipped to handle Projects and Labels in SimplerQMS
- Be able to create Projects and Labels and store documents related to them
Prerequisites for all
- Must be logged in to SimplerQMS
- Must be a member of one of these ‘User Groups’ to view records:
- All internal and external users
- Must be a member of one of these ‘User Groups’ to create new records
- Metadata Administrator
Prerequisites for creating Projects and Labels
- Must be a member of one of these ‘User Groups’
- Metadata Administrator
Section 1: Creating a Project
Step 1.1 – Create a Project– Metadata Administrator
There are multiple ways to create a Project in SimplerQMS:
I. Click on the Create (+) and choose Project from the dropdown list
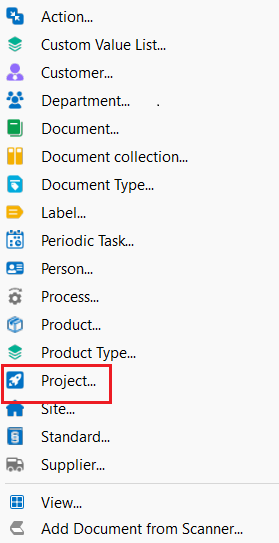
II. On the right side of the screen, expand Create and click on Project
A Metadata Card will pop up.
Step 1.2 – Fill out the metadata card for Project
| Field name | Description | Note |
| Name or Title* | Project identification | |
| Sites* | The site that the project belongs to | |
| Responsible Person* | A person responsible for project management | |
| Description* | Description of the project |
When you are done filling out the relevant fields, then click Create
If the following warning box pops up, then Click OK.
This warning pops up because projects need to be given access to by the metadata administrator, which you will see in the next section.

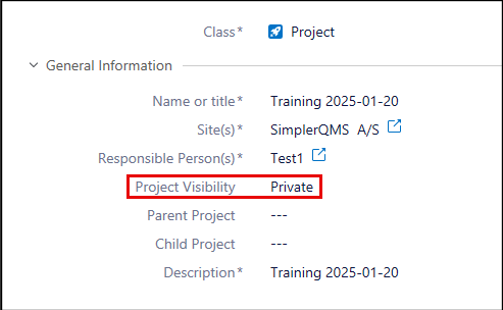
Step 1.3 – Configuring Project Visibility
Metadata Admin and Responsible Person Delegate can change Project Visibility to Private or Public using state transitions. These roles can alter the project visibility, switching between Private and Public.
Changing Project Visibility:
- Click once on the Project to select it
- In the state transition, choose either Project or Public

To assign access rights to private Projects, refer to: Knowledgebase Article: Managing Masterdata

Step 1.4 – Edit existing Project – Metadata Administrator
To change the properties of an existing project:
On the Browse section select “Main Views”, then “Projects”, double click it.

II. The view that opens will help you manage projects by different categorization. Use these to find the project you are looking for.
III. Double-click on the one that suits what you are looking for the best. In this case on All Projects.

IV. Find the Project you wished to edit. As a Metadata Administrator you have access to edit all metadata of the Project

You can edit the name, site, responsible person, or description in the Metadata card and click Save.


Step 1.5 – Make a Project Not Current – Archived – Metadata Administrator
If the Project is no longer current or will not continue, Select the Project and under “State Transition” click Not Current Archive.

If the Project is going to continue after moving it to Not Current-Archive, you can still make it Current. Click Current under “State Transition”.

Note: When the Project is Not Current, the documents in the project can still be accessible in All Documents, however, for new documents, this project can no longer be available for relations.
Providing user access to a project – Metadata Administrator
This step shows how to provide access rights to a project. Project access can be granted to all users in SimplerQMS and can be done by the Metadata Administrator.
I. Under the Common Views on the Browse window, double click on “Masterdata views”
II. Double click on “Person view”
III. Then double click on the category you would like to see- in this case Persons – All
IV. Select the person(s) you would like to give access to for the project
a. You can select multiple person(s) to grant an access to the project, Ctrl + Select names. In this case, there could be a (varies) field which you should not write into, otherwise all previous access to projects will be lost.

V. In the Metadata card of the person, expand both “Employee Access Rights to Released Documents” and “Employee Access Rights to Working Copy Documents” and add the project in the Project and Project Editor Fields.

VI. Save the changes. The person should now have access to all items related to the project.
Section 2: Creating a Label
Step 2.1 – Create a Label – Metadata Administrator
There are multiple ways to create an Label in SimplerQMS:
I. Click on the Create (+) next to the Home Tab and choose Label from the dropdown
list
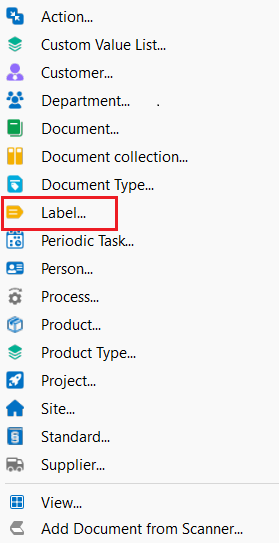
II. On the right side of the screen, expand Create and click on Label
A Metadata Card will pop up.
Step 2.2 – Fill out the metadata card for the Label
| Field name | Description | Note |
| Name or Title* | Identification of the Label | |
| Responsible Person* | The person who is responsible for this specific Label | |
| Description* | This is defined by your organization |
When you are done filling out the relevant fields, then Click Create. You might encounter the same warning box from before. Just click OK.
Step 2.3 – Edit an existing Label
To change the properties of an existing Label:
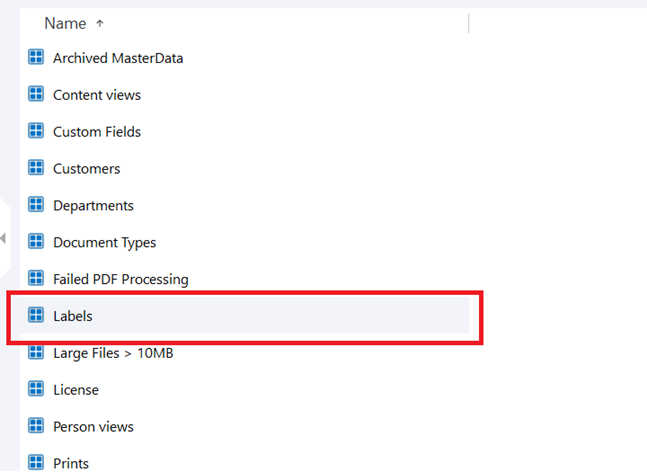
I. On the Browse section select “Masterdata Views”, then “Label”, double click it.
II. A view containing all Labels will open up.
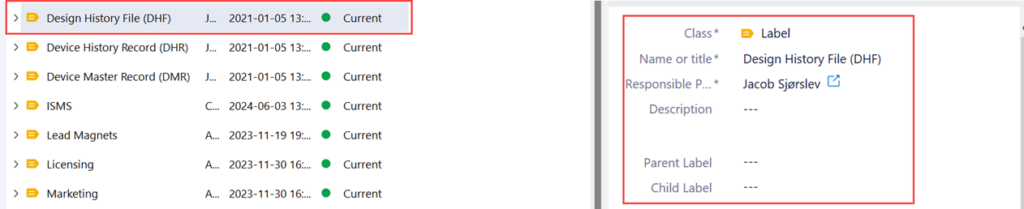
III. Find the Label you wished to edit. As a Metadata Administrator you have access to edit all metadata of the Label.
IV. You can edit the Name, Owning Label, Responsible Person or Description in the Metadata card and click Save.
Step 2.4 – Make an Label Not Current – Archived – Metadata Administrator
If the Label is no longer current, select the Label and under “State Transition” click Not Current Archive.

If the Label is to be used again after moving it to Not Current-Archive, you can still make it Current. Select the Label and click Current under “State Transition”.

Section 3: Relating a Quality Document to Projects and Labels – Initiator
Step 3.1 – Relate to Labels
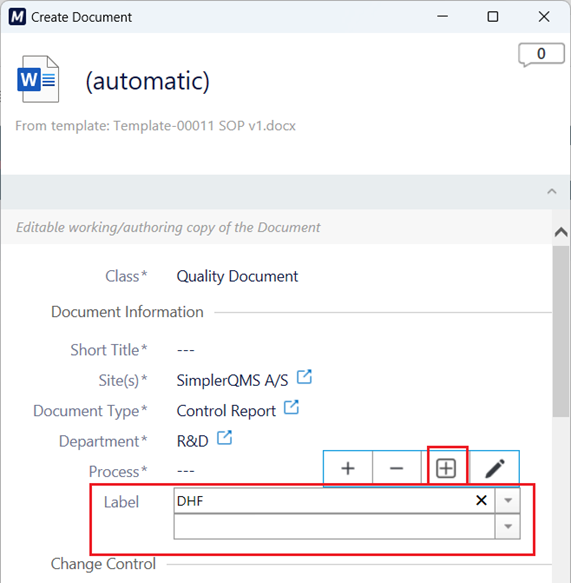
While creating a Quality document, the field for Label is going to be present on the metadata card. Select the Label you wish to link you document to.
Step 3.2 – Relate to Projects
To relate a record to a Project, choose the option “Related to Project” in the Relation(s) field, then define which Project you would like to relate your record to.

Note: By using the Related to Project and Label fields properly on documents, you can create a multi-level file structure within SimplerQMS.
Note: A Label or a Project can be created directly when creating a record, by clicking on the Add Value button while in edit mode: ![]()
Section 4: Using Projects and Labels for Navigation
Step 4.1 – View all Project related records – Person with Project Access
Documents that have been related to a Project can be viewed by all persons who have been given access to the project by using the Project specific views.
I. Form Task Menu under “Go To”, select Projects.
a. Or you can double-click the Main Views on the Browse section, under Common Views.
i. Once you are in the Main Views, you can double-click Projects

II. Double-click on “ALL PROJECT DOCUMENTS”
a. If you would like to see even more specific information, use on of the sub-views to do so. The most optimal view in this case would be 1.1 By Project
b. All documents related to Projects will appear in this section further broken down into categories by the selected Project.

This is an ideal view for projects with minimal related documents, however, other views may provide appropriate filtering of documents.
Within the same main Projects view, you can also find All Projects by different categorization. This is useful if you would like to find all related records to a project. Select the view that would best suit your needs.

Click on the Project you wish to see, then under View Extensions, click on Show Detail Listings.

This will open a view at the bottom of your screen which will include all related records to the chosen project.

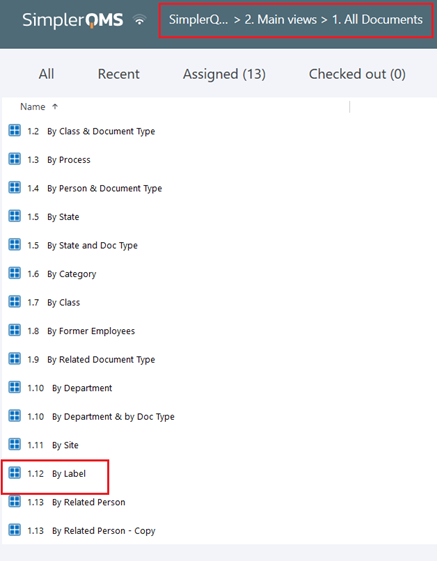
Step 4.2 – View all Label related documents
Similarly, to projects, you can also find all documents related to Labels. By using Main views, then All Documents, you can choose a view that will break down your documents based on which Label they are related to.
Detail listings are also available for Labels.